Recurring events let you automatically generate multiple standalone events that repeat on a schedule. This feature is useful for classes, workshops, lectures, or any activity that happens regularly and should appear as individual events in the booking calendar.
Note
Recurring events are available on the Standard, Pro, and Elite license plans.
How do I enable the recurring events feature?
To enable recurring events, go to Amelia → Features & Integrations → Features and activate the Recurring events slider. Once enabled, the feature becomes available during event creation and the slider changes to Disable. This feature does not have a setup page.
How do I configure recurring events?
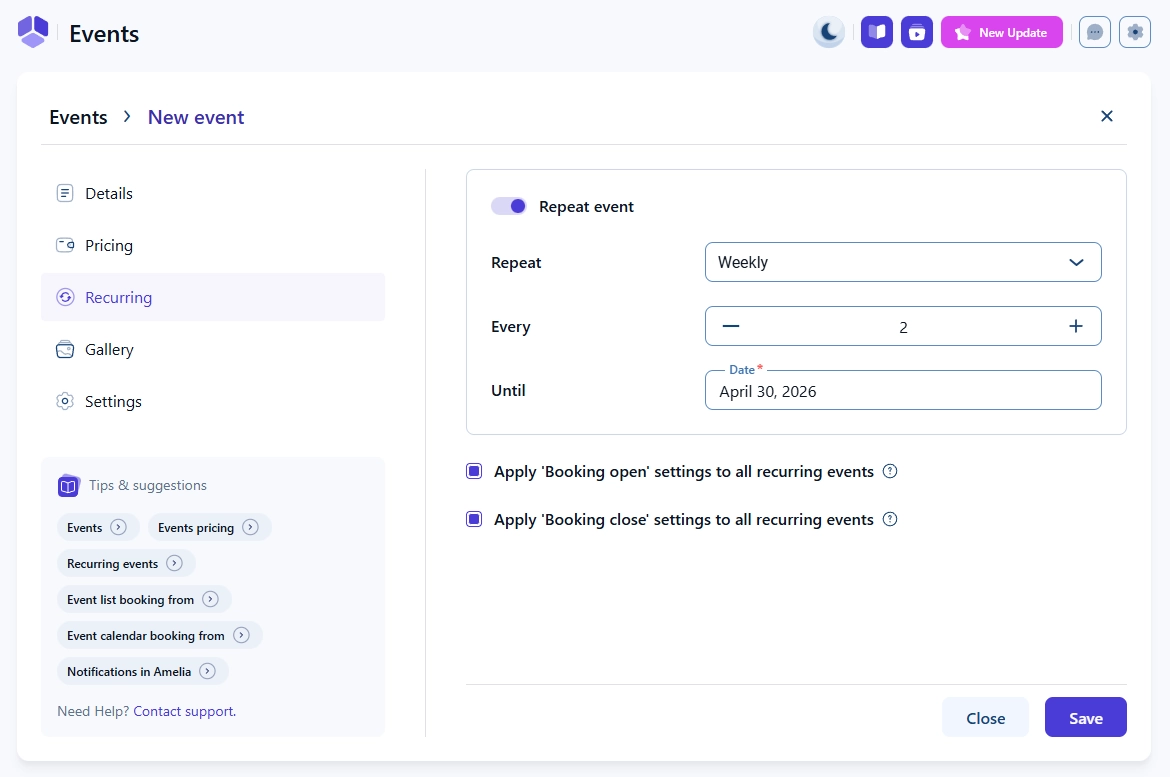
When creating a new event, you will see a Recurring tab in the left menu. This tab appears only if the recurring events feature is enabled.
Open the Recurring tab and enable the Repeat event slider to reveal all options. These settings allow you to define how often the event repeats and when the repetition ends.
The following fields are available:
Repeat – Choose how the event repeats: Daily, Weekly, Monthly, or Yearly.
Every – Set the interval for repetition. For example, “Every 2 days” or “Every 3 weeks”.
Until – Select the date on which the recurring sequence ends.
Apply ‘Booking open’ settings to all recurring events – If enabled, the booking-open time defined for the first event is applied to every generated event. If disabled, Amelia calculates the booking-open time for each occurrence based on the timing of the first event.
Apply ‘Booking close’ settings to all recurring events – Works the same way as booking open. When disabled, Amelia uses the first event’s logic to determine when each event closes for booking.
These settings only affect how often new events are generated and how the booking window is handled. All remaining event configuration options, such as capacity, pricing, gallery, or assigned employee, work the same way as for any regular event.
How do recurring events behave once created?
Each occurrence of a recurring event is treated as a separate event in Amelia with its own ID and attendee list. Status, capacity, and pricing are initially inherited from the first event in the series, but they can be edited later for individual events.
When you change a recurring event, Amelia will show an Apply changes to events dialog with two options:
This only – applies the changes only to the event you are editing.
This & future – applies the changes to the current event and all upcoming events in the series.
Customers booking a recurring event are added only to the specific event they select. They are not automatically assigned to all future occurrences that belong to the recurring series.
How are recurring events different from multi day events?
Recurring events repeat over time and create multiple standalone events. Customers book one date and attend only that event unless they manually book others in the series.
Multi day events contain several dates within a single event. Customers who book a multi day event are automatically assigned to all dates included in that event.
You can use both features together. For example, a four day festival can be configured as a multi day event that repeats every year. Customers booking the 2025 event will attend all four dates for 2025, but they will not be added to the events in 2026 or later.