How do I import customers into Amelia
You can bulk-add customers to Amelia by uploading a CSV file that contains their basic details. This is useful when migrating from another system or when you want to add existing contacts to Amelia so they can be used in future bookings.
Where do I find the customer import option?
Open Amelia → Customers and click the import customers button in the top right corner of the page. This opens the import modal where you can upload your CSV file and follow the steps to complete the import.

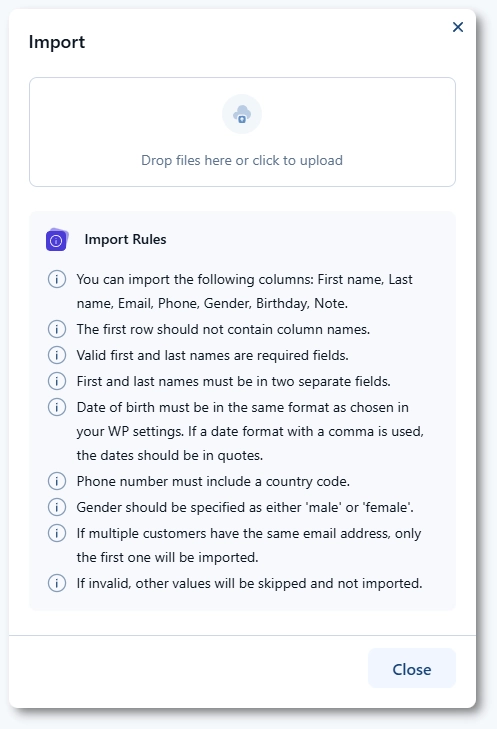
What file format and rules should I follow for importing customers?
The import tool accepts CSV files and expects specific customer information to be formatted correctly.
- Do not include column headers in the first row.
- Use separate columns for first and last names and ensure each entry contains valid values.
- The phone number must include a country code
- Birthday must follow the date format set in WordPress
- Gender should be written clearly as male or female.
If the same email appears more than once, only the first valid entry will be imported. Invalid rows are skipped and will appear in the final export of failed entries.
How do I upload my CSV file?
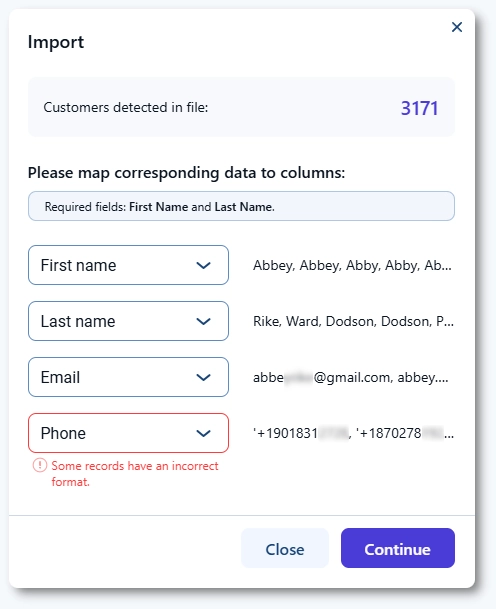
In the import modal, drag your CSV file into the upload area or click to choose a file from your computer. Once the file is uploaded, click Continue to proceed to the next step. If the file structure is recognized, Amelia will load a preview of the data and move you to the mapping screen.
How do I map CSV columns to Amelia fields?
The mapping screen displays all detected columns from your CSV file. For each column, select the corresponding Amelia field such as first name, last name, phone, birthday, or email. If a column contains information that cannot be imported into Amelia, choose the Do not import option. The top of the screen shows how many customers will be imported based on the valid data in your file.
What happens after I complete the import?
Click Continue to finalize the import. Valid customer entries will be added to Amelia immediately, and you will see a confirmation message when the process completes. If a customer in the CSV file uses an email address already assigned to an existing Amelia customer, you will be asked whether to overwrite that existing customer or skip the duplicate entry.
How do I handle failed or skipped customer entries?
If some entries cannot be imported due to invalid formats, duplicates, or missing required fields, Amelia will generate a downloadable CSV file containing only the failed records. You can review the data, correct any issues, and upload the corrected file again to import the remaining customers.

What should I keep in mind when importing customers?
- Ensure your CSV file uses the correct date and phone formats before uploading.
- Keep first and last names in separate columns to avoid import issues.
- Avoid duplicate email addresses because only the first valid entry is imported.
- Review the failed entries file to correct formatting problems or missing values.
- Always confirm field mapping before finalizing the import to prevent mismatched data.