
How to use the cart feature in Amelia
A customer wants a haircut, a manicure, and a massage on the same afternoon. With the cart, they add all three appointments in a single booking flow, review everything in one summary, and confirm and pay once at the end. If they call you instead, you can do the same from the back end: add all three appointments in one booking and save them with a single click.
The Cart feature lets you book multiple appointments in one go, both from the front end booking forms and from Amelia → Bookings. In the back end, a single booking can also include different customers, so you can schedule appointments for several people at once.
How do I enable the cart feature?
 Note
The Cart feature is available in the Pro and Elite license plans. It works for appointments only and isn't supported for events, recurring appointments, or packages.
You enable the cart in Amelia → Features & Integrations by activating the Cart feature; there are no additional settings to configure. Once it’s enabled, a Cart step is added to your front end booking forms, and an Add appointment button appears when you book appointments from the back end.
How does the cart work in the front end booking forms?
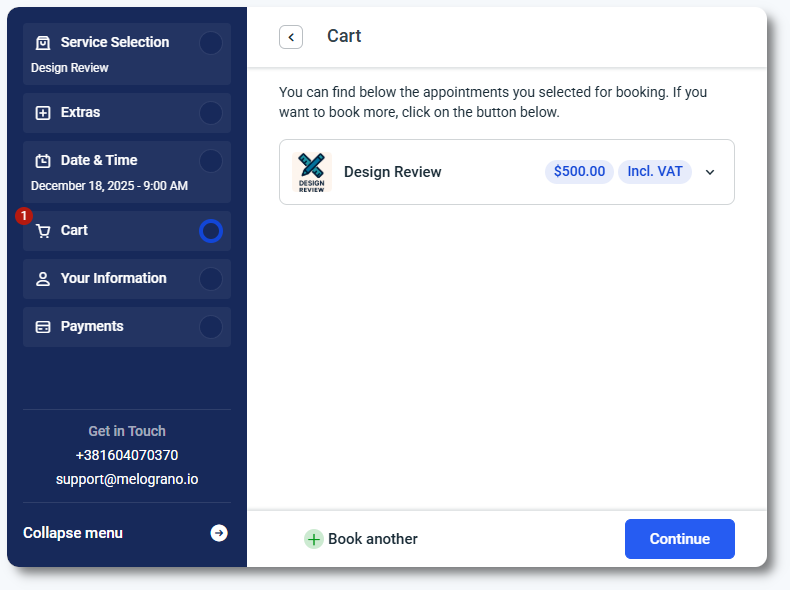
When a customer selects a service, date, and time in the front end form, they see two options: Book another and Continue. Book another takes them back to the service selection step so they can add more appointments to the cart, while Continue moves them forward to entering their details and finishing the booking.
All added appointments are listed in the cart step before the Your information step. Each item shows the service name, date, time, and any deposits or taxes, so customers can confirm that everything looks right. They can remove appointments they no longer need or go back and add more.
When more than one appointment is in the cart, customers can click the arrow on the far right of an item to expand and edit it, changing the service, employee, location, date, or time without starting over. Customers can book the same time slot more than once in the cart, as long as each appointment is with a different employee; the same employee can’t be booked twice for the same time slot.
 Please note
The cart isn't a replacement for chain appointments. Customers add multiple separate appointments to the cart and confirm them together instead of booking them one by one.
How are customer details and payments handled in the front end cart?
After reviewing the cart, the customer moves to the Your information step. If your services use booking custom fields, the fields from all selected services are shown together here, so the customer fills in everything in one place instead of repeating the same details for each appointment.
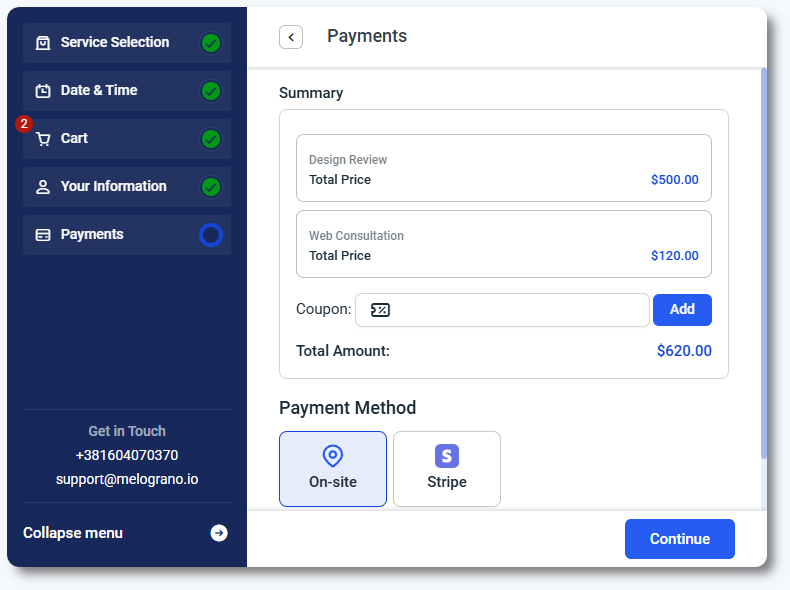
The final step is Payments, where customers see a price breakdown for each appointment in the cart along with the total. Deposits are calculated from the services that have a deposit defined, and the total deposit combines those amounts.
The cart uses all payment methods enabled in Settings → General settings → Payments. Even if a specific service has on-site payment disabled, it’s still offered in the cart as long as it’s enabled globally in Amelia’s payment settings.
How do I book multiple appointments from the back end?
You book multiple appointments from the back end in Amelia → Bookings, using the same appointment creation screen you use for single appointments. Unlike the front end cart, where every appointment belongs to one customer, a back end booking can hold appointments for different customers. The sections below cover adding appointments, assigning customers, and how Amelia keeps the schedule free of conflicts.
How do I add more than one appointment to a booking?
Go to Amelia → Bookings, click + Book appointment, and fill in the first appointment in the Details tab: Service, Employee, Date, Time, and Location. Then click Add appointment at the bottom of the screen.

A new appointment form opens below, and the previous appointment collapses into a row labeled with its number and service name, such as #1 – Group service. Fill in the new appointment the same way, and repeat for as many appointments as you need. Click the arrow on the right of a row to expand or collapse that appointment, or the trash icon to remove it from the booking.

How do I add customers to each appointment?
Customers are added per appointment. Expand the appointment you want to work on, then open the Customers tab and add its customers there; the counter next to the tab shows how many customers that appointment’s service accepts, for example 0/100 for a large group service or 0/3 for a smaller one. Repeat this for each appointment in the booking, then click Book to create all appointments at once.
Each appointment can have its own customers, so one booking can cover a single customer with several appointments, several customers with one appointment each, or any mix of the two. All created appointments appear in the Appointments list in Bookings.
Which time slots are blocked when I add another appointment?
When you add another appointment, Amelia blocks the time slots already used in the booking for both the employee and the customer, so neither can be double booked. A different employee isn’t affected, though, so you can book two customers at the same time as long as each appointment is with a different employee.
If several customers need the same service at the same time, don’t add a separate appointment for each of them. Add one appointment and put all customers in its Customers tab instead, as you would for any group appointment.
Can employees book multiple appointments at once?
Yes, but only from the WordPress admin area, not from the Employee panel. Employees who are linked to a WordPress user can use Add appointment in Amelia → Bookings, but they can only add appointments for themselves, not for other employees. Administrators and Amelia Managers can book appointments for any employee.
Which notifications are sent for cart bookings?
A customer who books several appointments at once receives the Cart purchased notification, which lists everything they booked in one message. You’ll find Cart purchased templates for both email and SMS in Notifications, and you can configure how the %cart_appointments_details% placeholder lists the appointments, choosing which details are included.
For back end bookings with more than one customer, each customer gets the notification that matches what they booked. A customer with several appointments in the booking receives Cart purchased, while a customer with a single appointment receives the regular Appointment approved or Appointment pending notification, depending on the appointment’s status. Each appointment in a back end booking also has its own Notify the customer(s) checkbox, so notifications are sent only for the appointments where it’s enabled.

For more on these templates, refer to the Customer notifications documentation.
How do I customize the cart step?
Once the cart is enabled, a Cart step appears in Customize. There you can adjust button types, control how VAT is displayed when taxes are enabled and configured, and edit the labels shown in the cart step, so it matches the look and wording of the rest of your booking form.
What should I know about the cart feature?
Keep these points in mind when using the cart:
- Availability: the cart works only for appointments and isn’t supported for events, recurring appointments, or packages. This applies in the back end too, so a recurring appointment has to be booked on its own.
- Deposits: the total deposit combines the deposits of all services in the cart that have one defined.
- WooCommerce taxes: if you use WooCommerce, taxes are added only for items that have a tax configured in WooCommerce.
- Refunds: each appointment in a cart purchase has to be refunded separately; there’s no option to refund the whole cart in one action.
- Employees: employees can book multiple appointments only from the WordPress admin area, and only for themselves.