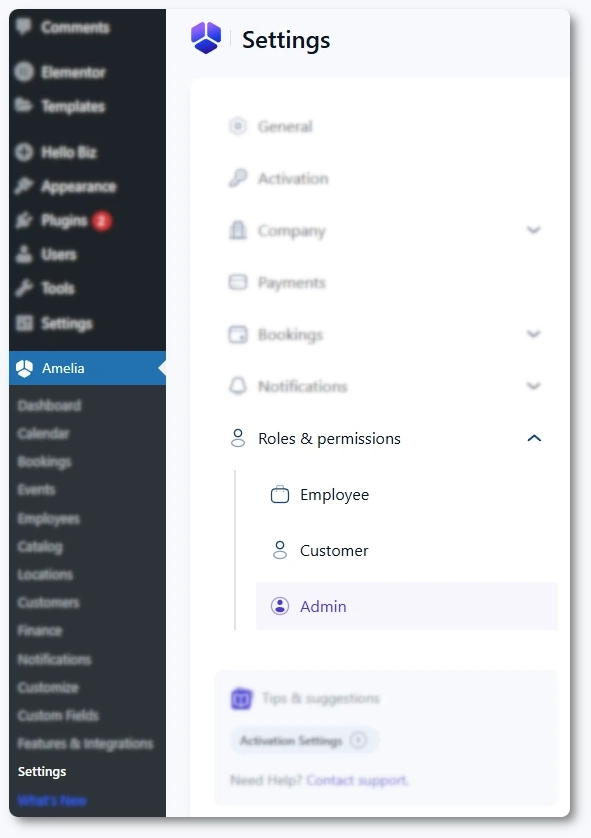
Don’t miss our Special Offer!

Up to 50% off
Grab Amelia
Grab Amelia

Roles Settings for the Amelia WordPress Booking Plugin

Roles Settings allow you to configure different options for different user roles in the Amelia Booking Plugin. These settings can be found on the plugin’s settings page; just click Settings -> Roles Settings, and you will see them.

Video Version

Roles Settings are currently divided into two tabs: Employee and Customer, based on these two Amelia user roles.

  • The Employee tab has the following options:
    • Configure their services – This option allows your employees to choose services they will work on (to assign services to themselves). It is disabled by default, so in this case, employees won’t see the Assigned Services tab in their profile. If you enable the option they will see this tab and will be able to configure their services.
    • Configure their schedule – This option allows your employees to edit their own work hours and breaks. It is disabled by default, in which case employees will only see their profile and be able to edit their personal information. If you enable it, they will see a new tab in their profile dialog that allows them to edit their Work hours.
    • Configure their days off – This option allows your employees to add their days off. It is disabled by default, so when you first install the plugin and connect employees with their employee role, they will not be able to see the Days off tab on their profile. If you enable this, your employees will see the Days Off tab on their profile, and they will be able to add their days off.
    • Configure their special days – This option allows your employees to add their Special days. By default, it is disabled, so your employees will not see this option. Once you enable it, they will see a new tab on their profile, and they will be able to add days with special working hours and services on their own.
    • Manage their appointments -This option allows your employees to add and/or edit their own appointments. It is disabled by default, in which case employees will only be able to see their appointments on the Appointments page and Calendar. If you enable it, they will see the “Edit” option beside each appointment and they will also be able to create appointments on the “+ New Appointment” button.
    • Manage their events – This option allows your employees to add and/or edit the events that are assigned to them. It is disabled by default, in which case employees will only be able to see the events on the Appointments page and on the Calendar page. If you enable it, they will see the “Edit” option beside each event and the “Attendees” option, so they can see the list of attendees that have booked the event.
    • Enable Employee panel – This option allows you to add the employee panel to your front-end pages where employees will be able to login and see and manage their appointments and events, or their profile. When you enable this option you will see an additional option: Employee Panel Page URL where you should add the URL of the page where you added the Amelia employee panel shortcode. You can read more about setting up the Employee panel on the Front-end Employee panel page.
  • Customer tab has the following options:
    • Check customer’s name for existing email when booking  – This option allows you to choose whether you want to check the customer’s name for the provided email or not. By default, this option is enabled and your customers won’t be able to use the same email for booking with different first and last name. If you don’t want this, disable the option and your existing customers will be able to enter different information when they are booking with the same email.
    • Automatically create Amelia Customer user  – If this option is enabled, every time a new customer makes an appointment, they will automatically get a WordPress user with the Amelia Customer user role and an email with login details from WP. That WP user would be connected to the customer created in Amelia. If someone is already a WordPress user and they book an appointment for the first time in Amelia while logged in to WP, the customer created in Amelia will be connected to that WP user, and they will get the Amelia Customer role in WP (there are plugins for managing multiple roles in WordPress, such as User role editor). This way, they will have the same login info for the Amelia customer panel and WordPress.
    • Allow customers to reschedule their own appointments – This option allows you to choose if you want to allow your customers to reschedule their single appointments. By default, this option is disabled but once you enable it your customers will be able to reschedule their single appointments by drag and drop or Edit option in their Calendar. However, they cannot reschedule group appointments since this appointment is scheduled by several different customers.
    • Enable Customer panel – This option allows you to add the customer panel to your front-end pages where customers will be able to log in and see and manage their appointments or their profile. They will be able to cancel their appointments by default or reschedule them if you enable this option in the Roles settings. When you enable this option you will see four additional options below: Require password for login, Allow customers to delete their profile, Allow customers to cancel packages, and Customer Panel Page URL. You can read more about these options and setting up the Customer panel on the Front-end Customer panel page.
    • Limit appointments per customer – By enabling this option, you can limit how many appointments a customer can book within a specific time frame and period.
      • Configuring this will apply to all services, but you can configure limitations per service, by adjusting the limits through the service settings.
    • Limit package purchases per customer – By enabling this option, you can limit how many packages a customer can book within a specific time frame and period.
      • Configuring this will apply to all packages, but you can configure limitations per package, by adjusting the limits through the package settings.
    • Limit events per customer – By enabling this option, you can limit how many events a customer can book within a specific time frame and period.
      • Unlike Services and Packages, configuring limitations per customer, per individual events is not currently possible, so the limitations you configure through Roles settings will apply to all events.

Please note that the customer’s email will be checked for applying the limit, so in order to use this feature, the customer’s email needs to be a mandatory field in the front-end booking form.

    • The screenshot below applies to Appointment and Event bookings. The limit for package purchases does not include the Time period is calculated from section since package bookings apply only to the Booking date and time.
limit-appointments-per-customer
      • Number of appointments/packages/events – This defines the number of appointments/packages/events the customer will be able to book when the limit is enabled.
      • Time frame – You can define the limitation per hour, day, week, month, or year.
      • Period – The period of the previously selected time frame when the limitation will apply.
      • Time period is calculated from – There are two options when the logic will apply:
        • Booking date and time – Selecting this option will set the limit based on the date when the booking is created, regardless of the appointment/event’s date and time.
        • Appointment date and time/Event start date and time – Selecting this option will set the limit based on the appointment scheduled date/event’s start date and time.

Example:

Limiting the customer bookings as shown in the screenshot above will allow a single customer to book 2 appointments within a period of 1 day. The limitation will apply 24 hours from the time the customer booked the appointment.

      • Since limiting the number of appointments/packages/events per customer checks the customer’s email address, the customers will be able to select the time slot and get to the Your Information step, where they enter their details. That’s when Amelia checks the email and applies the limitation, so the customers will only see one of the three error messages:
        • Time slot is unavailable” (for appointment bookings)
        • Booking is unavailable” (for package bookings)
        • Event booking is unavailable” (for event bookings)
limit-error-messages
      • This is done on purpose since the use cases can vary. Some businesses don’t want the customers to know that the number of appointments/packages/events they can book is limited, so having a simple notice like the one above should suffice.
      • If you want your customers to know that the number of appointments/packages/events they can book is limited, you can add a simple text block above the form, explaining how the limitation works, so they either don’t try to book the time slots in the defined time period, or they understand why there’s an “unavailable” message in the form.
    • Enable No-show tag – Once you enable this option, all customers who had appointments marked as “No Show” in the past will be seen differently in the “Appointments” section, and the Customer’s profile (in the “Customers”) section. A gray tag indicates the customer who failed to show up once; a yellow tag indicates the customer who failed to show up twice; and the red tag indicates the customer who failed to show up 3 or more times:
no-show
  • Admin tab has the following options:
    • Allow admin to book appointment at any time – This option allows you to choose if you want to allow the admin of the website to schedule appointments in the back-end at any time they want – without any restrictions regarding employees’ work hours, days off or special days. By default, this option is disabled but once you enable it the admin would be able to schedule appointments at any time.