How to set up the Customer Panel
The Customer Panel lets your customers manage their appointments, events, payments, packages, and personal information without accessing the WordPress back end. It appears on a regular WordPress page and gives customers a simple place to review bookings, reschedule future dates, cancel when allowed, or update their profile. This makes it ideal for businesses that want to reduce manual coordination and give customers a self-service experience.
When a customer opens the panel, they can immediately see upcoming and past appointments and events, view package details, pay for any remaining balance, and adjust personal data. Access can be password-based or token-based, depending on how you configure the panel in Amelia.
How do I create the Customer Panel page?
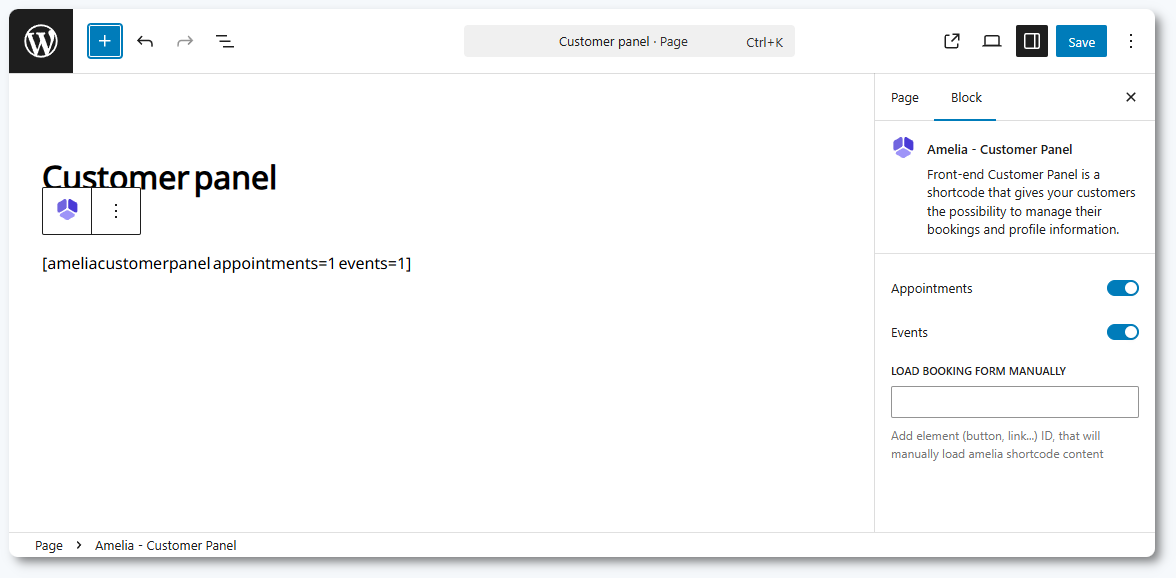
To create the Customer Panel, add the Amelia – Customer Panel block to any WordPress page. You can use Gutenberg, Elementor, or Divi. After inserting the block, use the Appointments and Events sliders to choose which booking types should appear in the panel. At least one slider must remain enabled, since the panel needs content to display.
If you are not using a supported builder, you can display the panel with one of these shortcodes:
[ameliacustomerpanel appointments=1 events=1]– shows appointments and events[ameliacustomerpanel appointments=1]– shows only appointments[ameliacustomerpanel events=1]– shows only events
Once the page is created, it is not functional until you paste its URL in Settings → Roles & permissions → Customer.
How do I enable access to the Customer Panel?
To activate the Customer Panel, go to Settings → Roles & permissions → Customer, expand the Panel & access permissions section, and paste the URL of the page where the panel is published into the Customer Panel Page URL field. Amelia uses this URL to include the link to the panel in notifications, and to generate unique access tokens for customers who do not use a password.
In the Panel access email template, the %customer_panel_url% placeholder is already defined instead of the raw link, so if you’re editing this template keep in mind that it needs to stay that way. This ensures that Amelia generates a unique, secure access link for each customer. Using the actual page URL will prevent the access token from working.

How does login work for the Customer Panel?
You can choose between password-based access or token-based access. In Settings → Roles & permissions → Customer → Customer configuration, the Require password for login option controls this behavior.
If the option is enabled, customers will create a password on their first visit and later log in with email and password.
If the option is disabled, customers will enter only their email address. Amelia will send them the Panel access notification containing a unique login token that grants access without a password. This token is generated every time they request access through their email.
How can customers manage their bookings in the panel?
In the Manage bookings section of the customer role settings, you can allow or restrict what customers can do with their appointments, packages, and profile data.
- Allow customers to reschedule their own appointments – adds the Reschedule option
- Allow customers to cancel packages – adds the Cancel button in the package view
- Allow customers to delete their profile – adds a Delete button to comply with GDPR
Customers always have the option to cancel appointments. This cannot be disabled. The settings in General Settings → Roles & permissions allow you to limit how soon before the appointment rescheduling and cancellation are permitted.

How do customers update their profile information?
Customers can update their name, email, phone number, and date of birth by clicking their full name in the panel’s top-left corner. If profile deletion is enabled, a Delete button will appear here as well.
Deleting a profile removes all personal data from your database. Scheduled appointments remain visible to admins and managers, but with the customer’s ID instead of personal information, ensuring GDPR compliance.

How do customers reschedule or cancel appointments?
Customers can manage appointments from the Appointments tab. Clicking the three-dots menu on any booking shows available options.
If rescheduling is disabled, the customer will only see the Cancel option. When you enable Allow customers to reschedule their own appointments, the three-dots menu will show both Cancel and Reschedule. Choosing Reschedule opens a dialog where customers can select another available time slot. If a chosen slot is unavailable, Amelia shows the next available option.

How can customers view and download invoices?
If the invoice feature is enabled in Amelia and an invoice exists for a booking, customers can access it from the three-dots menu in the Customer Panel. This applies to appointments, events, and packages.
Opening the three-dots menu for an item with an invoice shows options such as preview invoice and download invoice. Customers can quickly review invoice details in the browser or download the file for their records, while all invoice configuration remains controlled from the back end.
How does paying from the Customer Panel work?
If the Allow payment via Payment Link option is enabled in Settings → Payments, customers will see a Pay now button next to any appointment where a balance is still due. This includes appointments booked by admins or managers from the back end, or front end bookings where the customer paid a deposit or selected an on-site payment method.
If multiple online payment methods are enabled, the customer will choose a payment method from a dropdown list. If only one method is available, that method is used automatically. Once the payment is completed, the appointment status updates to Paid in the Finance section.
How can customers manage their packages in the panel?
When customers have active packages, the Packages tab appears in the Customer Panel sidebar. This tab lists all their packages, along with information such as duration and the number of booked versus remaining appointments.
Clicking a package opens its details, where customers can see all associated appointments, book remaining sessions, and cancel the package if Allow customers to cancel packages is enabled in the customer settings. Customers can also reschedule individual package appointments from the Appointments tab and choose their preferred employee when booking new sessions within the package, using the employee selector above the calendar.

How do I customize the Customer Panel?
To customize the Customer Panel’s colors, typography, labels, and layout, go to Customize in the Amelia menu and select Customer Panel. This opens the visual editor where you can adjust styling to match your brand. A separate documentation page will cover full customization steps.
What should I keep in mind when using the Customer Panel?
- Always use the
%customer_panel_url%placeholder in notifications so access tokens work properly. - At least one of the panel content sliders (Appointments or Events) must remain enabled.
- Cancellation is always available; rescheduling is optional.
- Profile deletion removes personal data but keeps existing appointments.
- Payment links only appear when a balance is due and payment link support is enabled.
- Customers cannot pay for appointments that are already fully paid or free.
- Package cancellation and appointment rescheduling depend on your role settings.