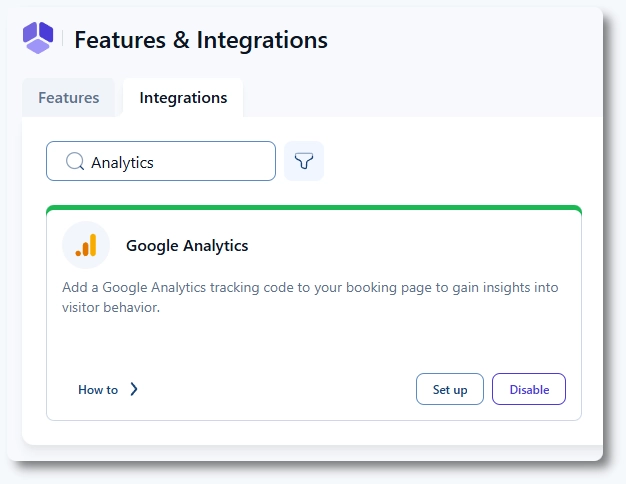
Don’t miss our Special Offer!

Up to 50% off
Grab Amelia
Grab Amelia

Google Analytics Integration in Amelia WordPress Booking Plugin

In order to help you track visitor activity on your website and Amelia particularly, monitor conversions and marketing performance, there is an integration with Google Analytics (GA4) available in Amelia. If you use GA4 you can create tracking for different events/actions in Amelia on which you will track conversions in your Google Analytics account.

For a deeper understanding of the significance of Google Analytics 4 (GA4) integration within Amelia, explore our blog post on Unlocking visitor insights with Amelia Google Analytics 4 integration. In this companion article, we delve into the role of analytics in digital marketing, the power of custom events, and how Amelia empowers user experiences. It’s a must-read to complement your knowledge on integrating GA4 within Amelia.

Integrating GA4 within the Amelia plugin

Copy the measurement ID from GA4 and paste it into the Amelia plugin

Log in to your Google Analytics 4 property and click on the gear icon (Admin) in the bottom left corner of the Google Analytics 4 interface:

integrating GA4

Then in the property column, click Data Streams:

data-streams

Select a web data stream that you want to connect with the Amelia plugin. 

data-stream-selection

A new window will appear. At the top-right column, you will see a measurement ID that starts with “G-”.

measurement-id

Copy the entire measurement ID (simply click on the icon right to ID). 

Now, you can log into your WordPress website, and go into Amelia/Settings -> Integrations. In there, access the “Marketing Tools” tab, and expand “Google Analytics”.

Paste copied measurement ID in the ID field:

measurement-id-amelia

Creating Events within Amelia plugins (which will be sent to GA4)

Create adequate Events along with belonging parameters and values

After entering the measurement ID from GA4, the connection between Amelia and GA4 is established. Next, you need to select the relevant GA4 Events, along with Event parameters and Values.

Before the GA4 Event creation, you have to choose the segment that suits you best, because each segment has a different predefined set of GA4 Events. 

Segments are: 

  • Appointment (booking services);
  • Packages (available only in Pro and Elite license plans);
  • Events (booking an event)

These are split into three tabs below the ID, and you can add the tracking for each segment.

tracking-events

Next, you need to choose a type of GA4 event from the list of actions on which the event will be called.

Please note that the list of events is different depending on which tab you choose – Appointments, Packages, or Events.

The events that are available for all three are:

  • Load page – the event will be sent on each page load where Amelia is
  • Show Checkout Form – this event will be sent when the last booking step (where customers provide their information) is accessed
  • Complete Booking Without Payment – this will track all of the successful bookings without online payments (on-site payment method)
  • Complete Booking With Payment – this will track all of the successful bookings that are paid using the online payment methods during the booking process

Please note that the WooCommerce payments can’t be tracked using this event because the form redirects to WooCommerce pages where the Amelia booking form isn’t available anymore.

The events available for Appointments only are:

  • Select Category – sent when the customer chooses a category;
  • Select Service – sent when the customer chooses a service;
  • Select Employee – sent when the customer chooses the employee;
  • Select Location – sent when the customer chooses the location.

For Packages, there is the Select Package event which is sent when the package is selected, and for Events the Select event which is sent when the Event is selected.

When you click on the +Add tracking button, a modal for creating a tracking will open:

GA4AddTracking

The dropdown menu Type allows you to select one of the predefined GA4 Events.

In the Event field, name the Event you’re creating (it’s recommended that the name is related to the Type).

Next, enter the Value and choose a value from the drop-down menu Placeholders.

In the last step, define the Event Parameter. Use lowercase for Event parameter names, and if the name consists of two or more words, separate them with underscores.

Please note:

  • Event names are case-sensitive. For example, event_one and Event_one are distinct events.
  • The “Placeholders” drop-down will only expand once you select the Type.

Don’t forget to hit the Save button!

After you’ve created the GA4 measurement ID, events with their respective parameters and values, and saved the settings, it’s necessary to add all the created Event parameters to GA4. Why? Because GA4 includes a specific set of default Event parameters. All Event parameters within an Event that are not default must be manually added to GA4 as Custom definitions.

Creating Custom definitions (dimensions)

Configure GA4 to recognize Custom dimensions from your Events.

To add custom definitions, in this case, custom dimensions, log in to your Google Analytics 4 property. 

In the bottom left corner of the Google Analytics 4 interface click the gear icon (Admin).

integrating GA4

Then in the property column, click Custom definitions.

custom-definitions

A new menu will appear, click on the Create custom dimension button.

create-custom-dimension

First, from the Scope drop-down menu, select Event, and then choose the desired Event parameter. It is recommended that the Dimension name aligns with the selected Event parameter. While not mandatory, it is preferable to provide a more detailed description in the Description field for the created dimension.

edit-custom-dimension

Google Analytics reports (excluding real-time and debug view) often take a considerable amount of time to process and display data. It’s customary to expect a delay of 24 to 48 hours.

With this in mind, if you’ve sent events to GA4 reports and only waited for a few hours, it’s important to understand that this might not be sufficient. It’s advisable to check your data the next day.

If the data is still not available, be patient and wait for an additional day before re-checking or reaching out to either our, or Google’s support

Your GA property is already connected, Events are set up, but you’re still not seeing Events in GA4?

The cause of this can be Data thresholding which is typically implemented in reports with a low user count. In such cases, GA4 conceals rows with these lower values. It’s crucial to understand that your data still resides in your GA4 property, even though it doesn’t appear in the report.

Data Thresholding is a system-defined feature, and there’s no option to customize the limit according to your preferences.

DataThresholding

Thresholding in GA4 serves a distinct purpose from sampling. It comes into play when specific conditions are met within your GA4 property:

  • You’ve gathered data through Google Signals by enabling this feature at some point.
  • Your Reporting identity is either set to Blended or Observed.
  • The report you’re viewing contains rows with relatively low user, event, or session numbers.

Under these circumstances, GA4 hides rows with small numbers in the report, even though the data remains accessible in the background.

How to Prevent Thresholding in GA4

There are three options available to prevent thresholding in GA4, with the most suitable approach being to switch your Reporting identity to “Device-based“.

To switch to Device-Based Reporting identity log in to your Google Analytics 4 property, access the Google Analytics 4 interface, and in the bottom left corner, click the gear icon (Admin). A new menu will appear, where you need to click on the Data display drop-down menu and then on the Reporting identity button. 

On the right side, you’ll find two selectable options: Blended and Observed. To reveal and then select the Device-based option, you need to click on Show all.

device-based-show-all

The menu will expand, revealing the “Device-based” option.

device-based

Select the Device-based option and hit the Save button. 

This setting doesn’t impact the data you’ve collected; instead, it influences the calculation of numbers.