Video version
Understanding how Notifications work
Notifications are emails sent to your customers and employees to alert them about some event. There are three different times when notifications can be sent:
- Right after an event is triggered.
- At the scheduled specified time after the appointment.
- At the scheduled specified time of the day.
For the 2. and 3. notifications types, it is necessary to set up a cron job on your server. You can see below how to configure these notifications.
Appointment Notifications
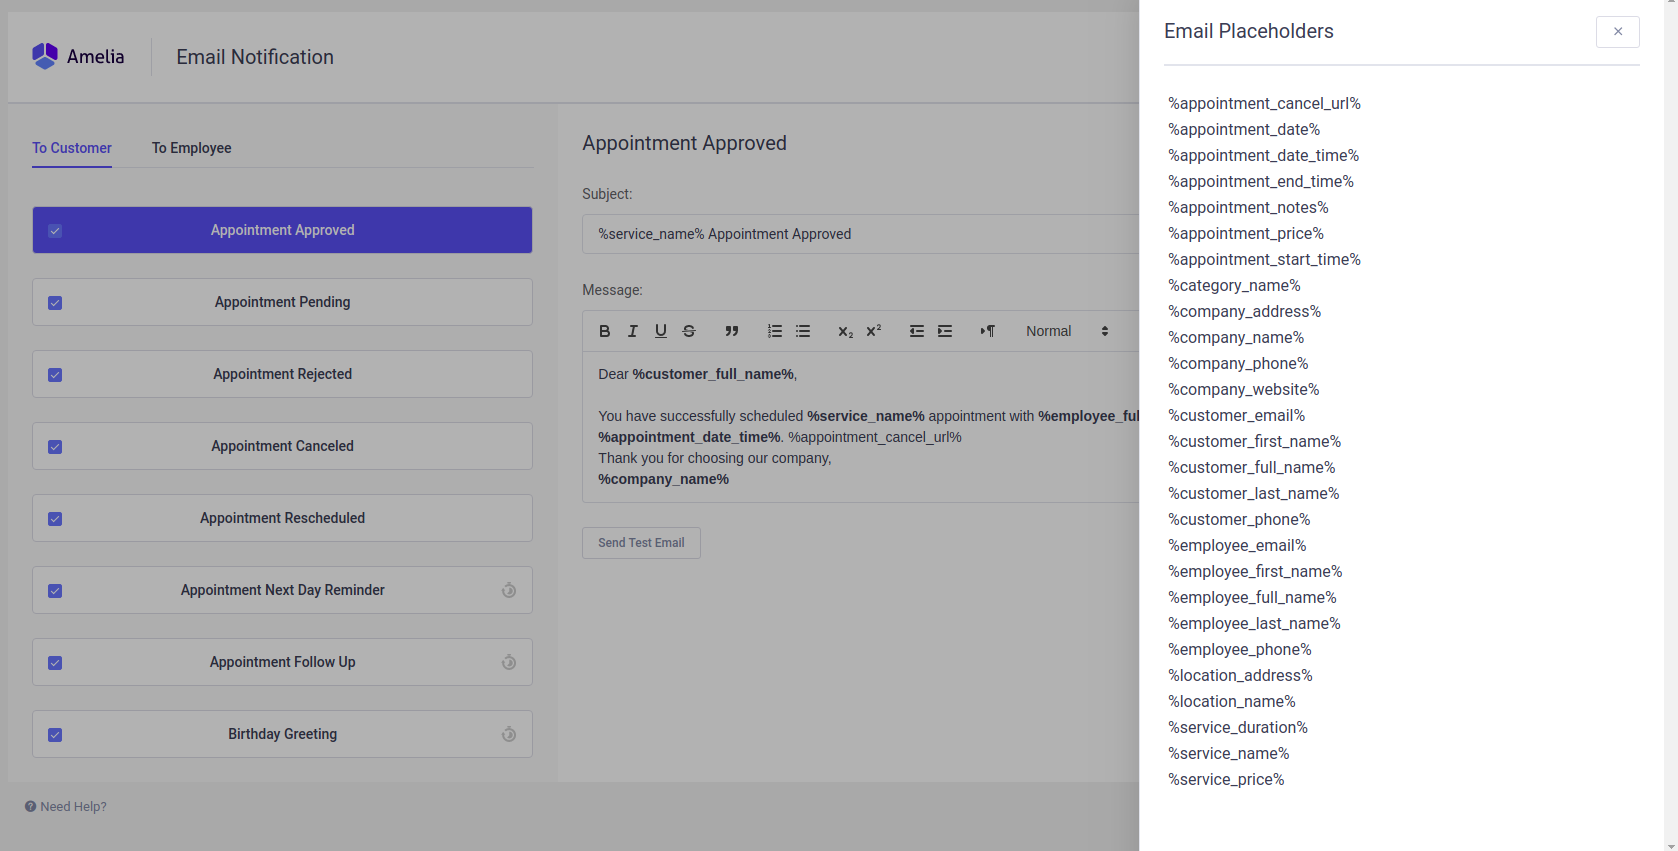
Notifications are divided into two tabs:
- To Customer – notifications you can enable/disable for sending to the customer, and
- To Employee – notifications you can enable/disable for sending to the employee.
For appointment notifications, five notification types are the same for customers and employees: Appointment Approved, Appointment Pending, Appointment Rejected, Appointment Canceled and Appointment Rescheduled, and three are only available for the customer: Appointment Next Day Reminder, Appointment Follow Up and Birthday Greeting. We will briefly explain each of them.
Appointment Approved
This email message will be sent right after your customer finishes the booking procedure, or after an appointment is created from the back-end of the plugin, if the default status of your appointment is Approved. This notification is available for both – the customer and the employee, but you can uncheck one of them if you don’t want it to be sent to both.
Appointment Pending
This email will be sent when the appointment is created but with a Pending status. You can set your “Default Appointment Status” as Pending, so every time a new appointment is created this email will be sent. The appointment will get a Pending status, so you will need to manually confirm it in the back-end of the plugin.
Appointment Rejected
This email is sent after the appointment is rejected. By default, an appointment can be rejected by the administrator or the manager. However, you can give permissions to the employees to reject their appointments by enabling the Allow employees managing their appointments option in General Settings. So, once the appointment is rejected the customer or employee will get an email about this action.
Appointment Canceled
This email will be sent after your customer cancels the appointment. The Cancel option is available for customers at the back-end of the plugin and through the cancel URL link in email, so once the customer cancels the appointment an email about this action will be sent to your customer and/or employee.
Appointment Details Changed
This email will be sent after the appointment details change:
- The assigned employee was changed;
- The location changed;
- The extras included were changed.
This email is automatically sent if anything related to the details of the appointment has been changed, and if this email notification is enabled. If you change the date and/or the time, the Appointment Rescheduled email template will be sent.
Appointment Rescheduled
By default, the administrator and the manager can move the appointment in the calendar or edit the date and time in the “Edit appointment” dialog. You can also give permissions to the employees to reject their appointments by enabling the option in General Settings. Either way, once you enable this notification, every time when the date and/or time details of the appointment changes the email will be sent.
Appointment Next Day Reminder
With this notification, you can remind your customer or employee about a next day appointment. On the upper right side of the page, you will see an option Scheduled For where you can choose a time when this notification will be sent. Once you’ve chosen the time and message, click on the Save button, otherwise, the chosen notification time will not be saved.
Appointment Follow Up
This is one of the two notifications available only to the customer. With this notification, you can send a follow-up email to thank your customer for coming or give some additional information. On the upper right side of the page, you will see an option to choose a time and schedule for this email. If you choose 1 hour, for example, the email will be sent to your customer 1 hour after the appointment. When you’ve finished configuring the notification, click Save and your notification message will be saved for sending.
Package Purchased
This notification sends out the details about the package that was purchased. In order to provide the details about the appointments that were booked during the purchase of the package, you’ll need to click on the “Configure Placeholder here” text in the bottom right below the template and then paste the %package_appointments_details% placeholder in the body of the template.
When configuring this placeholder, you can use appointment-related placeholders like %appointment_date%, %appointment_time%, %zoom_join_url%, and so on.
Package Canceled
This notification is triggered when the package has been canceled.
Birthday Greeting
With this email, you can congratulate your customer on their birthday. To be able to send this email you need to have filled in the Date of Birth option in the customer’s dialog. Choose a birthday greeting text and a time in the Scheduled For option when this email will be sent and click Save to keep your settings.
Events notifications
When it is about events, five notification types are the same for customers and employees: Event Booked, Event Canceled by Admin, Event Canceled by Attendee, Event Rescheduled, and Event Next Day Reminder; and Event Follow up is only available for the customer.
Event Booked
This email message will be sent right after your attendee finishes the booking procedure. The notification is available for both – the customer and the employee, but you can uncheck one of them if you don’t want it to be sent to both.
Event Canceled By Admin
This email message will be sent after the admin cancels the event. The notification is available for both – the customer and the employee, but you can uncheck one of them if you don’t want it to be sent to both.
Event Canceled By Attendee
This email message will be sent after the attendee cancels the event. At the moment, the notification will be sent only to the attendee as approval of his cancellation. The employee will receive the notification only when the whole event is canceled, not for each attendee.
Event Details Changed
This email will be sent after the Event details changed. Regardless of what the change was:
- The organizer or the staff (employee) was changed;
- The date was changed;
- The time was changed;
- The location was changed
This email is automatically sent if anything related to the event has been changed, and if this email notification is enabled.
Event Rescheduled
This email will be sent if the Event was rescheduled and moved to a different date and/or time.
Event Next Day Reminder
With this notification, you can remind your customer and/or employee about an event that happens the next day. On the upper right side of the page, you will see an option Scheduled For where you can choose a time when this notification will be sent. Once you’ve chosen the time and message, click on the Save button, otherwise, the chosen notification time will not be saved.
Event Follow up
As the appointment follow-up, you will use the Event Follow up to thank your attendee for coming or give some additional information. On the upper right side of the page, you will see an option to choose a time and schedule for this email. If you choose 1 hour, for example, the email will be sent to your attendees 1 hour after the appointment. When you’ve finished configuring the notification, click Save and your notification message will be saved for sending.
Configuring Notifications
To set up notifications you must first configure “Notification Settings” on the Amelia Booking Settings page. Settings that are mandatory are “Sender Name” and “Sender Email”. By default, Mail Service is set to “PHP Mail” but we strongly recommend changing to another mail server.
Each notification is enabled by default and it is possible to disable notifications if you want to prevent them from being sent. Also, it comes with the default “Subject” and “Message” that can be changed. In the “Subject” and in the “Message” it is possible to use placeholders. Click on the Show Email Codes button on the upper right side of the Notifications page and a dialog with placeholders will appear. Choose the one you need, click on it, the placeholder will be copied, after which you will paste it into the text area. In the real notifications received by your customers and employees, placeholders will be replaced with real data.

Scheduled notifications require a bit of additional configuration with your server cron scheduler. The command that has to be added can be found on the “Notifications” page when notification that requires scheduling is active. You can recognize these notifications by the clock icon next to the notification name. Copy command and paste it into the cron file. The command looks like this:
*/15 * * * * curl https://yourwebsite.com/wp-admin/admin-ajax.php?action=wpamelia_api&call=/notifications/scheduled/send
*/15 * * * * curl
https://yourwebsite.com/wp-admin/admin-
ajax.php?action=wpamelia_api&
call=/notifications/scheduled/send
You can see the more detailed tutorial on how to set up cron at this link, or you can follow our explanation on the FAQ page.


