Customer Custom Fields let you collect and store information directly in the customer’s profile — instead of just within individual bookings.
These fields can appear during booking (if you choose), and customers can also view or edit them later through the Customer Panel.

How do I access the Customer Custom Fields settings?
To create Customer Custom Fields, go to Amelia → Custom Fields in your WordPress dashboard, and click the Customer tab at the top.
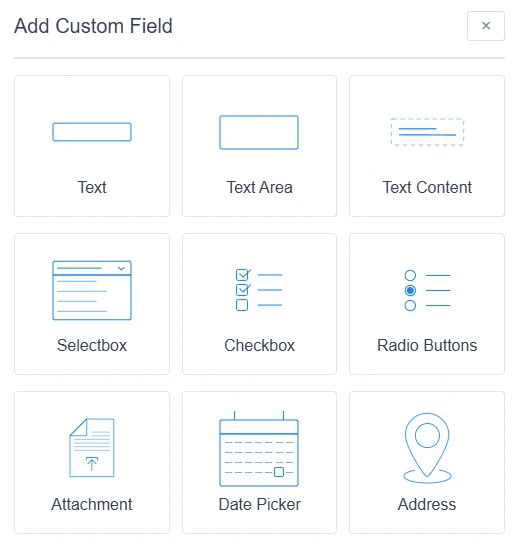
From there, click “Add Custom Field” (or the + icon in the lower-right corner) to create your first customer-related field.
What field types can I add?
Customer Custom Fields support the same field types as booking-related ones:
-
Text – for short, single-line responses.
-
Text Area – for longer notes or additional information.
-
Text Content – for adding static text or messages (supports HTML).
-
Selectbox, Checkbox, and Radio Buttons – for predefined options.
-
Attachment – allows customers to upload files (supported formats:
.jpg,.jpeg,.png,.pdf,.xls,.txt,.csv). -
Date Picker – to select a date.
-
Address – automatically fills in addresses when a Google Maps API key (listed as Maps Embed API in Google Cloud Console) is added under Settings → General in Amelia.

How do I configure each Customer Custom Field?
Once created, Customer Custom Fields can be customized in several ways:
-
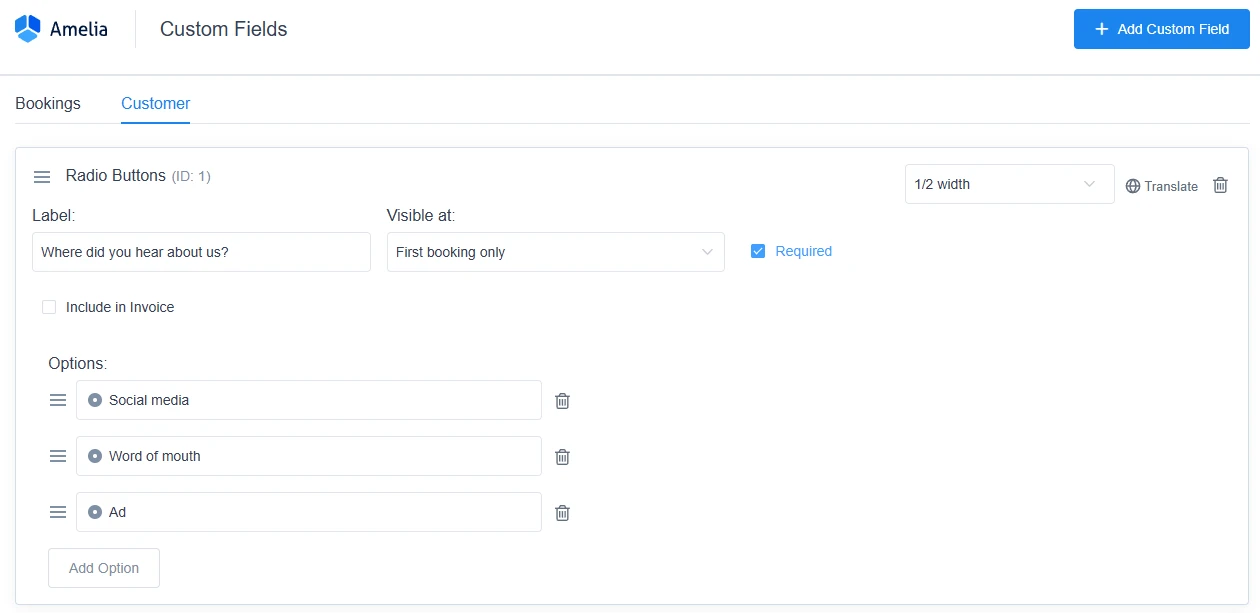
Label – The name or title of the field.
-
Required – Makes the field mandatory when customers first book.
-
Width – Choose between 1/2 or 1/1 width for layout flexibility.
-
Visible at – Determines when the field appears:
-
All bookings: The field appears during every booking (similar to booking-related fields).
-
First booking only: The field is shown once — on the customer’s first booking — and won’t appear again afterward.
-
- Include in Invoice – A checkbox below the label that lets you add this field’s value to your invoices. Learn more in the Amelia Invoices documentation.
-
Translate – Configure translations for all languages added in Amelia → Settings → General → Language.
How do I delete or reorder Custom Fields?
-
Reorder fields: Drag fields up or down using the handles beside each one.
-
Delete fields: Click the trash can icon next to the field you want to remove.
Where can I view or edit Customer Custom Fields?
Customer Custom Fields are linked directly to each customer’s profile.
You can find them in:
-
The Customers section of your Amelia back-end, by opening a customer’s profile.
-
The Customer Panel, where customers can review or update their own details.
You can also include Customer Custom Fields in your invoices — learn more in the Amelia Invoices documentation.