Here’s the situation you find yourself in.
You have a website that you want to optimize so that you can accept appointments automatically through it.
Not only that, but all that involves scheduling an appointment: picking a certain time slot in your calendar, syncing that booking calendar with Google Calendar, accepting payments, and having everything organized in one place.
That sounds complicated once you think about all the intricacies that it involves.
And that is true.
Unless you’re using a WordPress booking system to help you out.
Setting up appointments can be streamlined to perfection with one of the many WordPress booking plugins out there. You can even collect payments for appointments, which is another possible time-waster when done the old-fashioned way.
Creating a good WordPress booking system is very important if you care about saving time. And nowadays, we all know that time equals money.
A good WordPress booking system allows you to have full control over your schedule and it lets you organize your business much easier. This way, the stress of receiving phone calls for appointments will be gone.
With a good booking system, it is possible for the users to go through the entire appointment process online by simply filling out a booking form.
To do that, you can either opt for a WordPress theme with a booking system already built-in, or you can choose to have a booking plugin.
Learn below more about the topic in this article created by our team at Amelia, the #1 WordPress booking plugin.
There are two ways to create a booking system in WordPress:
- With an appointment booking plugin
- With a theme that has a built-in booking calendar
Let’s look at the two options.
How do I create a WordPress Booking System with a Plugin?
Easily.
Considering all the benefits of using a WordPress appointment booking plugin, the best option for having a booking system on your WordPress website is to create one using a reliable WordPress scheduling plugin.
This has never been easier, as there are many good plugins out there.
In this tutorial, we will feature three of the best WordPress booking plugins: Amelia, WPForms, and BirchPress. With them, you can create responsive and easy-to-navigate booking systems in WordPress.
Let’s go over how to create a booking calendar with each one of them.
Creating a Booking System with the Amelia WordPress booking plugin
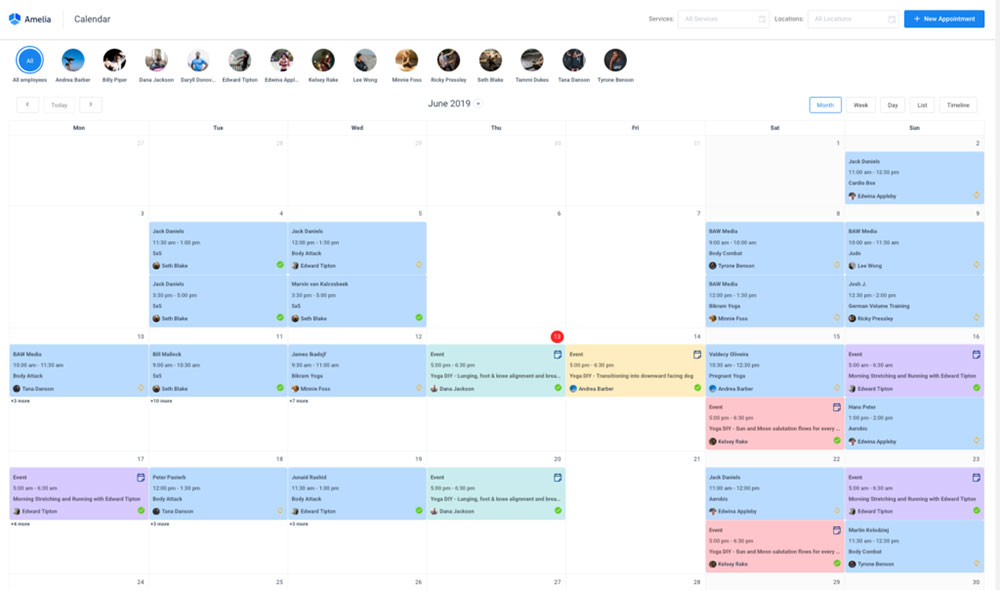
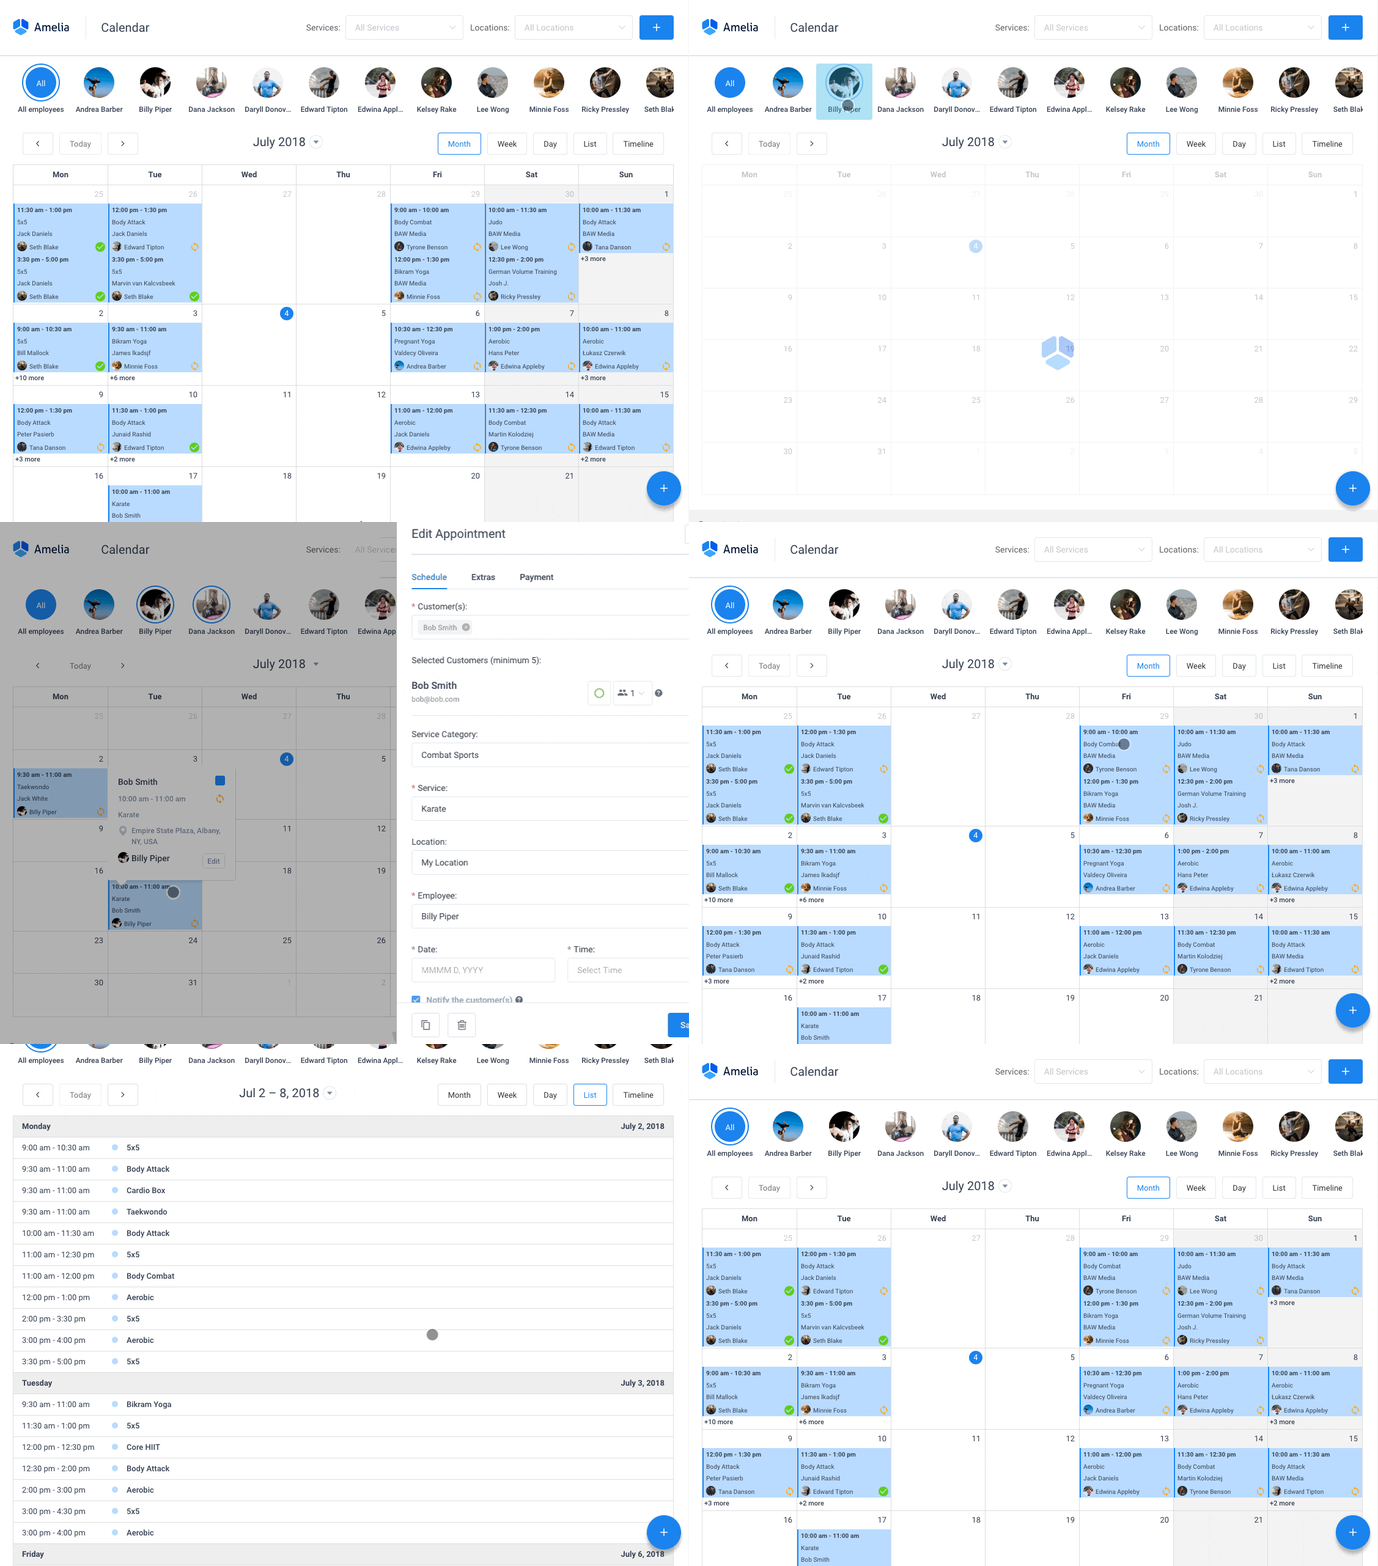
Amelia is one of the best WordPress booking plugins if not the best that works flawlessly with WordPress sites of all kinds. It has a minimal, yet powerful appointment booking interface designed to ease your workflow, automate repetitive tasks, avoid double booking, and make appointment booking a breeze for your customers.
You can even have email notifications and SMS notifications so that nobody forgets about their appointment bookings.
In order to book an appointment, the complete user interaction takes a few clicks with this WordPress plugin. Moreover, with it you can accept payments via PayPal and Stripe, perfect for those who want to pay in advance to book appointments.
As a business owner, you can monitor KPIs in the WordPress dashboard and analyze other important data to keep a pulse on your business. Amelia is a straightforward, no-nonsense WordPress reservation plugin and an amazing option for those who want an around-the-clock solution for their site.
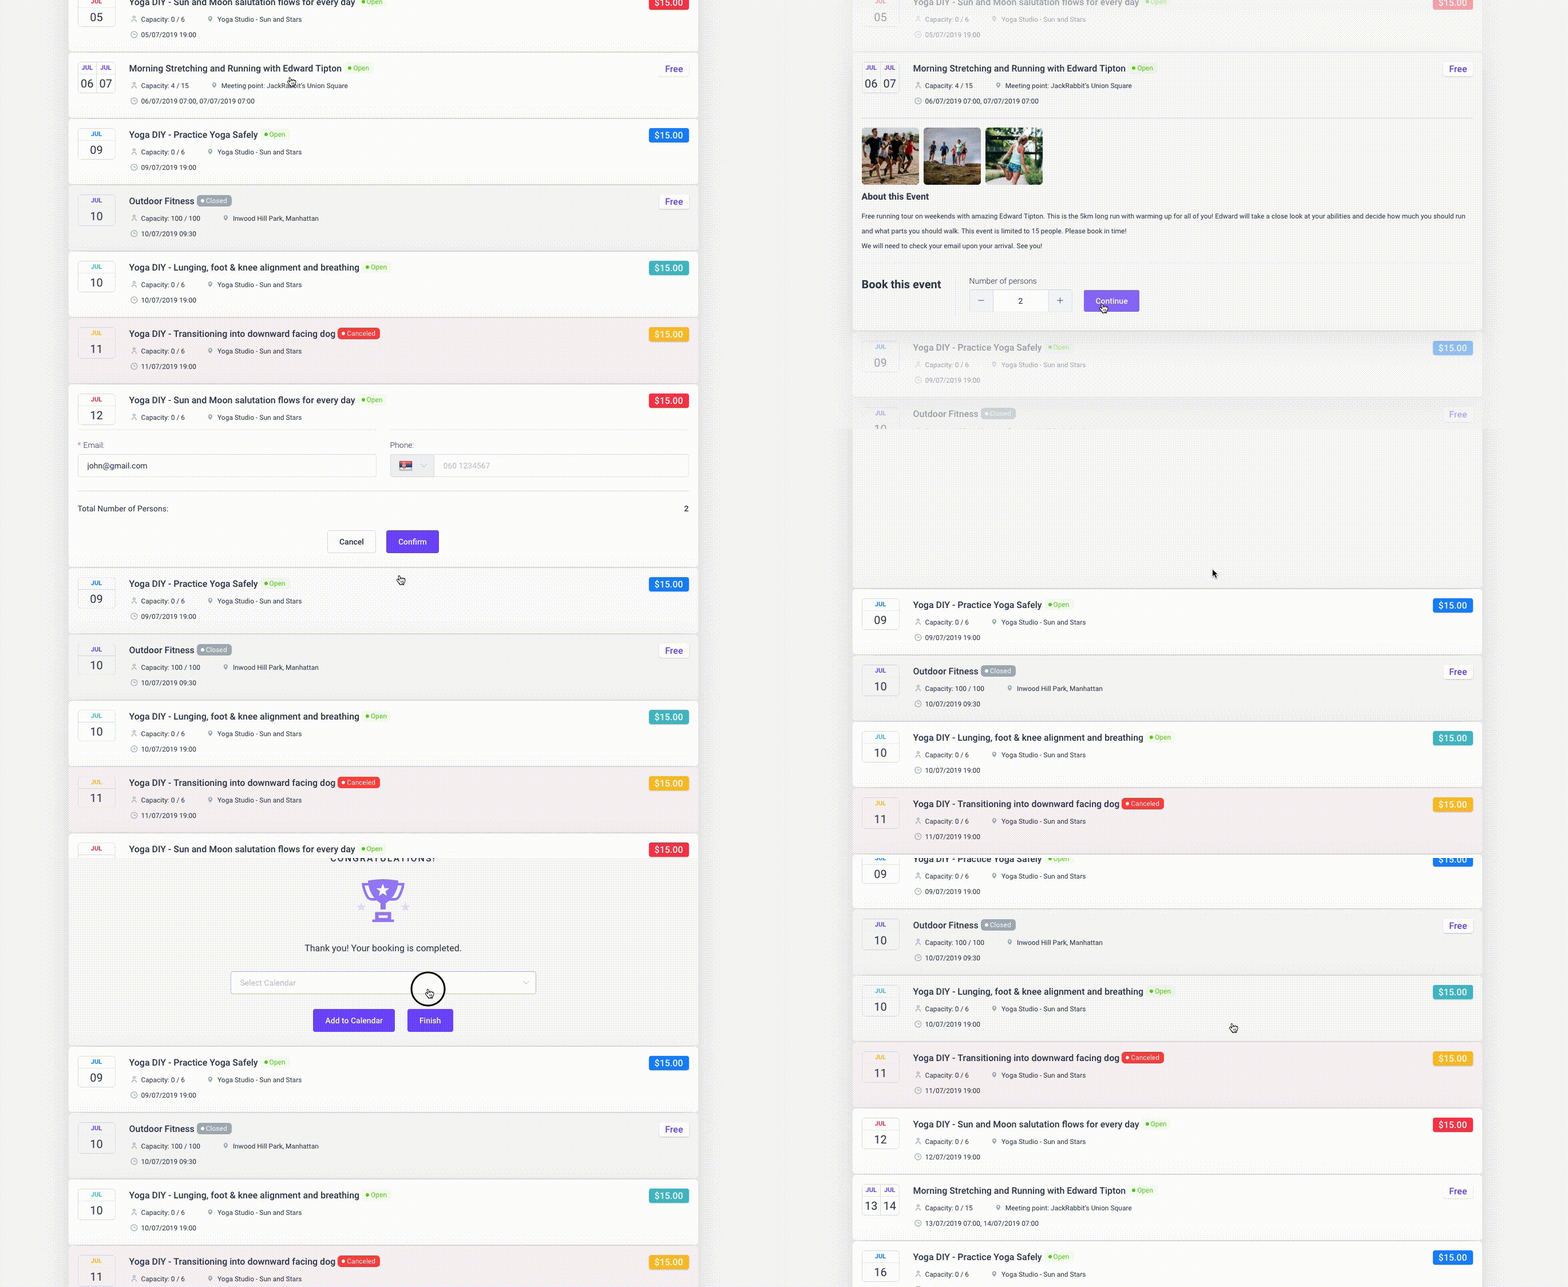
Amelia also has an Events Calendar module integrated within its features.
You can now automate your event bookings as well. To be more precise, it means that you will be able to schedule a single day, a multi-day, and also recurring events with Amelia.
Did we mention that you can manage multiple locations and that you have Google Calendar integration?
All of these and much more are under only one license, no add-ons are needed.
To test things for yourself, I’d suggest checking out the demos and seeing how things look on the front end as well as in the back end.
Medical/Health online booking page demo

A website of a demo private clinic, where a visitor can read about provided medical procedures and services, and schedule an appointment.
Barbershop booking page demo

A dummy WordPress website for Barbershops with online booking – a nice and easy implementation with the Bridge theme and the Amelia WordPress booking plugin.
Fitness Gym / Yoga booking page demo
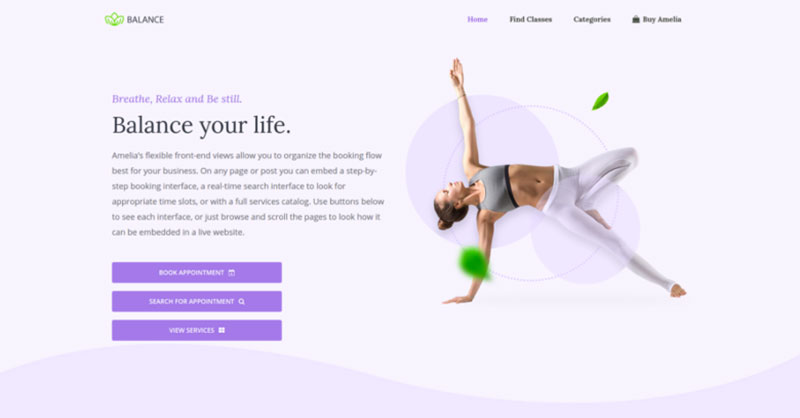
A pseudo Yoga/Gym online booking page where you can browse through possible Yoga classes, schedule individual or group training, and book a package of appointments.
Spa/salon booking page demo

A dummy cosmetology website – look through different cosmetic procedures and treatments, pick an employee and schedule appointments.
Consultant booking page demo

A pseudo Business Consultant / Coach / Lawyer website, where a customer can browse through provided consultancy and lawyer services and book an appointment.
Now let’s get to how to create a booking calendar on your site with Amelia.
Step 1: Install the Amelia WordPress booking plugin
The first thing you will need to do is, obviously, to install the Amelia booking plugin on your WordPress website. If you are using the free version, go to your WordPress dashboard, press Plugins > Add New, and search for “Amelia Lite.” Still, we recommend the premium version.
Step 2: Configure details
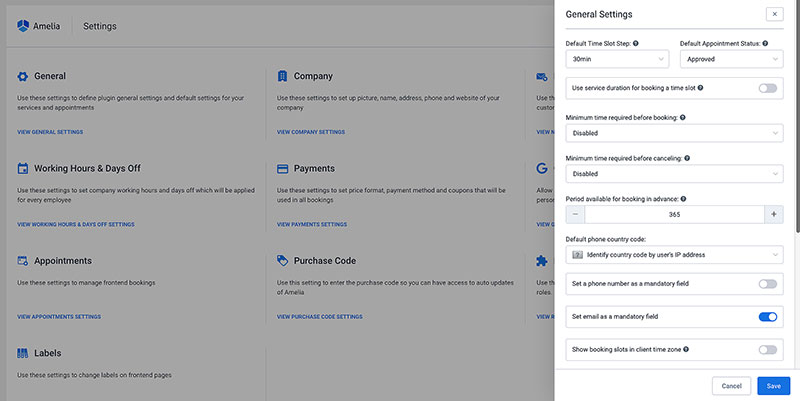
The next thing you will want to do is to add in some details, like your opening hours. To do that, go to Amelia > Settings, where you can configure the most basic details about your appointments.
Click on Company details, where you will have to enter some information about your business.
There, you will have the option to choose Working Hours & Days Off. That lets your customers know when you are available.
You can even add the break times, with the Add Break function. You can, for example, set that you are available for appointments in the morning, or you can take one hour off for lunch, and add the option to be available again in the afternoon.
Step 3: Create bookable services
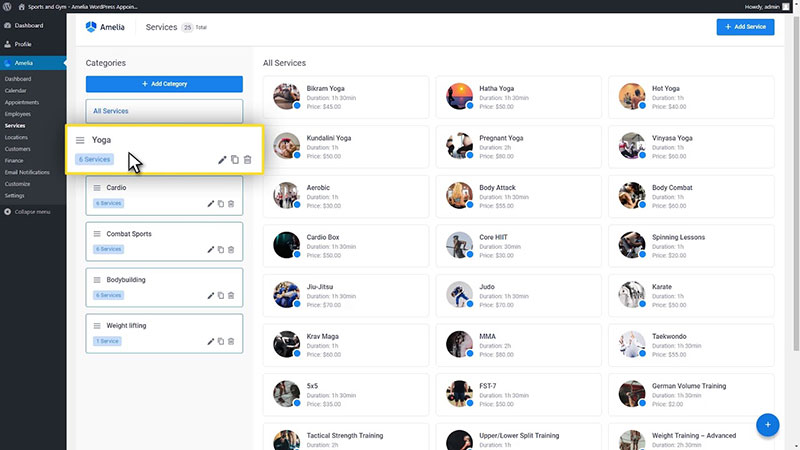
The next step is obviously to create what type of services you want to offer your customers for booking. Even the free version offers plenty of choices for this.
If you want to create the service, go to Amelia > Services.
Next, you will want to find the type of services you are looking to add. For example, if you are a personal trainer, you can add:
- Workout
- Consultation
- Nutrition
Once you have chosen the category, you can add more details to the service. You can do this with the +Add Service button to open the interface.
Open the Service Details tab, and configure the following details.
- Name – This is the name of your service
- Category – which category the service belongs to
- Duration – the duration of the service, or session duration.
- Price – the price for one session.
You can further customize the services in this booking calendar plugin by adding images to your service at the top and your description at the bottom.
You can even display the services that you offer in a gallery. This is a good way to present your services visually, and it can create an attractive design.
If you are done, click Save.
If you want to add more services, you can simply repeat the same steps that I mentioned above.
Step 4: Add an employee
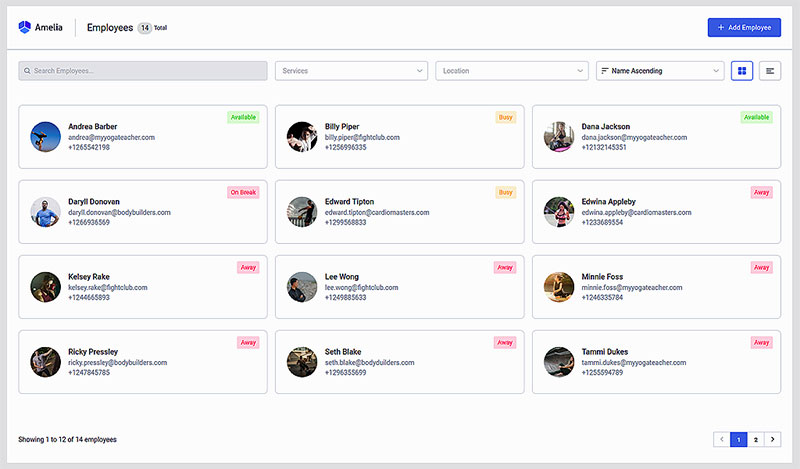
Next, you can add an employee to one of the services that you offer. Each employee can have his own working hours, services, and other details that can be customized here.
You can add an employee by going to Amelia > Employees.
Click on Add Employee, and then a dialog window will open where you will be able to enter details.
The first tab will offer you the option to add the basic info about the employee, like the first and last name, photos, phone, other notes, and more optional details.
You can then assign the services that you created in the previous step to these employees. To do that, simply tick the checkbox in the second tab near the selected service. To end, Save.
Step 5: Embed the appointment booking form
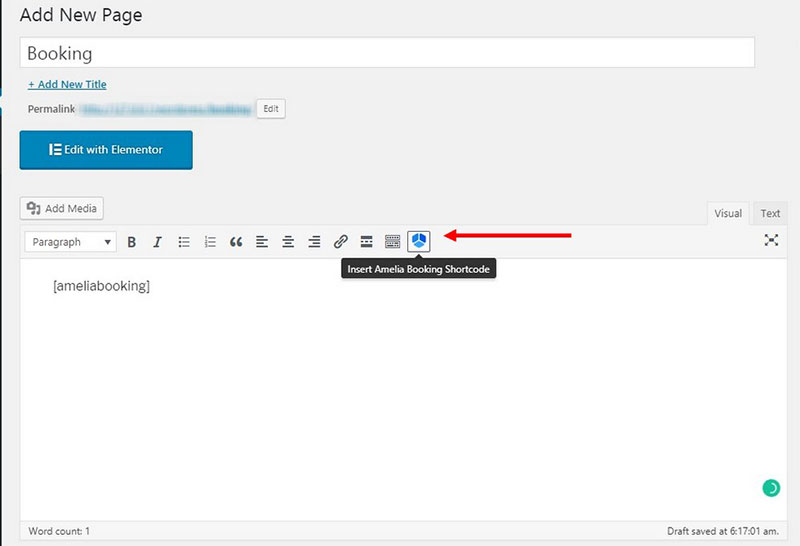
To add the WordPress scheduling form to the site, you will need to embed this form. Once you are done adding services, you can embed the front-end of the booking form to your site.
Simply go to the page of your site where you want to include the form, and search for the Insert Amelia Booking shortcode in the editor toolbar.
Click OK in the popup to add the shortcode.
If you want, you can even add additional text to the form or around it.
Creating a WordPress Booking System with WPForms
Another way to create a booking system is with WPForms. First, you will need to install the WPForms plugin and activate it. This is not exactly a WordPress booking plugin, but it has the functionality to create a booking calendar with it. There is no Google Calendar sync like you’d have if you use Amelia, though.
Here is the step-by-step guide on how to create a simple booking calendar with this plugin.
Step 1: Create the scheduling form
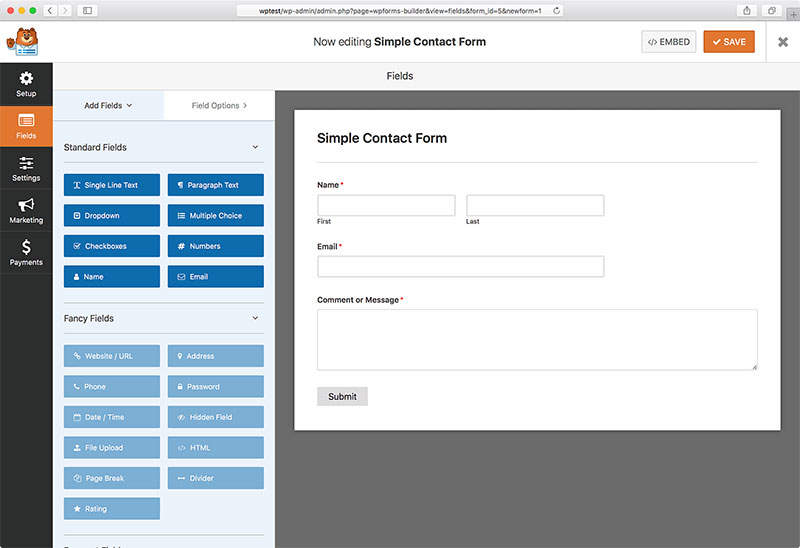
The first thing you will have to do is create a form inside the WordPress plugin. This is a simple contact form that can act as the booking form for your site. The following fields will be inserted by default:
- Name
- Comment or Message
You can always add more information if you need to by dragging custom fields from the left panel to the right panel.
Step 2: Customize
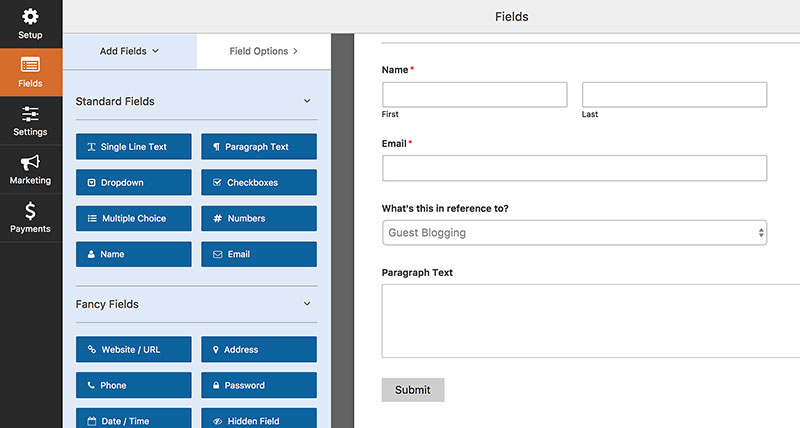
Of course, right now the form will look a bit bland and empty, so you will have to customize it. Drag the Multiple Choice form field from the left side to the right side and click on it.
In this example, customers will be able to choose from 3 services.
You can allow them to pick more services by adding checkboxes next to the services.
Add the time slots options so that the customers can pick the desired date.
Click on the form.
By now, the following changes have been made:
- Label
- Format
- Description
- “Required” Checkbox
Step 3: Configure your booking form’s settings
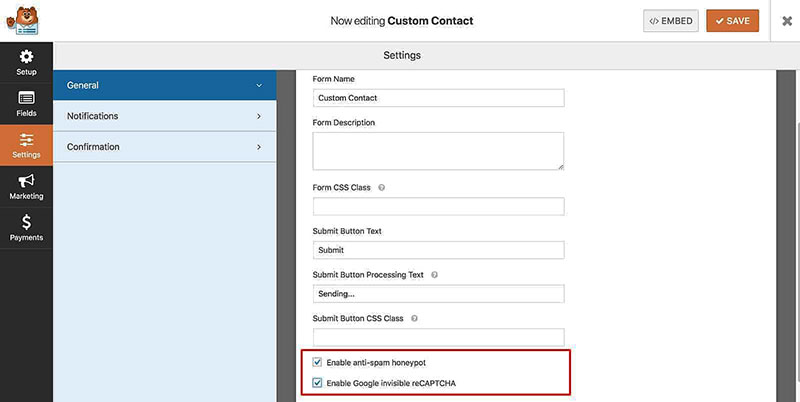
You will have to complete your form by configuring some of the form’s settings, which is a very important step to ensure that the booking works properly.
Go to Settings > General. Here you will be able to configure the following settings:
- Form Name – You can rename it
- Form Description – again, you can add anything you like as long as it suits your form
- Submit Button Text – customize the submit button
- Spam Prevention – important to enable the anti-spam honeypot and to add reCAPTCHA for safer bookings
- Enable AJAX booking forms
- GDPR attachments.
Step 4: Configure notifications
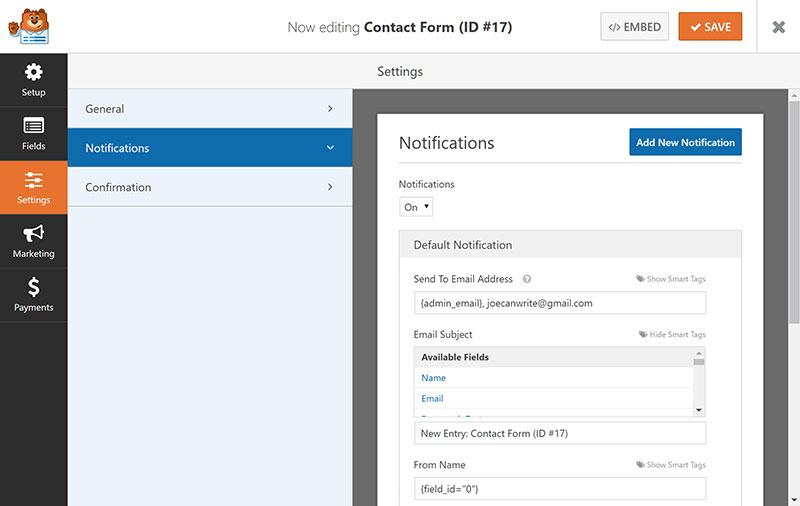
Email notifications can be a good way to make yourself stand out, and you can customize them to make them more unique. These notifications will be sent by email to your customers once they complete the booking.
Step 5: Configure confirmations
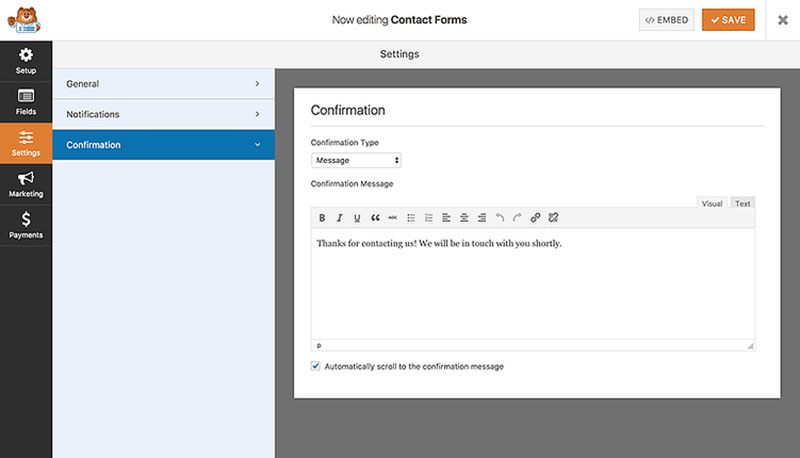
Confirmation messages are sent or displayed to your customers to let them know they have completed their booking process and that you have received their request for an appointment. In this step, we will take a look at how to configure them.
There are 3 types of confirmations that you can choose from with WPForms:
- This is the most common type of confirmation and one that is chosen by default. A message will be displayed once the appointment is made.
- Show Page. This can take your customers to another specific page once the process is done, and is displayed after.
- Go to the URL (redirect). Sometimes, users are taken to a different website after completion.
Step 6: Add the WordPress booking system to your website
The last step would be to add the booking form to your site. There are many locations that you can add the form to, such as your blog posts, or sidebar widgets.
Step 7: Integrate with Google Calendar
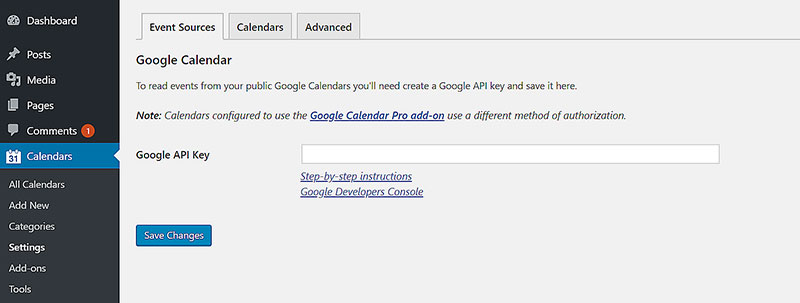
After you have added the form to your site, you can integrate it with Google Calendar. It allows for much easier use, and it integrates all the information and adds it to Google Calendar for much easier control over your appointments.
Creating a WordPress Booking System with BirchPress
BirchPress is a premium WordPress booking plugin that you can use to manage your appointments from the WordPress dashboard.
Step 1: Install the plugin
First, you will need to install the BirchPress plugin. Then, activate it, and go to plugin settings by going to Appointments > Settings.
There are more sections within the settings page.
- General – you can configure the general settings like currency and time zones
- Form builder – customize your booking forms
- Email notifications – set up notifications. These can be emails that are sent upon booking or rescheduling.
- Payments – set up your payments here. You can collect online payments via PayPal.
- WooCommerce – allows for integration with WooCommerce.
- Custom Code – you can add custom code.
Step 2: Add locations
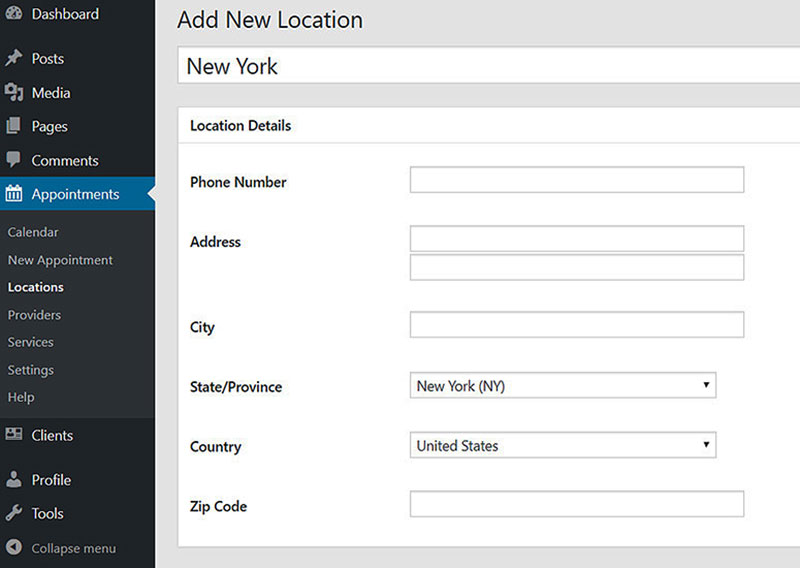
You can very simply add multiple locations of your services or your locations with this option. Go to Appointments > Locations > Add Locations.
Step 3: Add Service Providers
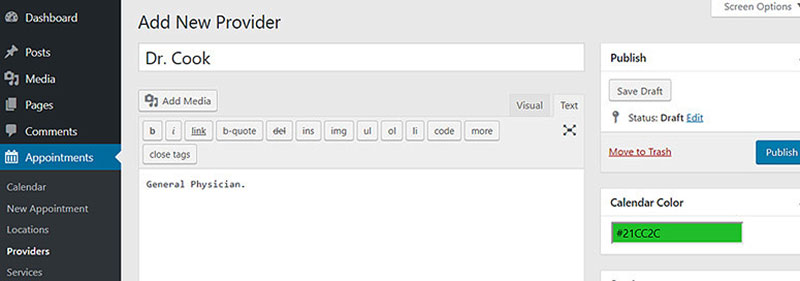
Here, you will include your service providers. This includes your staff, or if you work alone, you will have to add yourself.
Also, if you have more consultants for your company you will also need to add them.
To add providers, go to Appointments >Providers, and add more details about your providers.
Step 4: Add Services
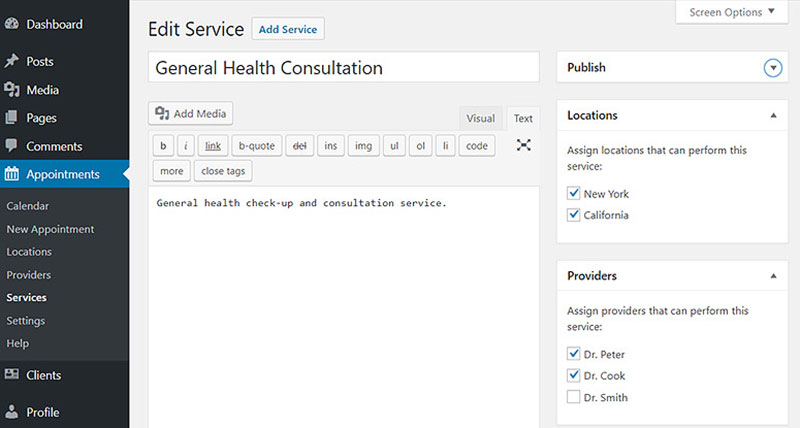
To add services, go to Appointments > Services, where you will be able to specify more details about your services, like locations and providers.
Step 5: Publish the form
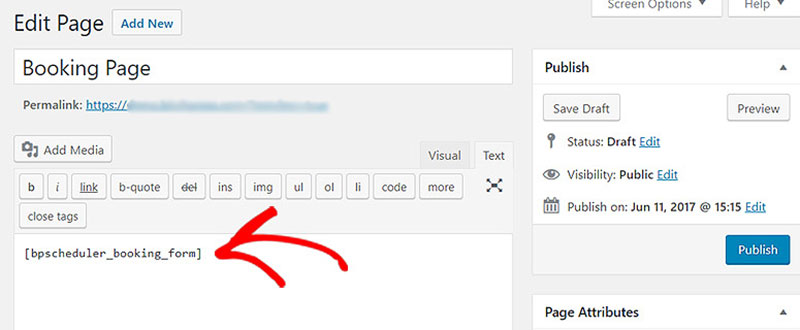
The last step to completing your WordPress booking system would be to publish the form on your site. It can be published via a shortcode very easily, and you can add it to a post page or to your widgets.
To add the form, create a new page in WordPress. The next step would be to add the following shortcode to the editor: [ bpscheduler_booking_form ]
And you’re done. Your website visitors can now book appointments on your website.
Using themes to create a booking system
There are many high-quality WordPress themes out there nowadays, and there are also many that have a booking system already incorporated.
For example, Themeforest has the best WordPress themes out there, and there are several that have a good booking system already in place. With them, you will be able to accept appointments and manage your schedule online.
Out of all the themes on Themeforest, you will surely find one that will suit your needs.
Many of these themes allow you plenty of breathing space and creativity, as you can easily customize them. For example, you can set the pricing options, the availability of your services, and many more things. Plus, you can enable online payments so that you won’t have to deal with payments once the customer comes to you.
A crucial thing that you should look for with these themes is the ability to book appointments for your services straight from the WordPress site. Here, you should also be able to customize the look of your booking forms.
Many of these themes, like Astra, come with all the features mentioned above and offer pre-built demos, which lay the foundations of your website for you. Doing this requires that you only have to make a couple of small tweaks or changes, allowing you to jump right into business.

What is more, these themes should offer you the ability to customize the booking calendar by offering you some useful tools, such as Visual Composer, where you drag and drop files to create a great booking page.
There are some great themes there, and many of them fit many purposes; if you are simply looking to promote your business, then you have many choices to choose from. If you need a more functional one with a booking system handy, then there are some good options for that, too.
Here are some features that a good-looking WordPress theme should have:
- Single-click installation
- Responsive design
- Online appointments
- Typography options
- Service showcase
- Browser compatibility
- Many options for customization and styling
- Widgets, shortcodes
- SEO
- Section to display your images
- Business location map
- Sidebar rendering
- Quick navigation
- Buttons for social media
- ECommerce integration
FAQs about WordPress booking systems
1. What is a WordPress booking system and how does it work?
An add-on called a WordPress booking system enables website owners to control and manage appointments, bookings, and reservations right from their online presence. It frequently has elements like online calendars, reservation forms, and automatic email notifications.
A smart booking system will integrate seamlessly with your website, making it simple for you to handle reservations, interact with clients, and organize your business operations.
2. What are the benefits of using a booking system for WordPress?
There are several advantages to using a WordPress booking system for your company. It enables clients to schedule appointments and services directly through your website, which can save you time and lower the possibility of overbooking.
Additionally, it offers an easy way to track reservations, handle customer data, and take payments online. You can concentrate on providing top-notch services to your clients and expanding your business by automating your booking and scheduling procedures.
3. What are the essential features of a good WordPress booking system?
Features like a configurable booking form, a calendar display, online payment processing, automated email reminders, and customizable confirmation messages should all be included in a solid WordPress booking system.
Additionally, it should be simple to integrate with your website and offer a user-friendly interface for both website managers and visitors.
It should also provide customizable scheduling choices so you can tailor your availability and reservation demands to meet your business needs.
4. What are the different types of booking systems available for WordPress?
Appointment scheduling plugins, hotel booking systems, tour booking plugins, and event booking plugins are just a few of the several types of booking systems that are available for WordPress. Every kind of reservation system is created to satisfy the unique requirements of various organizations and sectors.
A hotel booking system will enable you to control room availability and pricing, whilst an event booking plugin would often include functionality for ticket sales.
5. Can I customize the design of the booking system to match my website’s branding?
Yes, the majority of WordPress booking systems provide customization options that let you match the booking system’s look to the branding of your website.
Colors, typefaces, and style may typically be changed so that the booking system blends in perfectly with the overall appearance of your website. You can also apply your own unique CSS code to some reservation systems for even more intricate customization.
6. Can a WordPress booking system handle multiple services and resources?
Yes, the majority of WordPress booking systems are built to accommodate various resources and services. For instance, you can configure the booking system to let consumers choose their favorite service or class if you offer a variety of services or classes.
Additionally, you can configure the system to manage availability and scheduling for each resource if you have numerous employees or other resources.
7. How do I integrate payment gateways with my WordPress booking system?
The majority of WordPress booking platforms enable connectivity with well-known payment processors like PayPal, Stripe, and Authorize.net.
You normally need to create an account with the gateway provider and set up the plugin settings in order to connect to the gateway in order to integrate a payment gateway. Once everything is set up, consumers may pay for their reservations online, and you can control payments and refunds from within the booking system.
8. Can a WordPress booking system send automated reminders and notifications to customers?
Yes, the majority of WordPress booking systems have tools for notifying clients and giving them automated reminders. This can guarantee that clients are aware of their forthcoming appointments and assist decrease no-shows. Usually, you can adjust the messages’ time and content to meet your company’s demands.
9. How can I manage bookings and reservations using a WordPress booking system?
You will normally need to log in to the plugin’s dashboard in order to manage reservations and bookings utilizing a WordPress booking system. You may monitor and manage upcoming reservations from here, as well as accept or reject reservations and manage customer information.
Additionally, you can alter your availability and booking conditions, set aside specific dates and times when you won’t be available, and manually add or change bookings if necessary. You may export booking data for accounting and reporting purposes from many booking systems as well.
10. Is it possible to generate reports and analytics using a WordPress booking system?
Yes, a lot of WordPress booking systems come with built-in analytics and reporting tools. Typically, you can check analytics on website traffic, booking conversion rates, and more. You can also generate reports on reservations, sales, and customer information.
To enhance these metrics further, adopting a conversion driven design approach ensures your website turns more visitors into customers by prioritizing user experience and clear calls-to-action.
You may use this data to monitor your company’s performance, spot trends, and make data-driven decisions that will help your company expand. For more sophisticated monitoring and tracking, some booking systems also link with third-party reporting tools like Google monitoring.
Ending thoughts on creating a WordPress booking system
The importance of having a good WordPress booking system in place for your WordPress site has never been greater. It allows you to manage appointments and organize them easier and will open up hours of your time for more important things. With Amelia, our number one choice, you can create highly functional and easy-to-use booking forms that will make your customers very happy.
We are a bit biased, but we’re recommending you use Amelia. It is by far the best WordPress appointment booking plugin you can use.
If you enjoyed reading this article about how to create a WordPress booking system, you should check out this one about booking plugin examples.
We also wrote about a few related subjects like alternatives to the Acuity scheduling WordPress plugin, alternatives to Easy Appointments, lawyer WordPress themes, barbershop websites, WordPress calendar plugins, event WordPress theme options, and blog name generator tools.
