Limited time discount Book Smarter This Christmas
Up to 50%Off

How do I create appointments from the back end in Amelia

Administrators, Amelia Managers, and employees with back end access can create new appointments directly from the Bookings page. This is useful when handling phone bookings, walk-ins, or scheduling on behalf of customers. The booking interface follows the same availability rules as the front end, unless specific administrator permissions override them.

Where do I create a back end appointment?

Open Amelia → Bookings and stay on the Appointments tab. Click the + Book appointment button in the top right corner to open the appointment creation screen. You will land on the Details tab, where you select the service, employee, date, and time.

A Customers tab is also available, since at least one customer must be added before saving the appointment.

How do I select a service and employee?

The category dropdown at the top is optional and serves as a filter for narrowing down services. The service dropdown is required. If you pick a service first, the category is automatically selected above it.

The employee field is also required. If you pick an employee first, the service dropdown filters to only those services assigned to that employee.

Date and time remain disabled until both the service and employee fields are selected. Once selected, the date and time pickers display availability based on employee working hours, special days, and days off, matching what customers see on the front end.

Appointment creation screen with service and employee selection

How does administrator booking behavior differ?

Administrators have additional flexibility based on settings in Admin permissions. If Allow admin to book appointment at any time is enabled, administrators can select any time slot from midnight to midnight regardless of employee availability.

If Allow admin to book over an existing appointment is enabled, administrators can book over booked time slots, creating overbooked appointments.

These options should be used with caution.

Admin appointment creation screen showing an overlapping appointment being booked

How do location settings affect appointment creation?

If you have at least one location created, the location dropdown becomes mandatory when booking appointments. Location filters availability based on the selected employee’s working hours and special days for that location.

Changing the location may change available appointment times depending on the employee’s schedule.

What do the notify customer and internal note options do?

Notify the customer(s) is enabled by default and sends all enabled appointment notifications to the customer and employee when the appointment is created. You can disable it for silent updates when needed.

The internal note field allows you to store private comments about the appointment. Internal notes are visible only in the back end and do not appear in notifications or the customer panel.

How do I add customers to a new appointment?

Click Book in the Details tab to switch to the Customers tab or manually switch to it. At least one customer must be added before the appointment can be saved. You can also add multiple customers if the service supports group bookings.

For each added customer, you can set the appointment status, define the number of people they are bringing, apply an existing coupon created through the Coupons feature, and complete any booking-related custom fields you have configured in Booking custom fields.

Customers tab where customers, people count, coupons, and custom fields can be added
Alert Please note

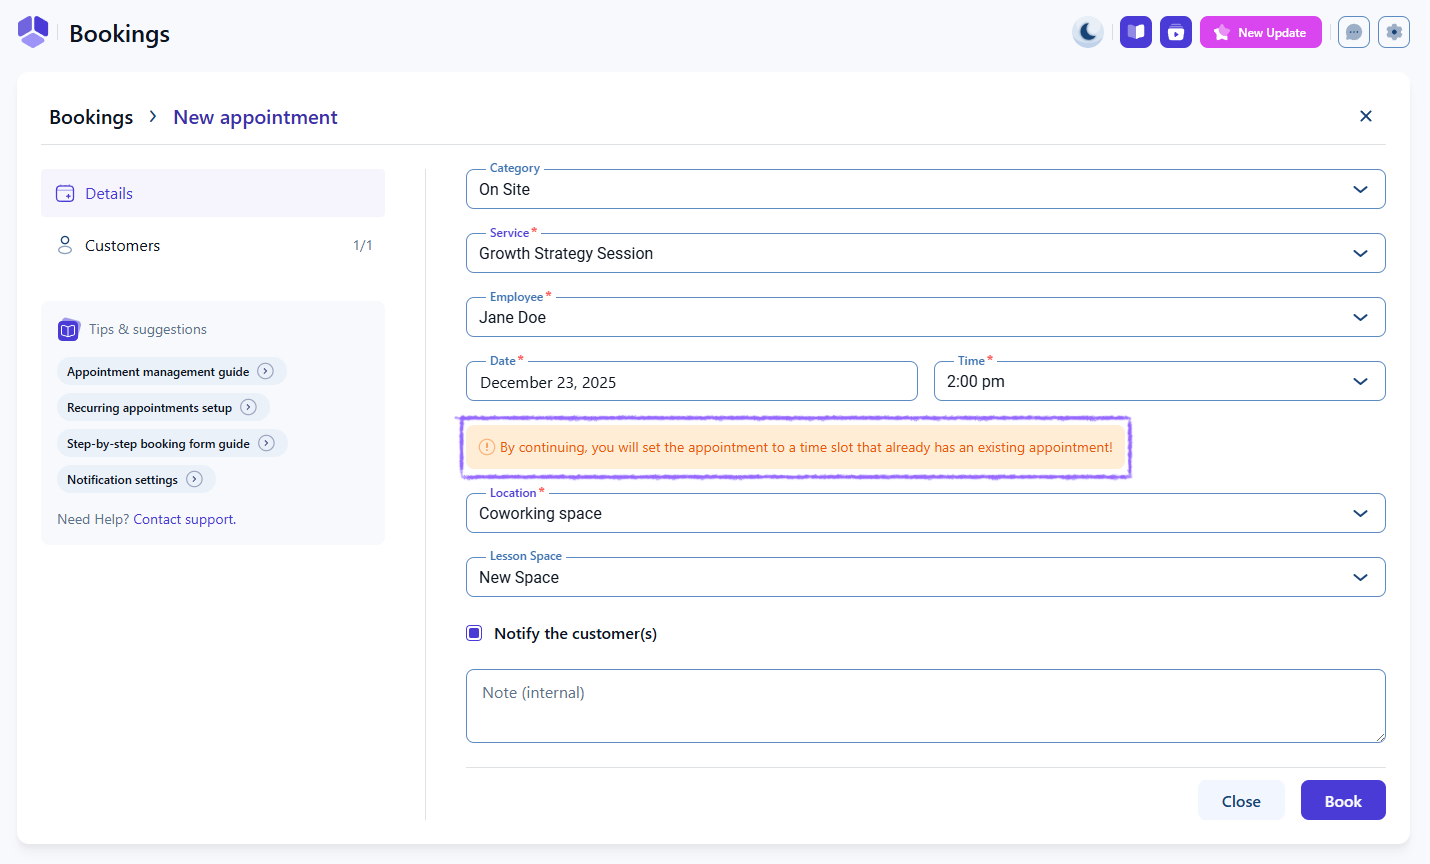
If the Appointments waiting list feature is enabled, you cannot add customers to the waiting list of a full appointment from the back end unless the Allow admin to book over an existing appointment option is enabled in Settings → Roles & permissions → Admin.

Use this option carefully, because it allows administrators to create overbookings and may set multiple customers to Approved instead of placing them on the waiting list.

How do I finalize the appointment?

Once service, employee, time, location, and customer information are added, click Book to create the appointment. The new booking will appear in the Appointments list in Amelia → Bookings.

You can edit it at any time by clicking the appointment card → Edit appointment or through the three-dots menu on the right side → Edit.

What should I keep in mind when creating appointments from the back end?

  • Service and employee selection determines available dates and times.
  • Administrators may bypass availability and capacity rules if given permission.
  • Locations are required when multiple locations exist.
  • Notifications can be sent automatically or disabled when needed.
  • At least one customer must be added to complete the booking.
  • Coupons and booking custom fields can be applied directly during booking.
  • Appointments can always be edited afterward from the Bookings page.