Meetings largely impact productivity. Consulting together encourages good communication and problem-solving. However, it can be difficult and stressful to schedule meetings, especially when a meeting has a large number of people, is called at the last minute, or includes people from different locations. It can also be burdensome to find the best time to meet as well as collect and distribute the materials needed. Microsoft Outlook can streamline this process, making scheduling meetings uncomplicated and stress-free.
This article created by our team at Amelia will guide you through the process of how to schedule a meeting in Outlook.
How to Schedule a Meeting in Outlook
Scheduling a meeting in Outlook allows you to invite more than one person at a time and track whether your meeting invitation has been accepted or declined. It reserves the allotted meeting time on your calendar. You can also set a location and add attachments to a meeting invitation. This feature works in the 2010, 2013, and 2016 versions of Microsoft Outlook.
Steps of how to schedule a meeting in Outlook:
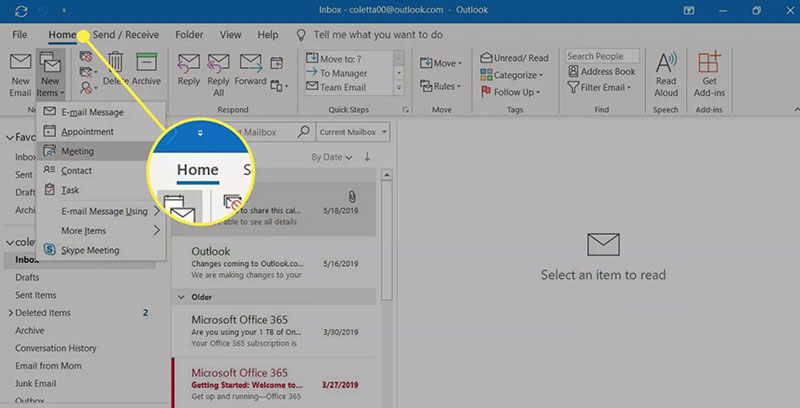
- Go to your Outlook calendar. While viewing the calendar, click on the Home tab on the calendar ribbon.
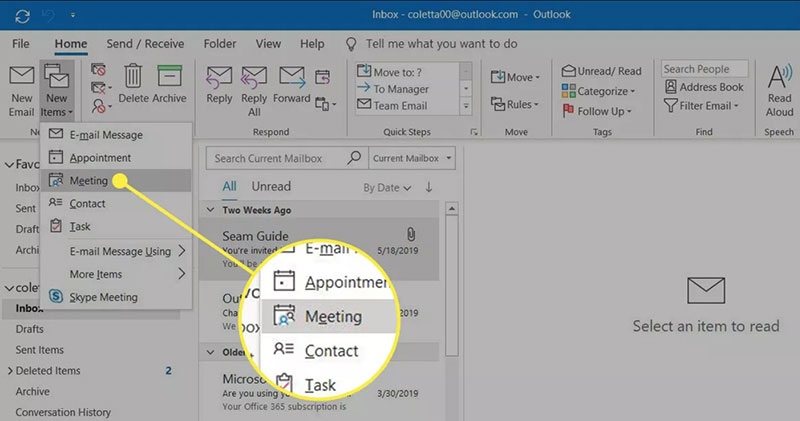
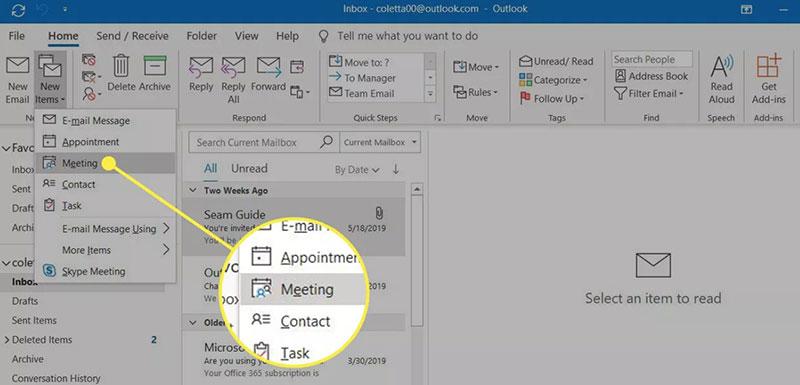
- Click on New Meeting. A meeting scheduling window will appear.
- Enter the invitees’ email addresses under the To field
- Next, enter a meeting title or subject under the Subject field

- Then, go to the Location If you have the server Exchange associated with your Outlook account, you can use a feature called Room Finder to set a location. Under the meeting tab, click on Room Finder. The Room Finder feature displays the meeting rooms available in your office. It will display when they are in use and for what time.
- Set the meeting date and the start time using the drop-down menu.
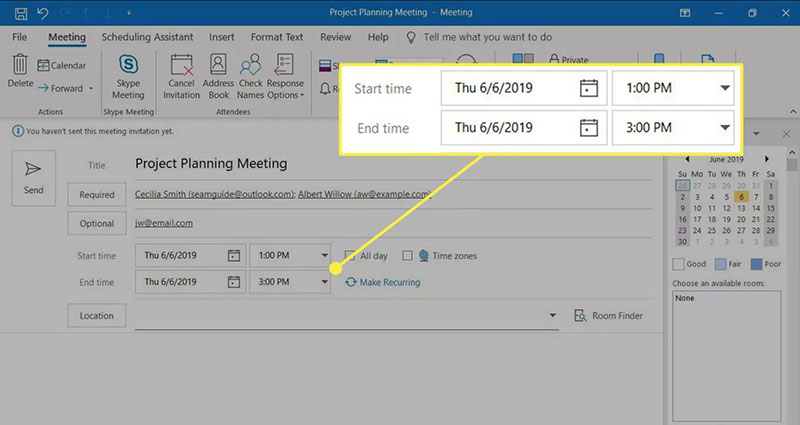
- Set the end time of the meeting.
- Next, you can add a message, more information, or include materials for the meeting in the text body.

- Click Send and you will have sent your meeting invitation.
Your meeting will now appear on your calendar and in the calendar of your invitees. They will be able to accept or decline the meeting invitation or suggest an alternative meeting time.
How to Schedule a Meeting in Outlook Using Scheduling Assistant
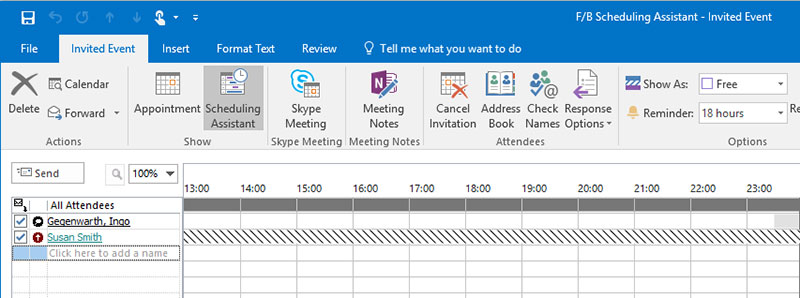
The Scheduling Assistant allows you to view your contact’s schedules, so you can schedule the meeting at the most convenient time. Using this tool assists in finding a meeting time that is compatible with each invitees’ schedule. Everybody’s calendar must be kept up-to-date for the best results.
Steps on how to schedule a meeting in Outlook with The Scheduling Assistant:
- Click on New Meeting.
- In the meeting window, click on Scheduling Assistant.
- Click on the box that appears under your name and type in the email or the name of an attendee. Or, you can click on Add Attendees which will show your address book.
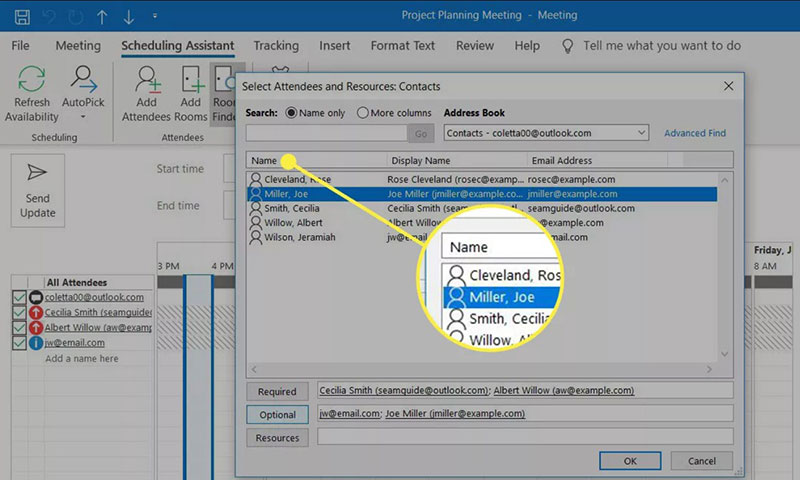
- When you start typing the name, Outlook will provide suggestions based on people you have emailed recently. Select the person’s name to add it to the list.
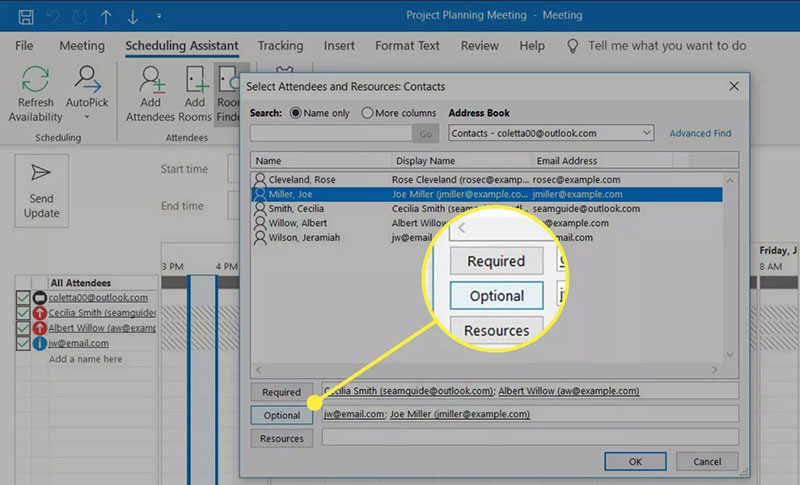
- There is an option to mark if a person is a required or optional attendee. Click on the icon next to the person’s name. Then you can choose either the required or optional option. You can also add and mark the resources that will be used in the meeting. Another way to do this is from your address book. Click on Add Attendees to have access to your address book. Then you can add the attendees’ names to the Required and Optional You can also add items to the Resource box, like a flip chart.
- Set the date along with the start and end times by using the drop-down menus.
- Add a location. In Outlook 2016 and Outlook for Office 365, you can type the name of a location and Outlook will display suggestions. Click on the suggestion to choose that location or continue typing to find a different location.
- You can also include in what room your meeting will take place by clicking on Add Rooms.
- Outlook can find the first available meeting time according to the invitees’ schedules. Under the Options tab, click on Auto-pick. Outlook can find a time that works for everyone on the list or only the required attendees.
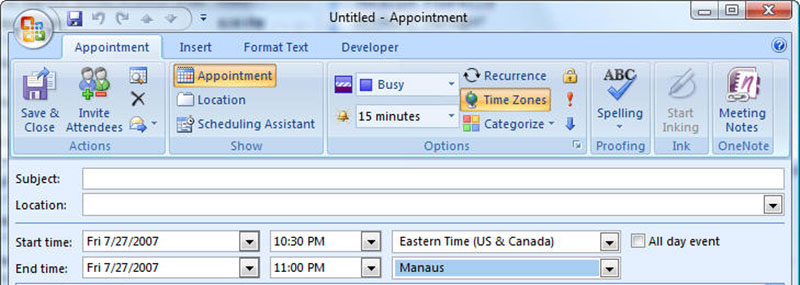
- Next, click on Appointment which appears above Scheduling Assistant. Here, you can write a description of the meeting in the text body area. You can use different fonts, bullet points etc. to customize the text.
- Click Send.
Other Options When Scheduling a Meeting in Outlook

Outlook provides an option to send materials for the meeting to your invitees. You can attach files to your meeting invitation to send them to everyone simultaneously.
Steps on how to schedule a meeting in Outlook with an attached file:
- After creating a new meeting by following the above steps, click on the Insert tab on the meeting ribbon.
- Next, select Attach File.
- Choose the file you want to add, and done!
What if you already scheduled a meeting but want to invite more people? Here is how to add a person to an already scheduled meeting:
If you are the owner of the meeting, follow these steps:
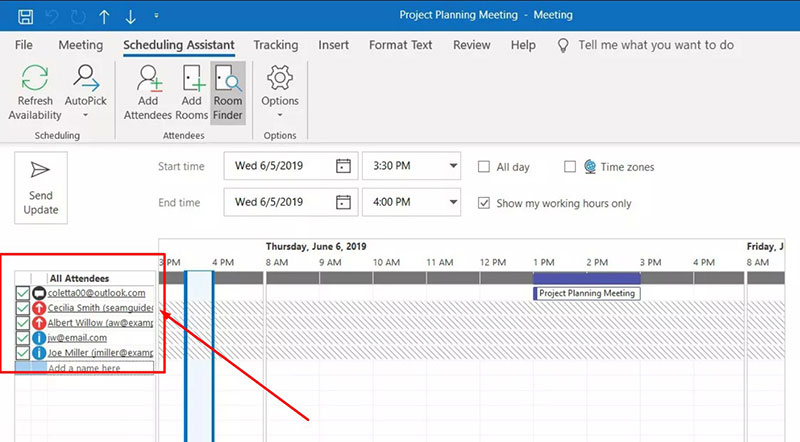
- Double-click on the meeting to open it.
- Add the email addresses of those you want to include in the meeting in the To field or in Scheduling Assistant.
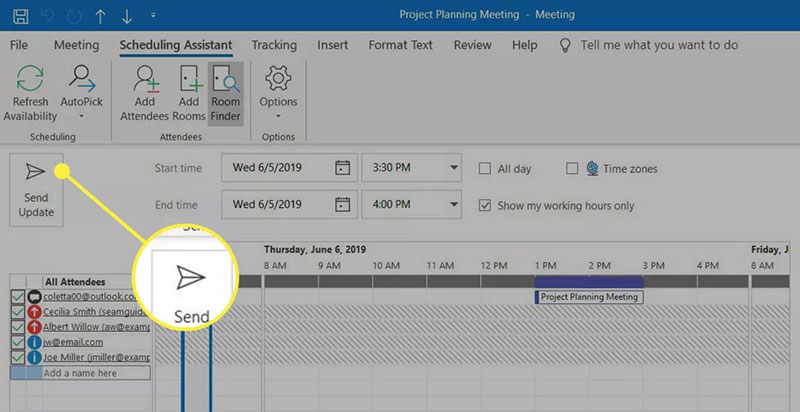
- Click Send.
- When you exit out of the meeting window, you will be able to send the updates to all attendees or only the added attendees.
If you are not the owner of the meeting, follow these steps:
- Open the meeting request.
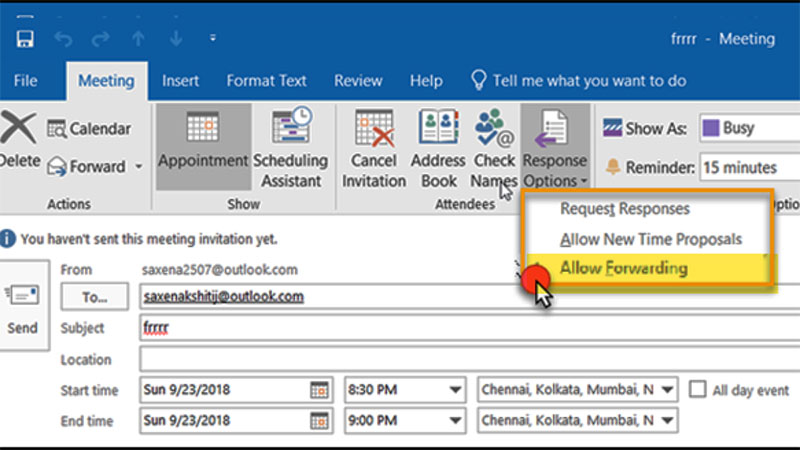
- On the settings ribbon, click on Respond.
- Then, press Forward.
- Enter an email address to add another recipient of the meeting request.
- Click Send.
The meeting owner will receive a notification that you have forwarded the request to someone else.
How to Schedule a Meeting in Outlook that is Recurring
Recurring meetings are very useful to keep projects up-to-date and encourage communication. Recurring meetings can be the key to finding quick resolutions to any problem that may arise on a project.
How to schedule a meeting in Outlook that is recurring with Office 365 calendar:
- Click New in your calendar.
- Fill out the details of the meeting (invitees, location, title, etc).
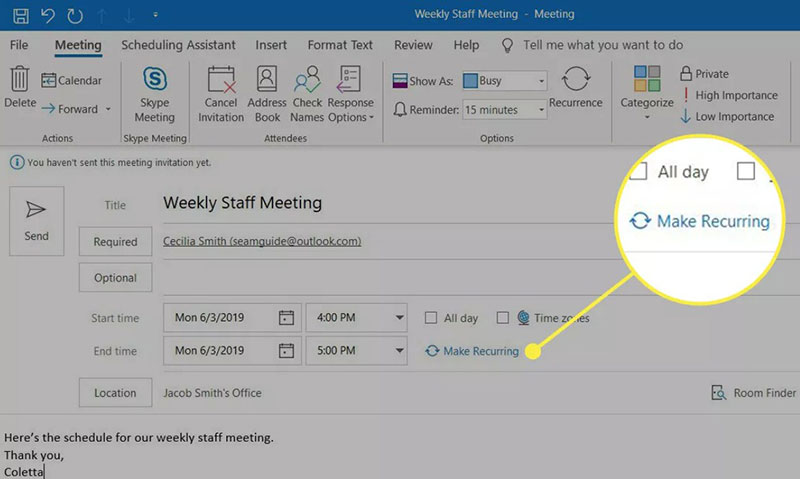
- Make it recurring with a preset option by selecting Repeat and then choose the recurring frequency from the drop-down menu.
- Or, to manually set a recurring time, use the Options button.
A word of caution when scheduling a meeting with Office 365:
If you schedule a recurring meeting in a specific room and someone else also schedules a meeting in the same room, Office 365 will not notify you of the time conflict.
How to schedule a meeting in Outlook that is recurring with the Outlook Calendar app:
- Start by creating a New Event.
- Click on the Repeat option.
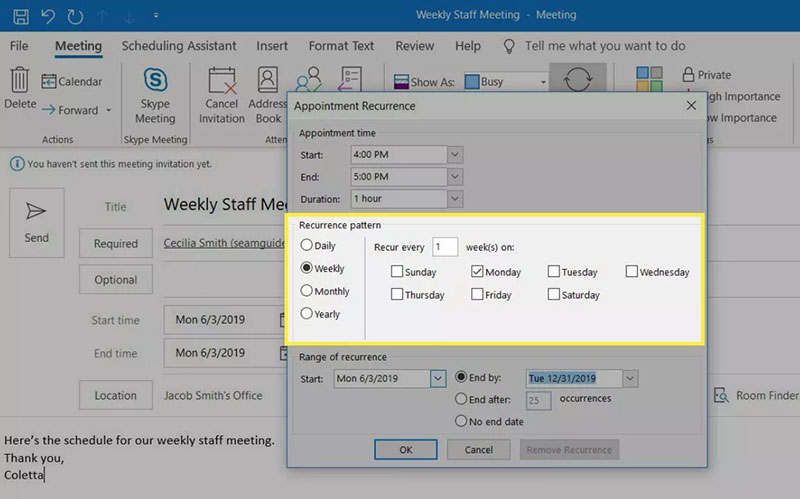
- Choose the frequency for daily, weekly, monthly, or yearly.
More Meeting Scheduling Features
Outlook provides some other features to make scheduling easier. Here are a few that will help you keep track of your meetings:
Color Coding Feature

Outlook uses a color-coding feature to help you keep track of your schedule. Since schedules nowadays are usually full, it is difficult to decipher where to be and when. With this tool, you can mark meetings as high or low importance and you can mark it as private, personal, or confidential.
Tracking Feature
![]()
The tracking feature helps you make sure no one is missing your meeting. After inviting your guests, the tracking feature allows you to see who has responded to your meeting request. To use this feature, select a meeting and then press on the tracking icon. A list of the invitees will appear with each invitee’s response.
Information Displayed on your Calendar
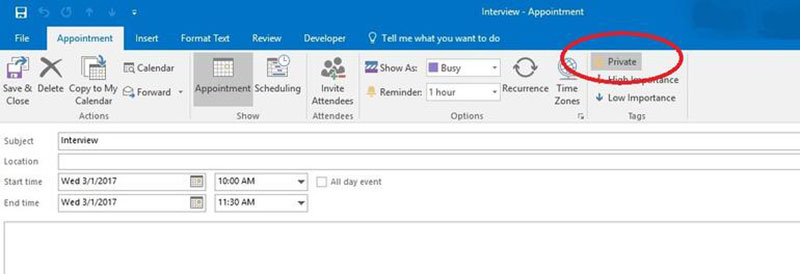
Sharing your calendar with a collaborator is a handy way to schedule meetings. To prevent colleagues from seeing your entire schedule, you can mark some items as private. Right-click on the item you want to keep private, and select Private. Colleagues will be able to see that you are busy at that time but will not be able to see what your plans are.
FAQs about how to schedule a meeting in Outlook
1. How do I schedule a meeting in Outlook?
Open your calendar in Outlook and select “New Meeting” from the ribbon at the top of the screen to set up a meeting. By doing so, a new meeting request window will open, allowing you to enter information about the meeting’s time, place, location, and participants.
2. Can I schedule a meeting for multiple dates and times?
In Outlook, yes, you may set a meeting for several times and days. To achieve this, choose the frequency, days, and times for the recurring meetings by clicking the “Recurrence” button in the meeting request window.
3. How do I invite people to a meeting in Outlook?
In the meeting request box of Outlook, enter the email addresses of the attendees in the “To” field to send invitations to them. By selecting the “Scheduling Assistant” option, which displays the participants’ availability for the suggested meeting time, you can easily add attendees.
4. Can I set up reminders for my scheduled meetings?
Indeed, Outlook allows you to set up reminders for your booked meetings. To do this, open the meeting request box and click the “Settings” tab. Then, select the desired reminder time and mode (email or pop-up notification, for example).
5. How do I cancel a meeting in Outlook?
Open the meeting request in Outlook and select “Cancel Meeting” from the ribbon at the top of the screen to discontinue the meeting. By doing this, you will cancel the meeting and remove it from your calendar, notifying everyone who was scheduled to attend.
6. Can I view my meeting schedule in a calendar format?
Indeed, Outlook allows you to view your meeting schedule in calendar style. To see your calendar, which will show your meetings and appointments, simply click the “Calendar” button in the navigation pane on the left side of the page.
7. How do I check if someone has accepted or declined my meeting invitation?
Open the meeting request in Outlook and click the “Tracking” icon in the ribbon at the top of the screen to see if anyone has accepted or denied your invitation to the meeting. This will display a list of every participant along with their level of response.
8. How do I reschedule a meeting in Outlook?
Open the meeting request in Outlook and click the “Reschedule” button in the ribbon at the top of the screen to reschedule the meeting. By doing so, you’ll be able to update everyone attending and edit the meeting’s date, time, and other specifics.
9. Can I add attachments to a meeting invitation in Outlook?
Yes, you can include attachments in an Outlook meeting invitation. To do this, click the “Attach File” button on the meeting request window and pick the file from your computer or cloud storage that you wish to attach.
10. How do I add a conference call or video link to a meeting in Outlook?
In the meeting request window, click the “Online Meeting” button, then pick your preferred choice, such as Teams or Skype, to add a conference call or video link to the meeting. This creates a URL for the meeting and adds it to the invitation automatically.
Ending thoughts on how to schedule a meeting in Outlook
Scheduling meetings can be difficult and communicating back and forth with several people can be time-consuming and confusing.
Learning how to schedule a meeting in Outlook can make this chore effortless. Scheduling a meeting in Outlook is useful for inviting several people in an organized manner. Another way to schedule meetings with ease is by using Amelia.
Amelia is an appointment and event scheduling system. This plugin can be added to any WordPress site to manage all appointments.
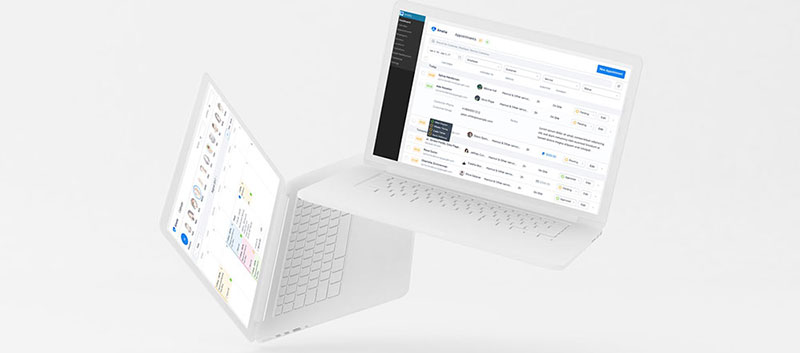
Amelia automates the scheduling process to lower costs and eliminates human errors. The backend and front end have a simple interface with a responsive design to be used on any device. With this tool, you can make scheduling meetings a chore of the past.
If you enjoyed reading this article on how to schedule a meeting in Outlook, you should check out this one on how to schedule a Skype meeting.
We also wrote about a few related subjects like meeting checklist, meeting reminder, text message reminder, the best online appointment scheduling apps, and appointment confirmation email.

