Due to the current pandemic, we have seen a marked increase in the number of employees working from home. This has prompted a rise in communication issues.
Skype for Business, formerly Lync, is a messaging and video-conference software for enterprises. It allows you to host a meeting with up to 250 participants, without the recipients needing to use the program. It brings audio, video, and chat together in one place.
Still, a meeting will not host itself. You need to know how to use the app correctly to schedule a Skype meeting.
Learn below more about this topic in this article created by our team at Amelia, the appointment booking solution for successful businesses.
How To Schedule A Skype Meeting
Setting Up a Skype Meeting Using Outlook
To set up a meeting you first need to obtain the Skype for Business log-in and password.
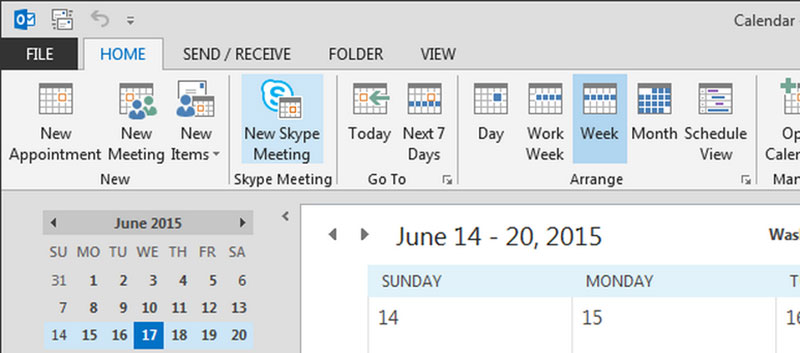
Go to Outlook and open the calendar.
On the Ribbon go to the Home tab, and in the Skype Meeting section select New Skype Meeting.
Next, type in the email addresses of all participants you wish to invite (remember to separate each email address with a semicolon).
Type in the meeting name in the Subject box.
Participants can join the meeting in person. Under the Meeting tab, go to Options, click on Room Finder to find an available room, or type a meeting location in the Location box.
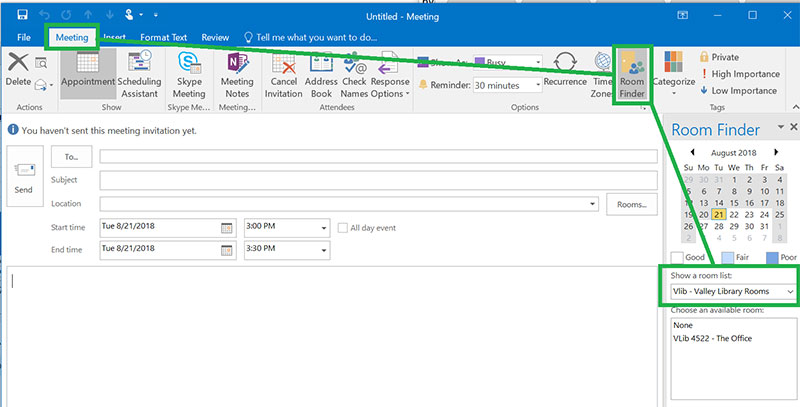
Choose the start and end time for the meeting.
You can use the Scheduling Assistant (located in the Show section on the Meeting tab) to find the best time that suits all participants.
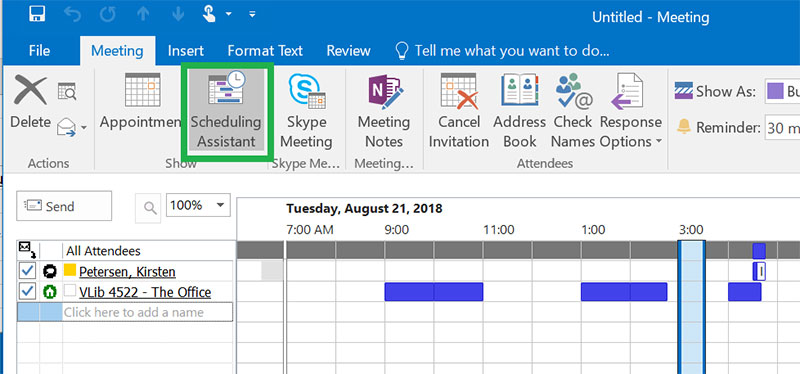
Input the meeting agenda in the meeting area. Ensure none of the Skype meeting information is altered.
If you have access to a Business or Enterprise subscription for Office 365, you can schedule an online meeting using the Outlook Web app. This gives you a Join Online meeting link and Find a Local number link for dial-in conferencing.
Setting Up a Large Skype Meeting
The instructions detailed above for setting up a Skype meeting use the default options. This works well for small meetings including members of the same company.
To schedule a large video conference with participants outside your enterprise you need to change some meeting options. Let us walk you through the process.
Execute a scheduling process
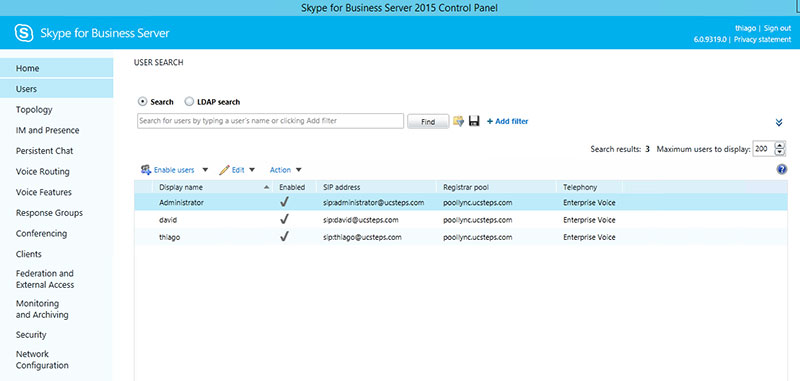
A Skype for Business Server pool that is dedicated to hosting large meetings can support one meeting of up to 1000 participants at the same time. An out-of-band scheduling process is vital for preventing schedule conflicts and ensuring support from the front-end servers. For that purpose, if available, you can use your company’s support team’s ticketing system.
Follow the steps presented below to set up a large Skype for Business meeting.
The time, duration, size of the meeting, and the number and names of presenters are decided on by the meeting organizer or delegate. If the number of participants is higher than 250 or to provide a better user experience for a conference of under 250 participants, the organizer or delegate needs to submit a large meeting request.
The scheduling staff checks the large-meeting calendar to confirm that the desired date and time is available then approves the meeting request.
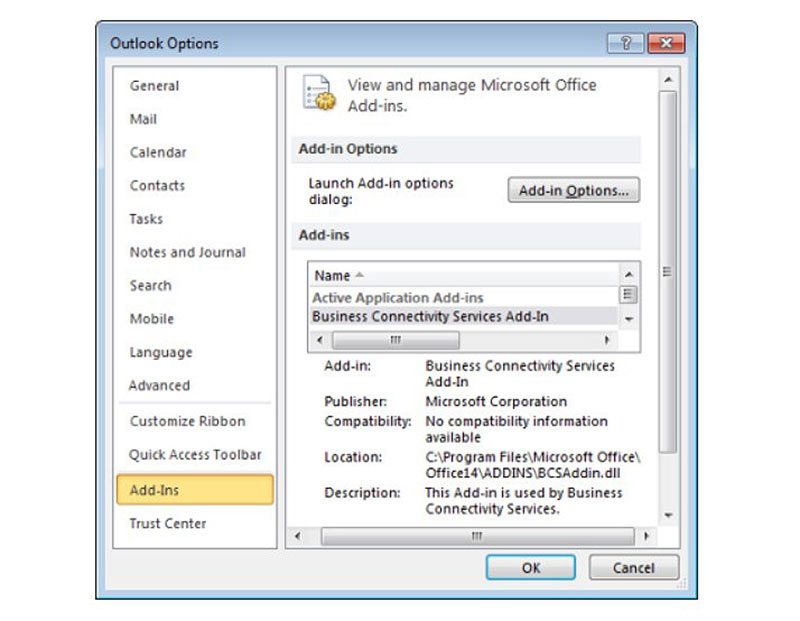
Next, the scheduling staff uses the credentials on the dedicated pool to set up a meeting using Online Meeting Add-in for Skype for Business with Outlook. The person requesting the meeting receives the approval notice which includes the URL needed to join the meeting.
Next, the meeting organizer or delegate can schedule the conference using Outlook and will include the provided URL in the meeting invitation before sending it to the invitees.
Defining needed scheduling configurations
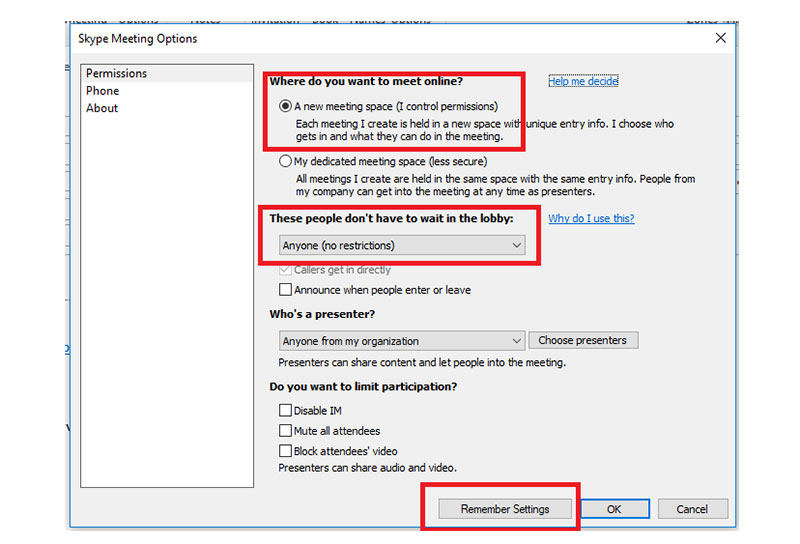
There are some things you need to set once the large meeting support staff schedules the requested meeting on the large meeting pool.
It is important to make sure you adjust the access levels and other meeting settings according to your needs. Below are some tips and settings you will find useful.
Do not use the dedicated meeting space for multiple meetings. Always set up a new one.
Configure the meeting access levels appropriately.
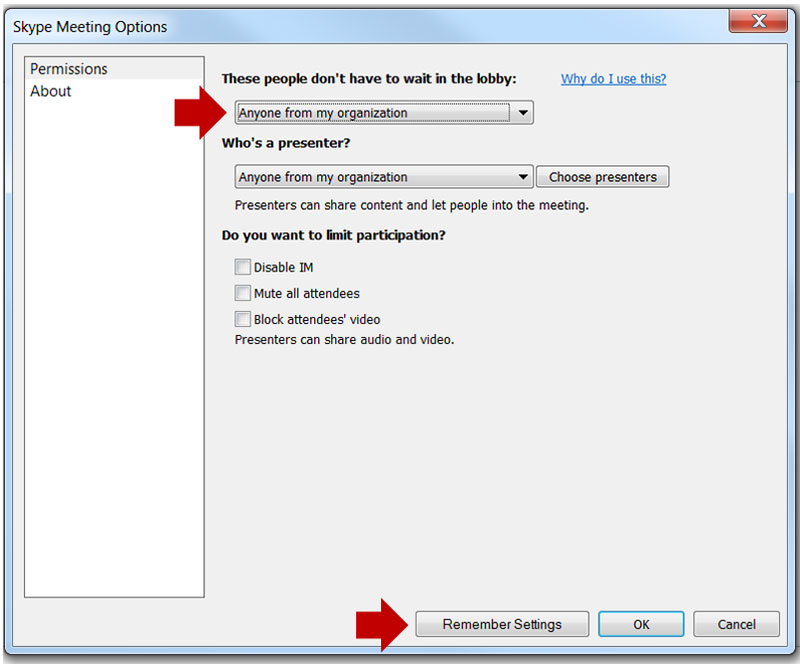
If there are any people from outside the company joining the meeting, set the meeting access type to “Anyone (no restrictions)”. This way you will not have to deal with attendees still in the waiting room when the meeting has already started.
If all attendees are company members, set the access type to “Anyone from my organization”.
We advise you not to choose the “People I invite from the company” option. If you do you will have to add all individual email addresses to the invitee list.
Do not select the “Only me, the meeting organizer” option. This access type means that all participants, including presenters, have to be in the waiting room when the meeting is in progress. In that case, the person running the conference needs to watch the waiting room roster at all times to admit new attendees.
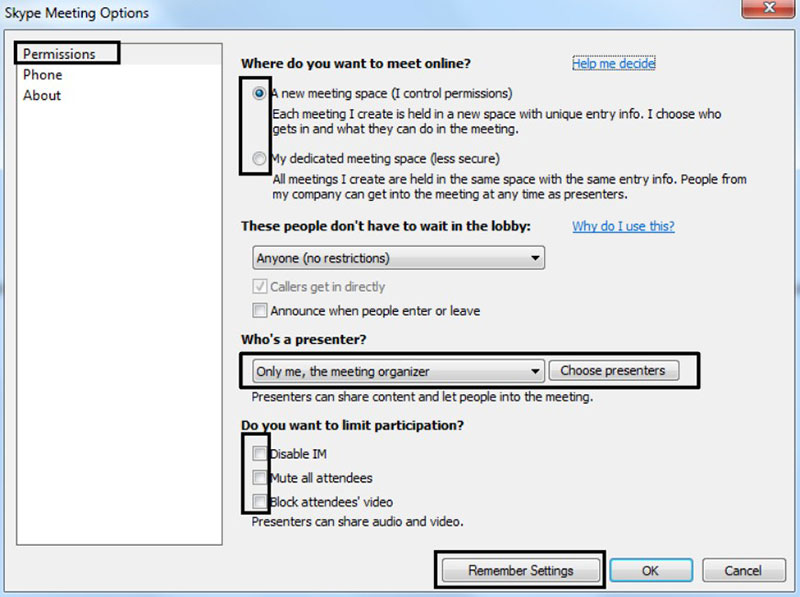
We suggest you check the “Callers get in directly” box to permit the automatic admission of the attendees dialing-in from their phones.
Remember to include the meeting organizer or delegate as well as all the presenters on the meeting invitation list you receive from the meeting requester.
Do not use the auto-promote option in the presenter setting. Introducing the presenters directly will help you to keep the number of presenters low and manageable. Most of the people in the meeting should have attendee status. This will reduce the risk of any unexpected disruptions such as an unauthorized person deleting the PowerPoint presentation or muting or unmuting other participants.
To further prevent any undesired situations, check the “Mute all attendees” and “Block the attendees’ video” boxes to ensure that only the presenters are permitted to transmit audio and video during the meeting.
Creating a Large Meeting Policy
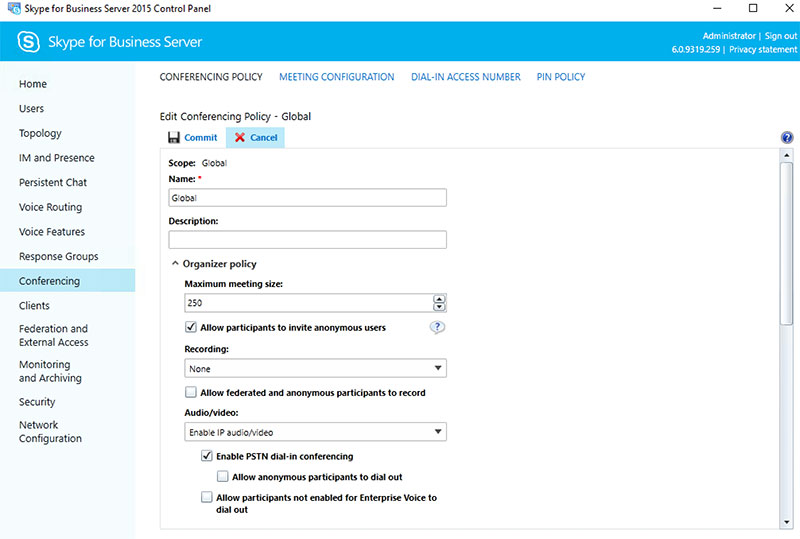
It is important to create a new conferencing policy and ensure all participants assigned to the large meeting pool have access to it.
Use the configurations below to set up the policy:
- Change the MaxMeetingSize from the default 250 to 1000.
- Set the AllowLargeMeetings parameter to True.
- Set the EnableAppDesktopSharing parameter to None.
- Set the AllowUsersToScheduleMeetingsWithAppSharing parameter to False.
- Set the AllowedSharedNotes parameter to False.
- Set the AllowAnnotations parameter to False.
- Set the DisablePowerPointAnnotations parameter to True.
- Set the AllowMultiview parameter to False.
- Set the EnableMultiviewJoin parameter to False.
The following are the implications of the AllowLargeMeetings:
- Hides the attendee roster.
- Disables errors in the IM window.
- Disables multi-party video.
- Disables the ability to promote an attendee to a presenter. All presenters must be specified in advance.
- Disables the ability to unmute individual attendees.
- Disables the ability to apply the Lock Video Spotlight feature to attendees.
- Since there is no Personal Virtual Assistant responsible for Touch Tone commands for active large meetings, telephone dial-in attendees will not be able to unmute themselves using the 6 dial button. If the meeting organizer turns on the “MuteAll” option when setting up the meeting, PSTN participants will remain muted throughout the whole duration of the meeting.
Attending Skype for Business Meetings using Mobile Devices

You don’t have to be sitting in front of a computer to be able to join Skype for Business meetings. Those who do not have a desktop or laptop computer available can download and install the app on their mobile device. If they also have MS Exchange or Office365 installed on their device, they will also be able to use these services co-operatively.
The Skype for Business user interface is similar on all devices (Windows, iOS, and Android).
On devices using Android OS, the home screen shows the upcoming meetings and recent contacts. For the full list of current or next day meetings, click on the Meeting icon located at the top of the screen. The “Join” button is located on the meeting information screen.
Once you have joined the meeting, you have the ability to interact with other attendees, add more participants, share videos, and see the presenter’s shared screen.
Devices running on Windows enables you to see the presenter’s shared screen in high quality. Controls can be either hidden or visible.
On an iOS device, the image quality of the shared screen is the same. However, the controls are positioned in a way that follows the iOS user interface design.
Looking for an Alternative Option?
After its acquisition by Microsoft in 2012 there have been many changes made to Skype including adding new features and removing others. Microsoft has also been integrating Skype into the Office Suite.
If you need a good alternative for scheduling meetings, one of the best is Amelia.
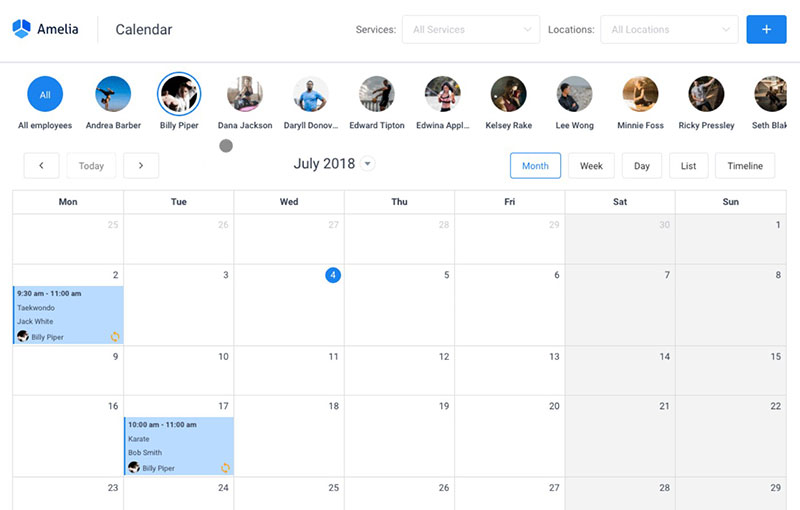
Amelia is an appointment booking plugin for your WordPress website. It boasts enterprise-level front end and back end experience. Despite not being a heavy piece of software, it gives the full range of functions allowing you to manage services, locations, customers, and payments.
All of Amelia’s elements are integrated into one smooth and highly responsive interface.
Moreover, the Amelia plug-in can be personalized to suit different types of businesses. Whether you are a lawyer, own a hair salon or spa, Amelia is a handy, reliable, and fully-featured events & appointments booking calendar.
FAQs about scheduling a Skype meeting
1. How do I schedule a Skype meeting?
Open the Skype app on your computer or mobile device first in order to organize a Skype meeting. Then, click the “Meet Now” option, choose the time and day of the meeting, and then invite attendees by providing their email addresses. To schedule the meeting, click “Create” at the very end.
2. Can I schedule a Skype meeting without a Skype account?
No, a Skype account is required to set up a Skype meeting. You can open a free account on the Skype website if you don’t already have one.
3. How do I invite participants to a scheduled Skype meeting?
Open the meeting in your Skype app and select “Invite Additional People” to send out invitations to participants. After that, input the recipients’ email addresses and click “Send.”
4. Can I schedule a Skype meeting from my mobile device?
The answer is yes. Simply open the Skype program on your phone or tablet and follow the identical procedures as described above to organize a meeting.
5. How do I set up a recurring Skype meeting?
The Skype app’s “Schedule Call” button must be clicked, the first meeting’s date and time must be chosen, and then “Recurring meeting” must be clicked. The meetings’ frequency can then be decided upon, such as daily or weekly.
6. Can I schedule a Skype meeting in advance or do I have to schedule it for the same day?
A Skype meeting can be scheduled in advance or on the spot. When you create the meeting, simply choose the day and hour you want it to start.
7. Can I add or remove participants from a scheduled Skype meeting?
Yes, you can include or exclude people from a Skype meeting by launching the meeting in the Skype app and selecting “Invite Additional People” to include or exclude people from the attendee list.
8. How do I change the date and time of a scheduled Skype meeting?
Open the meeting in your Skype app, select “Edit,” then update the date and time as necessary. To change the time and date of a scheduled Skype meeting, do so. To update the meeting, click “Save” after that.
9. Can I schedule a Skype meeting with people from different time zones?
It is possible to arrange a Skype conference with individuals in various time zones. Just be sure to choose a time and day that accommodates everyone, taking into mind the various time zones.
10. How do I access a scheduled Skype meeting on the day of the meeting?
On the day of the meeting, launch the Skype app and select the “Join” button next to the planned meeting in order to join a Skype meeting. The meeting URL that was supplied to you in the meeting invitation can also be used to attend the meeting.
If you enjoyed reading this article on how to schedule a Skype meeting, you should check out this one on how to schedule a meeting in Outlook.
We also wrote about a few related subjects like meeting checklist, meeting reminder, text message reminder and appointment confirmation email.
