Missing a class because it wasn’t on your calendar is a painful way to learn a lesson.
Knowing how to add a class schedule to Google Calendar saves you from that. It also keeps your course timetable, assignment deadlines, and reminders in one place across every device you own.
This guide covers every method that actually works:
- Adding recurring class events manually
- Importing a .ics file from your university portal
- Syncing directly from Canvas, Blackboard, or Moodle
- Setting up notifications so reminders show up on time
By the end, your full semester schedule will be set up, color-coded, and working on mobile.
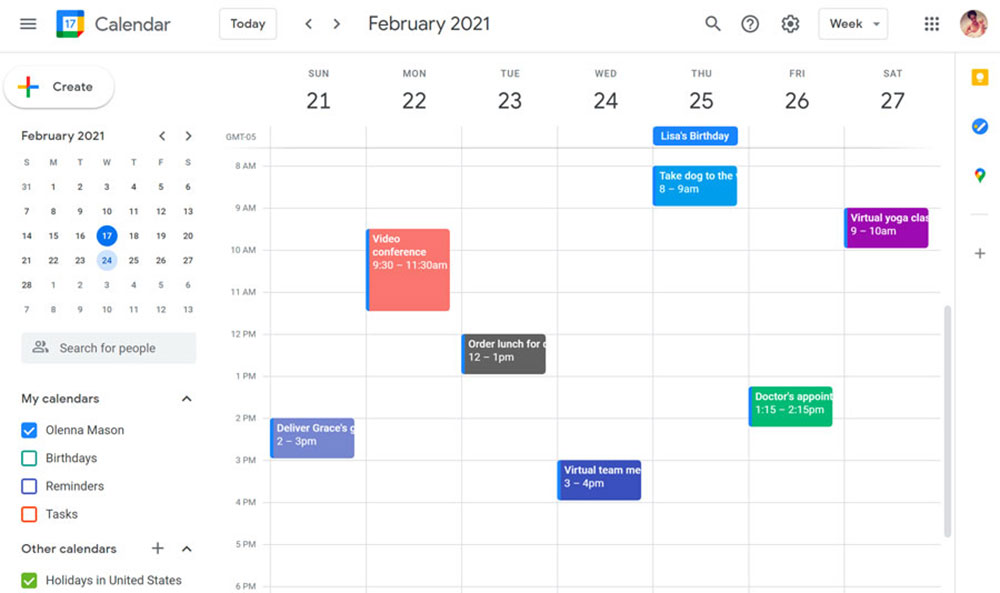
What a Class Schedule in Google Calendar Looks Like
Before touching a single setting, it helps to know what you’re actually building. Google Calendar doesn’t have a dedicated “class schedule” mode. What you end up with is a set of recurring events, color-coded by subject, laid out across a weekly view.
That’s it. Simple, but effective once it’s set up properly.
Google Calendar has over 500 million monthly active users and handles roughly 50 billion events per day (ZipDo, 2021). A huge chunk of that is students managing academic schedules.
Here’s what a finished class schedule typically looks like inside Google Calendar:
- Each course appears as a recurring weekly event (e.g., “BIOL 201 – Lecture” every Tuesday and Thursday)
- Courses are color-coded so Monday’s schedule doesn’t blur into Friday’s
- The weekly view shows your full course timetable at a glance
- Imported schedules from platforms like Canvas or Blackboard show up as a separate calendar layer
One thing worth knowing upfront: there’s a real difference between events you create manually and a subscribed calendar feed. Manually created events are fully editable. A subscribed calendar feed updates automatically but can’t be edited inside Google Calendar.
Knowing which one you want before you start saves a lot of backtracking later.
Adding Classes Manually One by One
This is the most work, but also the most flexible. If your school doesn’t offer an export option, or you only have a handful of courses, doing it manually gives you full control over every detail. It’s also the only viable approach if you’re enrolled in online courses for college credit through a provider outside your main institution, since those courses won’t appear in your university portal’s schedule export.
87% of students say better organization would help them get better grades, and 88% want to improve their time management skills (Reclaim, 2024). Setting up a clean, color-coded weekly class schedule is one of the most practical first steps.
Setting Up Recurring Class Events
Recurrence is everything here. A class that meets every Tuesday and Thursday for 16 weeks shouldn’t be created 32 times. Set it once with the right repeat settings.
Steps to create a recurring class event:
- Open Google Calendar and click on the time slot when your class starts
- Click “More options” to open the full event editor
- Set the title (course name and section number works well)
- Under the date, click “Does not repeat” and change it to “Custom”
- Select the specific days (e.g., Tuesday, Thursday) and set an end date matching your semester’s last day
Set the end date to your semester’s actual last class, not the exam date. You can always add exams as separate events.
Adding Class Details (Location, Notes, Reminders)
Location field: building name and room number. Google Calendar links it to Google Maps, which is actually useful the first week of a new semester.
Description field: professor’s name, office hours, and course code. Anything you’d otherwise search for at the wrong moment.
For reminders, 10 minutes before is the default. For classes, 30 minutes works better. It gives you time to actually get there.
Assign each course a unique color label before saving. Six courses with six different colors makes the weekly view readable in about two seconds flat. Without color-coding, it’s just a wall of blue blocks.
Importing a Class Schedule with a .ics File
If your university student portal, Banner, or Workday account offers a schedule export, this is the fastest method. One file, one import, done in under two minutes.
The .ics file format (iCalendar standard) is supported by Google Calendar, Apple Calendar, Outlook, and most other calendar apps. It’s been the universal calendar exchange format since 1998, so compatibility isn’t a concern.
Exporting Your Schedule from Your School Portal
Where to find the export option depends on your school’s system:
- Banner (Ellucian): Student tab > Registration > Student Detail Schedule > look for a calendar/export icon
- Workday: Academics worklet > Course Schedule > export or subscribe option
- Degree Works: varies by institution; check the schedule view for a download icon
- Generic university portals: look for “Export,” “Download,” or “Add to Calendar” near your registered courses
The downloaded file will end in .ics. Save it somewhere you can find it in the next step.
Importing the .ics File into Google Calendar
This only works on desktop. The Google Calendar mobile app doesn’t support .ics imports, so open a browser on your computer.
Steps:
- Go to calendar.google.com
- Click the gear icon (top right) and select “Settings”
- In the left sidebar, click “Import & export”
- Click “Select file from your computer” and choose your .ics file
- Choose which of your calendars the events should be added to
- Click “Import”
Your class events will appear immediately across your calendar views. They’re now fully editable, since this is an import, not a live subscription.
One real limitation: if your school updates the schedule after you import (room change, time change), your Google Calendar won’t update automatically. You’d need to re-import or edit events manually. For a live sync, the subscription method below handles that better.
Syncing Your Class Schedule via Google Calendar Subscription Link
This is the smarter setup for anyone who wants their calendar to stay current without doing anything manually. Instead of downloading and importing a file, you add a URL that Google Calendar checks for updates.
Key difference from .ics import:
| Method | Syncs Automatically | Editable in Google Calendar | Works on Mobile |
|---|---|---|---|
| .ics Import | No | Yes | No (setup) |
| Subscription URL | Yes | No | Yes (after setup) |
If your school’s portal or student information system offers a “subscribe” or “calendar feed” link, that’s what you want for this method.
Finding Your Subscription URL
Most schools that support this feature place the link in the same area as the .ics export. Look for language like “Subscribe,” “Add to Calendar,” or “Calendar Feed URL.”
The URL usually starts with webcal:// or https://. Copy the full link exactly as shown.
Adding the Subscription in Google Calendar
- Open Google Calendar on desktop
- On the left sidebar, find “Other calendars” and click the + icon
- Select “From URL”
- Paste your school’s calendar feed URL
- Click “Add calendar”
The subscribed calendar will appear under “Other calendars” with its own toggle. You can rename it and change its color inside Settings.
Google checks subscribed calendars for updates roughly every 24 hours. So if a room change happens today, expect your calendar to reflect it by tomorrow. Not instant, but close enough for most schedule changes.
Adding Classes from Canvas, Blackboard, or Other LMS Platforms
Canvas leads the US LMS market with nearly double the institutional share of its nearest competitor (edutechnica, Spring 2023). If you’re in higher education, there’s a solid chance your courses live in Canvas. Blackboard is still widely used, and Moodle holds ground at many international universities.
All three support Google Calendar integration, though the steps differ slightly.
Canvas to Google Calendar
Canvas lets you export your calendar as a feed URL that syncs with Google Calendar. Here’s how:
- Log into Canvas and go to the Calendar section (left sidebar)
- Scroll to the bottom of the calendar page and find “Calendar Feed”
- Click it to reveal your unique calendar feed URL
- Copy the URL
- In Google Calendar, go to “Other calendars” > “From URL” and paste it in
This feed pulls in course events, assignment due dates, and any calendar items your instructors have added. Worth noting: Canvas’s calendar feed includes assignment deadlines alongside class times, which makes it more useful than a plain class schedule import.
Blackboard to Google Calendar
Blackboard uses a similar subscription approach. According to Blackboard’s own help documentation, the process works like this:
- In Blackboard, go to the Calendar tool
- Open Calendar Settings
- Find the “Share Calendar” option to get your feed URL
- Add that URL to Google Calendar under “Other calendars” > “From URL”
Blackboard also supports .ics file uploads in the opposite direction (adding external calendars into Blackboard), but for most students, getting Blackboard data into Google Calendar is the more useful direction.
Moodle’s calendar export is found under the Calendar block > Export Calendar option. You can export all events or filter by course, then import or subscribe using the same Google Calendar steps above.
Setting Up Reminders and Notifications for Classes
Getting your schedule into Google Calendar is step one. Making sure you actually see the reminders before you need them is a different problem entirely.
A survey found that 78% of college students felt less stressed after using a digital scheduling app for one month (The Listening App). Most of that benefit comes from reminders doing the mental work of remembering for you.
Setting Custom Reminders Per Event
Google Calendar’s default notification is 10 minutes before an event. For a class across campus, that’s not enough time.
To change the reminder on a single class event:
- Open the event and click the edit (pencil) icon
- Scroll to the notification section
- Change the default 10-minute reminder to 30 minutes (or whatever you need)
- If the event is recurring, choose “This and following events” to update all future instances
You can add multiple reminders per event. A 30-minute heads-up plus a 5-minute final alert works well for back-to-back classes.
Email vs. Push Notifications
Push notification: appears on your phone screen in real time. Best for same-day reminders.
Email notification: hits your inbox at the set time. More useful for next-day or morning reminders (“you have three classes tomorrow starting at 9 AM”).
Most students use push notifications for class reminders and reserve email notifications for assignment deadlines. That said, this comes down to how you actually use your phone. If your phone is always on Do Not Disturb, email may be more reliable.
Do Not Disturb Conflicts
This trips people up more than anything else. You set up perfect reminders, then wonder why they’re not showing up. Check your phone’s Do Not Disturb schedule against your class times.
On Android: Settings > Sound > Do Not Disturb > Schedules. You can add Google Calendar as an exception so class reminders break through even when DND is active.
On iOS: Settings > Focus > Do Not Disturb > allowed notifications. Add Google Calendar to the allowed apps list.
Also worth checking: if you subscribed to a calendar feed from Canvas or your school portal, those events may not automatically inherit your default notification settings. Open a few of those imported events and confirm reminders are actually set on them, not just on events you created manually.
Organizing Multiple Classes with Colors and Calendars
Six courses. Six professors. Labs, lectures, and office hours all stacked in the same week view. Without a clear visual system, Google Calendar turns into an unreadable wall of blue blocks.
Color-coding events by category makes your brain process your schedule faster than reading text ever could, according to ClickUp’s productivity research (2024).
Creating a Dedicated Class Schedule Calendar
Best approach: create one calendar called “Classes” and assign it a base color. Then override colors on individual events within that calendar for each course.
How to set it up:
- On the left sidebar, click the + next to “Other calendars”
- Name it “Fall 2025 Classes” or something semester-specific
- Assign it a base color (you’ll override this per course anyway)
- Add all class events into this calendar, not your personal one
Keeping classes in their own calendar means you can hide the entire semester in one click during breaks. Your personal calendar stays clean.
Assigning Colors Per Course
Google Calendar offers 11 built-in colors per calendar, plus custom hex codes if you go through Settings. Most students with 4-6 classes can cover everything with the default palette.
To change a single event’s color, open the event editor and click the colored circle next to the event title. Choose “This and following events” to apply it across the whole recurring series.
A few color assignment approaches that actually hold up across a full semester:
- Color by subject area (all science courses in green, humanities in blue)
- Color by priority (high-stakes courses in bold red, electives in muted tones)
- Color by day cluster (MWF classes one color, TR classes another)
Using Sub-Calendars for Study Blocks and Exams
Exams and deadlines: keep in a separate “Exams” calendar. Toggle it on during midterms and finals, off during regular weeks.
Study blocks: a dedicated calendar for self-scheduled study time lets you see at a glance how much prep time you’ve actually built in around each class.
At the end of the semester, archiving is simple. Rename the calendar to “Fall 2025 – Done” and uncheck it. Everything stays accessible but out of the way. Google’s Time Insights feature (available on desktop) can even show you how many hours per week went to each color category.
Viewing Your Class Schedule on Mobile
Most students check their schedule on a phone, not a laptop. The Google Calendar mobile app handles this well, but there are a few things worth knowing before assuming the experience is identical to desktop.
Google Calendar is installed on over 5 billion devices as of 2021 (ZipDo), and the average person spends about 4.9 hours per day in mobile apps (TechRT, 2025). Your class schedule needs to work where you actually are.
Best Calendar Views for Class Schedules on Mobile
Three views are actually useful for students:
| View | Best For | Access |
|---|---|---|
| Schedule view | Seeing the next 7 days in a list | Swipe right from the calendar icon |
| Week view | Visualizing your full class timetable | Three-line menu, tap “Week” |
| Day view | Checking today’s classes and times | Tap any date in the mini calendar |
Schedule view is underrated. It skips empty days automatically, so if you have no Monday classes, it just shows Tuesday. Less scrolling.
Syncing Imported and Subscribed Calendars to the App
If you imported a .ics file or added a subscription URL on desktop, those calendars sync to mobile automatically once you’re signed into the same Google account.
One thing that trips people up: the calendar may not show on mobile if it’s toggled off in the app. Open the app, tap the three-line menu, and scroll down to find all your calendars. Make sure the class schedule calendar has its checkbox enabled.
Subscribed calendars from Canvas or your school portal show up under “Other calendars” in the mobile app, same as desktop.
Setting Up a Calendar Widget
The Google Calendar widget on Android shows your next few events directly on the home screen. No need to open the app.
To add it: long-press an empty area on your home screen, tap “Widgets,” search for Google Calendar, and choose the size. The Schedule widget works best for students since it shows a running list of upcoming events rather than a monthly grid.
On iOS, the Google Calendar widget works through the Widgets gallery (long-press the home screen, tap the “+” in the top corner). The Medium widget showing the next 3 events is the most practical size for daily class tracking.
Common Problems When Adding a Class Schedule
Setup goes wrong more often than it should. Most issues come down to one of five recurring problems, and all of them are fixable without starting over.
.ics File Not Importing Correctly
The most common cause: trying to import on mobile. Google Calendar’s .ics import only works in a desktop browser. If you’re on a phone or tablet, the import option doesn’t appear at all.
Other causes worth checking:
- The file downloaded as a .ics but your system renamed it (check for .ics.txt extensions)
- You opened the file in a text editor instead of saving it first
- The portal exported an empty or corrupted file (re-export and try again)
Duplicate Events After Multiple Imports
Import a .ics file twice and every event appears twice. There’s no automatic deduplication in Google Calendar.
Fix: go to calendar.google.com, open Settings, find the calendar the duplicates landed in, and delete all events from that import date. Then re-import the correct file once. Tools like GCal Toolkit’s “Remove Duplicates” feature can also bulk-delete duplicate events if the manual approach isn’t practical with a large schedule.
Subscription Link Not Updating
Google checks subscribed calendars roughly every 24 hours. If your school changed a class time and it isn’t showing in your calendar yet, that’s normal. Wait a day.
If it’s been several days with no update, open the subscribed calendar’s settings in Google Calendar (gear icon, then Settings, then find the calendar under “Other calendars”) and look for a “Refresh” option. Some older subscription feeds also stop syncing if the original URL changes on the school’s end. In that case, delete the subscription and re-add it with the new URL.
Time Zone Mismatches Causing Wrong Class Times
This one is a known issue when importing iCal files if the source file doesn’t include timezone data. Events default to UTC, which can shift your 9 AM class to 2 AM or 3 PM depending on your location.
Fix in two steps:
- Go to Google Calendar Settings and confirm your primary time zone is set correctly
- If imported events still show wrong times, delete them, check your system clock timezone matches your Google Calendar timezone, then re-import
If the issue is with a subscription feed rather than an import, the problem is usually on the school portal’s side. Contact your registrar or IT help desk, since they control the timezone data in the feed.
Events Showing on the Wrong Calendar
During import, Google asks which calendar to add events to. Easy to miss. If your class events landed in your personal calendar instead of your “Classes” calendar, there’s no bulk move option in the standard Google Calendar interface.
The workaround: open each event, click edit, and change the calendar dropdown at the top of the event form. For a small schedule (5-6 courses), this takes about two minutes. For larger imports, the Google Calendar API or third-party scheduling tools can handle bulk calendar reassignment more efficiently.
Going forward, always double-check the calendar selection step during import before clicking “Import.”
FAQ on How To Add a Class Schedule To Google Calendar
Can I add my class schedule to Google Calendar from my phone?
You can create and edit class events on the Google Calendar mobile app. But .ics file imports only work on desktop. For phone setup, use a subscription URL from your school portal instead.
How do I make a class repeat every week in Google Calendar?
Open the event editor, click the recurrence field, and select “Custom.” Choose your specific days (Tuesday, Thursday, for example) and set an end date matching your semester’s last class. One setup covers the whole term.
Can I import my Canvas calendar into Google Calendar?
Yes. In Canvas, go to the Calendar section and find the Calendar Feed link at the bottom. Copy that URL, then add it to Google Calendar under Other Calendars. It syncs assignments and class times automatically.
Why are my imported class events showing the wrong time?
This is usually a time zone mismatch. The .ics file may lack timezone data, causing events to default to UTC. Check that your Google Calendar timezone matches your system clock, then delete and re-import the file.
How do I color code my class schedule in Google Calendar?
Open any class event, click the colored circle in the editor, and pick a color. Choose “This and following events” to apply it across the full recurring series. Assign a different color to each course for quick visual scanning.
Does Google Calendar sync with Blackboard?
Yes. In Blackboard, go to Calendar Settings and select Share Calendar to get your feed URL. Add that URL to Google Calendar under Other Calendars. Course events and deadlines will appear and stay updated automatically.
Can I subscribe to my university schedule so it updates automatically?
If your school provides a calendar feed URL, yes. Add it via Other Calendars in Google Calendar. Unlike a one-time .ics import, subscribed feeds reflect schedule changes within roughly 24 hours.
How do I add class reminders in Google Calendar?
Open any class event, scroll to the notification field, and change the default 10-minute alert to 30 minutes. Select “This and following events” to update the whole series. You can add both push and email notifications per event.
What is the difference between importing and subscribing to a class calendar?
An imported .ics file creates editable, static events that don’t update. A subscription URL creates a live feed that syncs automatically but can’t be edited inside Google Calendar. Choose based on whether you need flexibility or automatic updates.
How do I view my class schedule on the Google Calendar mobile app?
Open the app and switch to Schedule or Week view from the menu. Make sure your class calendar is toggled on under Other Calendars. For quick daily access, add the Schedule widget to your phone’s home screen.
Conclusion
This conclusion is for an article presenting every practical method for syncing your academic calendar with Google Calendar, from manual recurring events to live subscription feeds from Canvas or Blackboard.
The right approach depends on your school’s setup. If your university portal offers a calendar feed URL, subscribe. If it exports a file, import it on desktop.
Either way, the result is the same: your full course timetable, color-coded by subject, with push notifications set before each class.
Pair that with proper semester schedule management and you won’t need to check a separate student portal again.
Set it up once. Let Google Calendar handle the rest.

Explore topics
Google Calendar Vs Apple Calendar: Which One to Use
Acuity Scheduling vs Square Appointments: The Best of the Two
Introducing Amelia and IvyForms: A New Way to Collect Details Before Booking
Calendly vs. Doodle: Why One Is Better Than the Other
Per-Person Pricing vs Flat Rate Pricing: Which One Fits Your Service?

Read Inspiring Customer Stories
Check out how our user set Amelia for his business