

Explore topics
Group Bookings vs. Individual Appointments: Which Model Fits Your Business?
Amelia vs Start Booking: Which Booking Solution Is Better for WordPress Businesses?
Amelia Q1 2026 Update: Improvements, Integrations, and What’s Coming Next
Manage Staff, Locations, and Availability Without Losing Your Mind with Amelia

Read Inspiring Customer Stories
Check out how our user set Amelia for his business
Read the full storyYou have planned an event on your website. You have all the details worked out, and the guest list ready to go. Now you come to the next step: creating tickets for events you have planned. How do you do that?
Since the creation of WordPress plugins, the event industry has undergone a huge transformation. These plugins take care of all the details of event planning, from keeping track of attendance to tracking revenue. Using the right WordPress plugin can help you sell tickets and track information that you can use to better plan your next event. With this information, you can also upsell and cross-sell, which would be extremely difficult if you were to try to do all this manually.
With WordPress plugins, creating tickets for events has never been easier. You can either follow one of the prebuilt templates or create custom tickets according to your specifications. You can fully customize the settings so that the tickets appear right where you want them on your site. You can allow customers to use coupons too.
Advantages of Setting Up an Event Ticketing System Using a WordPress Plugin
The ticket template solution that already comes with WordPress helps you create an event page on your site. But say you want to promote your event to a larger audience. Are there options for promoting tickets to your event over social media or through advertisers? Yes. As an example, TicketSource gets millions of hits every month from people searching for events.
Plugins designed to create tickets for events accelerate sales and help you connect with attendees. But ticket management plugins have so much more to offer. Below you will find a list of some of the advantages of using ticket-creating plugins.
Streamline event registration
An important part of event registration is ticket sales. You want to know how many tickets you sold and who bought them.
Automate the entire process
Ticket plugins help you streamline the process by automatically sending personalized confirmation emails to your attendees.
Eases guest management
You can manage the total attendance through the plugin. This helps you keep track of how many people attend your event. This will also give you valuable information about your events. For example, it can tell you where you need more crowd management, the busiest areas, and the areas with the best seating.
Offers better communication
Using a plugin to manage your tickets allows you to know who bought tickets, and who canceled them, and send personalized emails accordingly. If someone did not finish registering for the event, you can also send an email prompt to remind them to finish.
Improves customer experience
Having a good system in place for ticket management impresses customers. It helps improve the visitor’s experience. Having the option of interacting freely with you when needed gives them more confidence in you.
Data and insight
Having a well-built ticket-selling plugin gives you valuable information to help you manage and grow your business. It helps you see which events are most popular, which times of day have the most traffic on your ticket-selling page, and more.
How to Create Tickets for Events in WordPress
The following is a guide to using the Amelia events plugin to create event tickets.
You can use this plugin for a variety of events. Whether your event is one day, several days, or recurring, this plugin can adjust to your needs. You can even assign specific employees to work a specific event.
Here is how to create an event using Amelia.
First, go to Events and select + new event. Once the dialog box is open, you will have the option to register the information about your event. The information is sorted into three tabs.
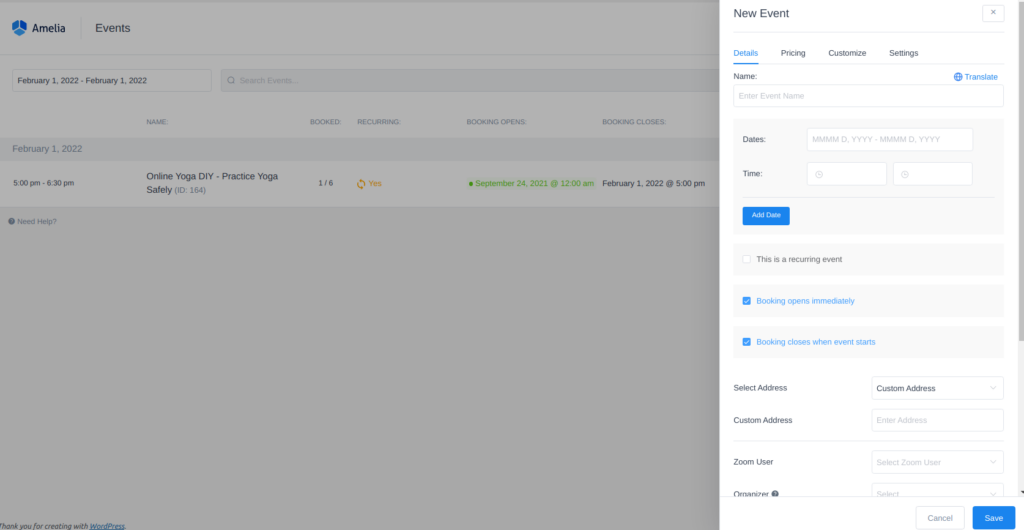
Tab one is called Details. Here you will be able to put in the following information about your event:
- In this box, you can set the name of your event.
- Here you can enter the dates and times for your event, even if it lasts more than one day.
- Select this box if this is a repeating event. If you select this box, you will also be prompted to input Repeat event, Every, and Until when.
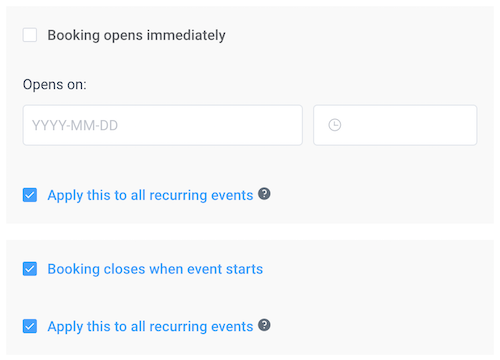
- Booking opens immediately and Booking closes when the event starts. This option allows you to set limits on when visitors can book tickets for your event. The options range from the moment of posting to the website up to the time the events start.
- Apply this to all recurring events. If you do not select this box, the settings will revert to the settings of the previous event.
- Maximum allowed spots. Here you can set limits on the number of tickets available. Once all the tickets have been sold, a message will alert all future visitors that the booking is closed.
- Allow bringing more persons. Here you can indicate if the customer is allowed to bring guests with them or not.
- Allow the same customer to book more than once. You can choose to allow the customer to purchase tickets more than once using the same email address.
- Select Address. This option allows you to indicate the location of the event. This will be visible to customers on the front end of your page.
- Assign employees to this event. You can choose to assign multiple employees, or you can skip this step if no employees will be necessary.
- Set up tags to make your event easier for customers to locate. Tags are not necessary, but if you have many events for customers to sort through, it could be useful to create tags. You might set a tag for classes or business events, for example. Then customers can filter their search for the events they are interested in.
- Here you can describe the event you are hosting. This will be shown on the front end, so this is a good place to include any extra details that customers should know about the event.
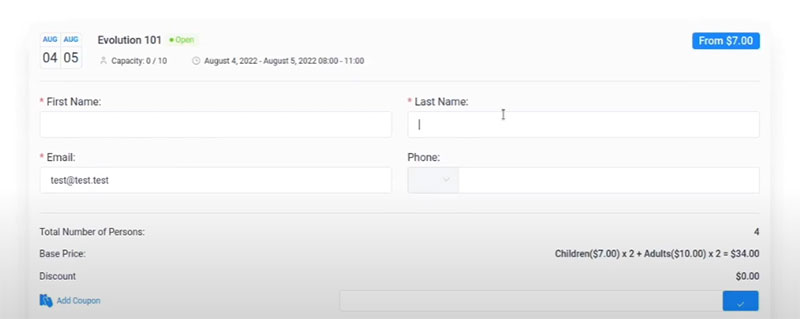
Pricing is the next tab you will come across when creating an event. This tab allows you to input pricing and payment details for booking a ticket. You can set the prices and disclose deposit information. The Pricing tab allows you a lot of flexibility. One idea is to create custom tickets and prices for VIP customers, another for Regular customers, or Early Birds, and so on.
The third tab is the Customize tab. You can include an event gallery where you upload photos for the event. You can assign the event a certain color in the calendar and indicate if the event will be visible on the public site or only to you and your employees.
Final Words about Creating Tickets for Events
When you are creating tickets for events, Amelia is a great option to meet all your needs. It gives you all the control you need for each step of the process. From creating tickets for events to managing the status of your bookings, the whole process is under your command.
Another great aspect of using Amelia to create tickets is that you don’t need any experience in coding. This plugin supports an abundance of payment options. Buyers have the option of using Amazon Pay, PayPal, Stripe, Square, or Alipay.
The goal is for you to have full control of planning your event. Amelia can help you every step of the way as you customize your best event yet.
If you enjoyed reading this article about creating tickets for events, you should check out this one with event WordPress themes.
We also wrote about a few related subjects like event ticketing apps, adding an event calendar on a website, how to add a calendar to WordPress, and Divi Events calendar alternatives.
Not only that, but we also created articles about setting up recurring events on a WP site, how to sell tickets on WordPress, Elementor event calendar plugins, and creating a church event calendar.
Read Inspiring Customer Stories
Check out how our user set Amelia for his business
Read the full story