

Explore topics
Amelia 9.3 Update Brings More Control to Scheduling and Events
Group Bookings vs. Individual Appointments: Which Model Fits Your Business?
Amelia vs Start Booking: Which Booking Solution Is Better for WordPress Businesses?
Amelia Q1 2026 Update: Improvements, Integrations, and What’s Coming Next
Recurring Appointments Guide: Streamline Your Scheduling & Boost Performance

Read Inspiring Customer Stories
Check out how our user set Amelia for his business
Read the full storyAlthough WordPress is commonly considered to be a user-friendly CMS, its maintenance can be challenging at times. You can find yourself encountering persistent technical issues, grappling with plugin conflicts, or navigating security concerns. In such instances, the best solution is to reset your WordPress site.
Whether you’re troubleshooting glitches, streamlining performance, or embarking on a fresh digital journey, this guide aims to equip you with the expertise and insights essential for a successful WordPress reset.
From understanding the diverse scenarios requiring you to reset your WordPress site to exploring an array of methodologies, including manual database manipulations, plugin-driven resets, and alternative strategies, this guide offers a comprehensive view of the WordPress reset landscape.
Let’s begin!
When Do You Need to Reset Your WordPress Site
Sometimes, a WordPress site encounters issues that can’t be resolved by simple troubleshooting. These issues might include persistent bugs, broken functionalities, or a cluttered database due to various plugins and theme installations. In such cases, resetting the site to its default settings can be a viable solution.
Persistent issues
Persistent issues within a WordPress site can significantly hinder its functionality and user experience. These issues might include:
- Bugs and Errors: Frequent encounters with errors or bugs that hinder site performance or display incorrectly.
- Performance Deterioration: Gradual slowdowns or lagging performance despite efforts to optimize the site.
- Unresponsive Elements: Parts of the website that consistently fail to load or function as intended.
Plugin/theme conflicts
Conflicts among plugins and themes are a common occurrence in WordPress due to the diverse ecosystem of third-party offerings. These conflicts manifest in various ways:
- Functionality Breakdown: Certain features or functionalities fail to work properly due to conflicts between installed plugins or between a plugin and the theme.
- Visual Discrepancies: Themes might not render correctly or might clash with specific plugins, causing visual inconsistencies.
- Backend Issues: Conflicts can also impact the backend, making it challenging to manage content or settings effectively.
Database overload
The WordPress database, over time, accumulates unnecessary data, leading to inefficiencies and performance bottlenecks:
- Cluttered Database: Accumulation of redundant or outdated data within tables can result in a cluttered database.
- Decreased Performance: The increased volume of data can slow down database queries, affecting site loading times.
- Resource Consumption: Large databases consume more server resources, impacting the overall performance of the website.
Hacked site
In the unfortunate event of a hack, collaborating with your web host is crucial for recovering files and securing your site. However, after removing the hack, a complete site reset might be necessary.
Resetting the site eliminates any changes the hacker made to the content or configurations, ensuring a clean slate for a secure rebuild.
Site crash recovery
Site crashes often require accessing the site via the control panel or FTP/SFTP. However, if site access via the WordPress panel is available, a reset plugin proves useful.
Resetting your WordPress website allows for the removal of unnecessary plugins/themes or a return to a stable version of the site before the crash occurred.
Learning and experimenting with WordPress
For newcomers learning WordPress, experimentation is common. However, when seeking a fresh start or after gaining sufficient knowledge, a complete site reset might be desirable.
Resetting the entire site enables a clean slate for implementing newfound knowledge or starting a site from scratch.
Simplifying page and post deletion
Deleting numerous pages or posts individually can be arduous, especially with extensive content history. Using a plugin simplifies and expedites the process of wiping out multiple posts or pages.
Plugins allow swift deletion of bulk content, facilitating efficient management of pages and posts without the tedious manual process.
*Note: Before initiating a WordPress site reset, it’s vital to back up all essential data, including files, images, themes, plugins, and the database. This ensures that even if something goes wrong during the reset process, you have a safety net to revert to.
How to Reset a WordPress Site: 3 Different Methods Available
Resetting a WordPress site can be approached in various ways, each method offering distinct advantages and complexities.
- How to reset a WordPress site using WordPress plugins for resetting
- How to reset a WordPress Site using manual reset via database
- How to reset a WordPress Site using WP-CLI Commands
1. How to reset a WordPress site using WordPress plugins for resetting
If you’re looking for the easiest way to reset WordPress, consider using a plugin. Resetting WordPress using a plugin is an efficient and stress-free method. It offers multiple benefits, such as the ability to reset the entire database or specific tables and the option to reactivate plugins or themes post-reset. There are several WordPress reset plugins available, each with unique functionalities:
Best WordPress reset plugins to consider
1. WP Reset
- Features: Deletes content, resets the database to default settings, and offers selective reset options for specific parts of the website.
- Benefits: Allows a comprehensive reset, including plugins, themes, users, user roles, and database tables, with the ability to exclude certain elements.
2. WordPress Reset:
- Features: Deletes customizations and content, resetting the WordPress database back to its defaults without file modifications.
- Benefits: Offers a clean reset without altering files, ensuring a fresh start for the site.
3. Advanced WordPress Reset:
- Features: Resets the WordPress database and content back to its original status without modifying files.
- Benefits: Offers a straightforward reset without deleting or altering any files, ensuring a clean slate while preserving the site structure.
4. WordPress Database Reset:
- Features: Enables the reset of the entire database or specific database tables back to default settings.
- Benefits: Provides flexibility in choosing specific database tables for reset, minimizing data loss while restoring default configurations.
5. Customizer Reset:
- Features: Resets all theme customizations registered via the Customizer API in a single click.
- Benefits: Facilitates the quick removal of theme customizations, ideal for starting anew with a theme’s default settings.
6. WPWH – WP Reset Webhook Integration:
- Features: Integrates WP Reset with WP Webhooks, expanding functionalities for developers.
- Benefits: Offers extended capabilities for developers to manage and integrate resets within their development workflows.
These plugins cater to different reset requirements, from comprehensive site resets to selective options for specific aspects like themes, plugins, or database tables. Consider the unique features of each plugin to determine the best fit for your WordPress reset needs.
Among these plugins, WP Reset stands out as the most popular and widely used WordPress reset plugin due to its comprehensive functionalities. That’s why we’ll use the WP Reset to illustrate the process of using a plugin to reset your WordPress site.
How to reset a WordPress site using the WP Reset plugin:
Step 1: Install and Activate the WP Reset Plugin
- Login to Your WordPress Dashboard: Access the admin panel of your WordPress website using your credentials.
- Navigate to ‘Plugins’ > ‘Add New’: Click on the ‘Plugins’ tab in the left-hand menu and then select ‘Add New’ to access the WordPress Plugin Repository.
- Search for ‘WP Reset’ and Install the Plugin: In the search bar, type ‘WP Reset’ and press Enter. Locate the WP Reset plugin and click ‘Install Now’ to begin the installation process.
- Activate the WP Reset Plugin: Once installed, click on the ‘Activate’ button to enable the plugin on your WordPress website.
Step 2: Access the WP Reset Interface
- Go to ‘Tools’ > ‘WP Reset’ in Your Dashboard: On the left-hand menu, find the ‘Tools’ option and click on ‘WP Reset’ to access the WP Reset interface.

Step 3: Initiate the Site Reset
- Scroll Down to the ‘Site Reset’ Section: In the WP Reset interface, navigate to the ‘Site Reset’ section. This section is where you’ll perform the reset action.
- Type ‘reset’ to Confirm Reset Action: As a safety measure to ensure you intend to reset the site, type the word ‘reset’ in the provided text box. This confirmation is necessary before proceeding with the reset.
- Click ‘Reset WordPress’ to Initiate the Reset Process: After typing ‘reset,’ click on the ‘Reset WordPress’ button. This action will trigger the WP Reset plugin to begin the reset process.

Step 4: Confirm and Complete Reset
- Confirm the Reset Action: A confirmation prompt will appear, asking you to confirm the reset action. Review the details displayed to ensure you want to proceed with the reset.
- Wait for the Reset Process to Complete: The WP Reset plugin will now initiate the reset process. Depending on the size of your site, this might take a few moments. Allow the plugin to complete the reset operation.
- Success Message Upon Completion: Once the reset process finishes, a success message will appear at the top of your WordPress dashboard, indicating that the reset was successful.
Additional Options:
- Deactivate vs. Delete Themes/Plugins: WP Reset, by default, deactivates previously installed themes and plugins. However, within the plugin’s ‘Tools’ section, you can choose to delete them entirely if required.
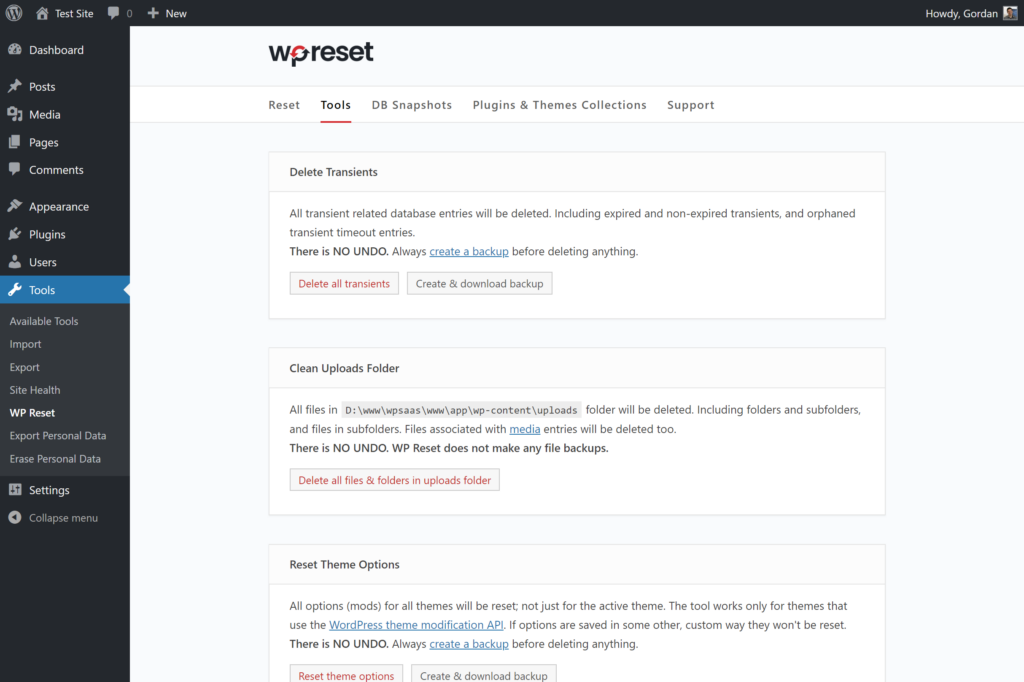
- Selective Reset and Other Tools: The ‘Tools’ section within WP Reset provides various options for selectively resetting or deleting specific parts of your WordPress site, offering more granular control over the reset process.
Performing a reset using WP Reset can significantly streamline the process of reverting your WordPress site to a default state. However, always proceed with caution and make sure to back up your WordPress site before executing a reset action, as this process will remove content and configurations, potentially leading to data loss.
2. How to reset a WordPress Site using manual reset via database
Resetting through the database requires a meticulous approach as it directly impacts the site’s core data. This method demands a sound understanding of database structure and SQL queries, as well as using an FTP/SFTP client, such as FileZilla.
You can perform a manual reset via cPanel’s phpMyAdmin or you can access phpMyAdmin directly from your hosting account. Both interfaces essentially provide access to the database and allow the execution of SQL queries.
The primary difference lies in the access point:
- Direct phpMyAdmin Access: When you access phpMyAdmin directly from your hosting account, you navigate through the hosting provider’s interface to reach the database management tool. It might be integrated into the hosting dashboard with additional features or a customized interface based on the hosting service.
- cPanel’s phpMyAdmin: When using phpMyAdmin within cPanel, the process involves accessing it through the cPanel interface. cPanel provides a suite of tools and functionalities, including phpMyAdmin, within its own environment. Users accustomed to managing their hosting environment through cPanel might find it more convenient to access phpMyAdmin directly from there.
Both interfaces essentially serve the same purpose of managing databases, executing SQL queries, and performing operations on your WordPress database. The steps for identifying tables, clearing data, and executing SQL queries to reset the WordPress site remain consistent between the two interfaces.
Step 1: Accessing the cPanel
- Login to Your Hosting Account: Access your hosting provider’s website and log in to your account.
- Locate and Access cPanel: After logging in, find the cPanel option. It’s typically accessible from the dashboard or a control panel section. Click on the cPanel icon or link to enter the cPanel interface.
Step 2: Accessing the Database
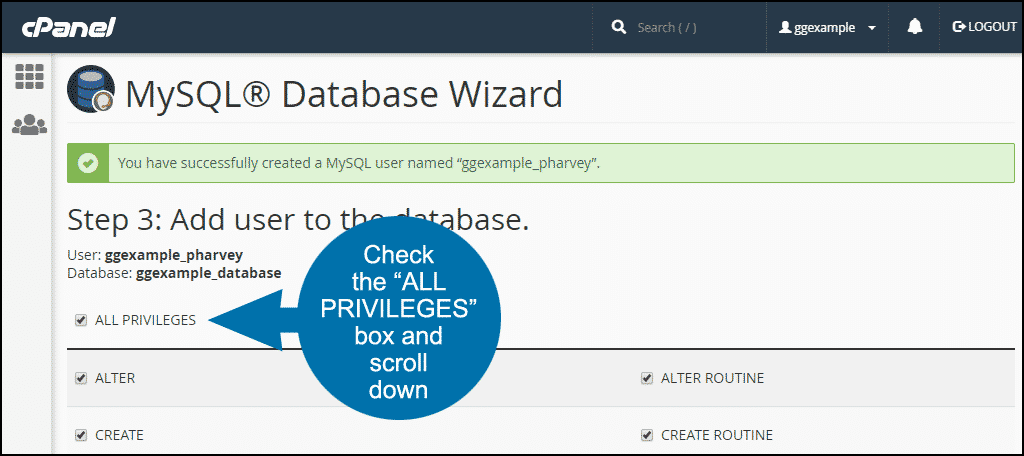
- Find the Databases Section: Within cPanel’s interface, look for the “Databases” section. Usually, you’ll find options like “MySQL Databases,” “phpMyAdmin,” or “MySQL Database Wizard.”
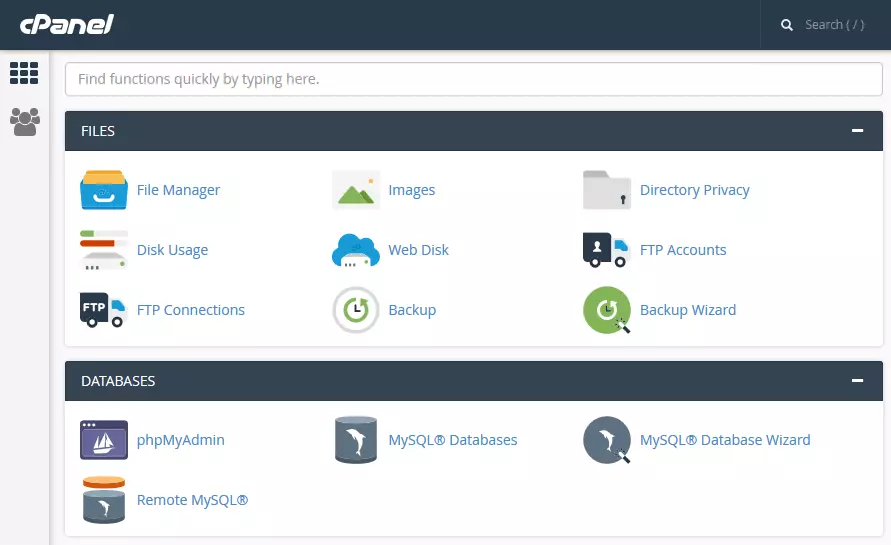
2. Enter MySQL Databases: Click on the MySQL Databases option. This action will take you to the MySQL Databases interface, similar to accessing it directly from the hosting panel.
Step 3: Deleting the WordPress Database
1. Identify and Select the Database Associated with Your WordPress Site: Look for the database typically prefixed with wp_. You can find this information within your hosting account’s database management interface, often accessed via cPanel or a similar tool.
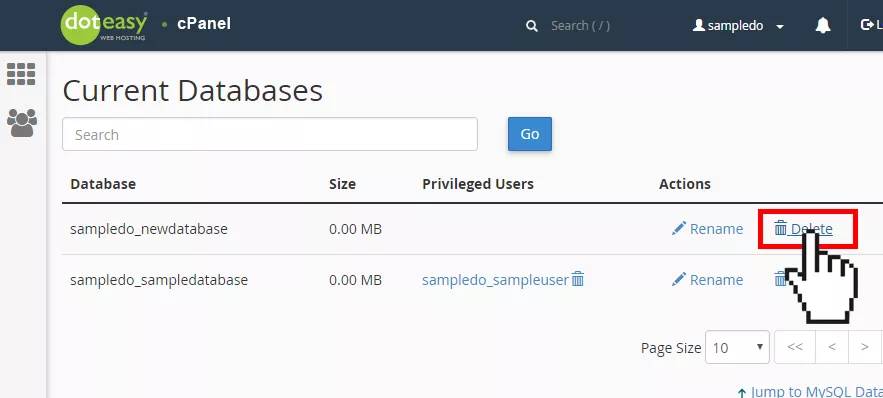
2. Delete the Selected Database and Confirm: Proceed to delete the selected database. Confirm this action when prompted by the interface. This step removes the existing WordPress database, essentially wiping out all its data.
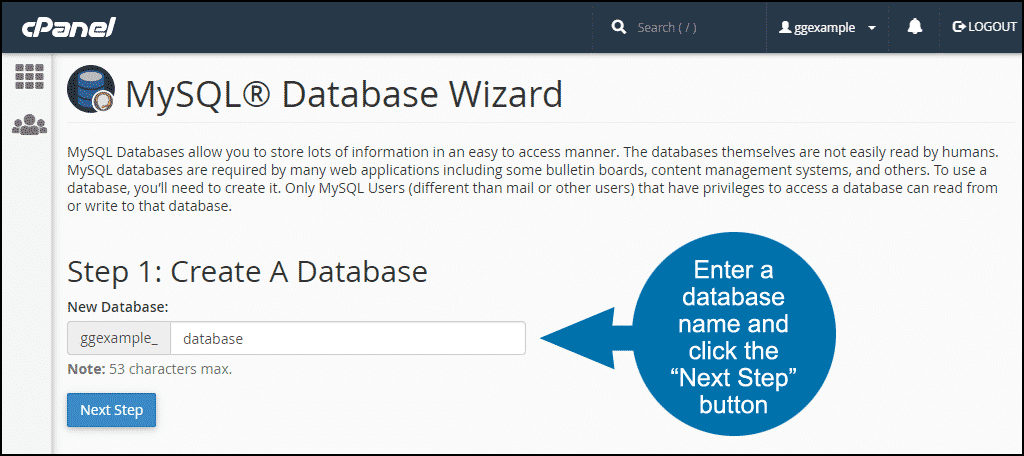
Step 4: Creating a New Database
1. Create a New Database Within cPanel: Access your hosting account’s cPanel and locate the ‘Create Database’ function. Use this function to generate a new database for your WordPress site. After creating it, the newly generated database will appear on the database list.
Step 5: Adding your old user to the Database
1. Assign Your Old Username to the New Database: Utilize the ‘Add a User to a Database’ function within the cPanel. Assign your previously used username to the newly created database. This step is essential for accessing and managing the new database.
2. Locate User Information in wp-config.php: If you encounter visibility issues with your user in the cPanel, access the ‘wp-config.php’ file via FTP. This file contains the username and password associated with the database. Use this data to correctly assign the user to the new database.
Step 6: Connecting via FTP/SFTP
1. Establish a Connection to Your Hosting Server: Use an FTP/SFTP client (e.g., FileZilla or Cyberduck) to establish a connection to your hosting server. Input the required credentials provided by your hosting service to establish the connection.
Step 7: Removing unwanted files
1. Navigate to the public_html/wp-content Directory: Access the public_html/wp-content directory using the FTP client. Within this directory, you’ll find themes, plugins, and other files associated with your WordPress site.
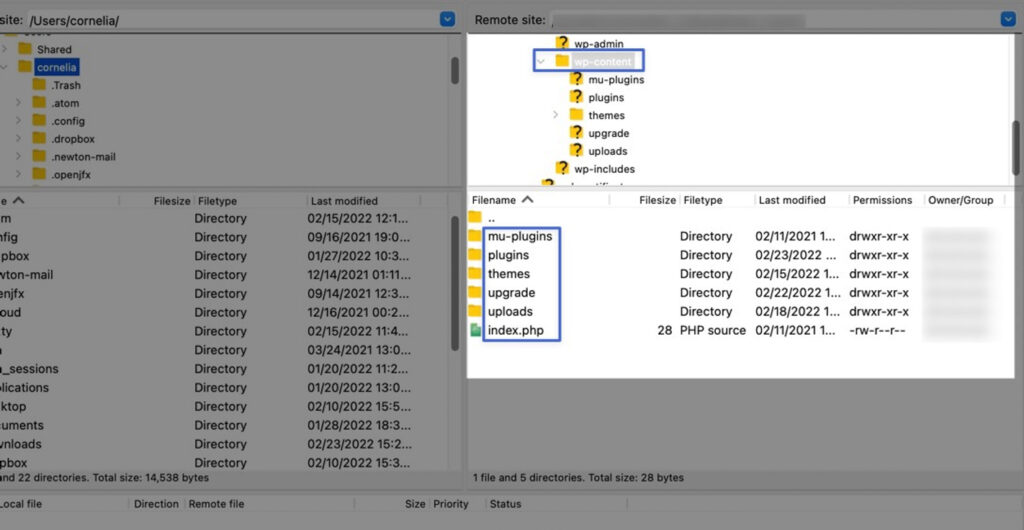
2. Delete Unwanted Themes, Plugins, or Files: Delete any themes, plugins, or files that are no longer required on your site. This step helps declutter the site and remove unnecessary elements.
Step 8: Running the WordPress installation script
1. Initiate the WordPress Installation Wizard: Open a web browser and access your domain followed by /wp-admin/install.php. This action will initiate the WordPress installation wizard, guiding you through the WordPress setup process.
Optional: How to reset only certain WordPress settings manually
If you have only certain settings and databases that you wish to reset, you can also do it via SQL queries:
Step 1: Identifying and clearing tables
- Selecting the WordPress Database: In MySQL Databases, locate and select the WordPress database associated with your website.
- Choose Tables to Reset: Identify tables related to content or settings that you want to reset, such as
wp_posts,wp_pages,wp_comments, andwp_options. - Clearing Tables: You can clear these tables selectively by clicking on them, selecting all entries (or specific entries) within the table, and choosing the “Delete” or “Empty” option. Ensure you understand the implications before performing any actions.
Step 2: Executing SQL queries
1. Access SQL Tab: In phpMyAdmin, find the SQL tab or section.
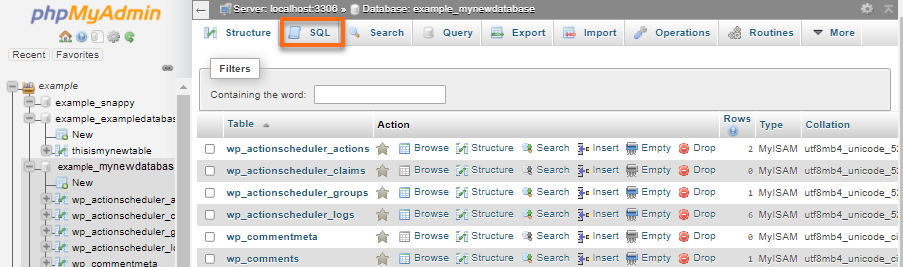
2. Enter and Execute Queries: Here, you can enter SQL queries to perform specific resets. For example, to reset the site and home URLs to default, ensuring the site loads properly, you can execute:
UPDATE wp_options SET option_value = '' WHERE option_name = 'siteurl' OR option_name = 'home';
3. Execute with Caution: Be precise with SQL queries. Double-check the queries before executing them, as incorrect queries can lead to data loss or site malfunctions.
Reiterating the importance of backing up the database before making any changes cannot be stressed enough. Be precise with SQL queries. Errors can lead to irreversible data loss or site malfunction.
This manual method provides ultimate control over the reset process but demands technical proficiency and meticulous attention to detail. Proceed with extreme caution and consider alternatives if uncertain about database manipulation.
3. How to reset a WordPress Site using WP-CLI Commands
Resetting a WordPress site via WP-CLI (WordPress Command Line Interface) offers a powerful and efficient method for managing WordPress installations. It allows for streamlined execution of commands, including resetting sites, databases, and more, directly from the command line.
Step 1: Installing and configuring WP-CLI
1. Download WP-CLI.phar:
-
- Use
curlorwgetto download the WP-CLI.phar file from the official WP-CLI GitHub repository:
- Use
curl -O https://raw.githubusercontent.com/wp-cli/builds/gh-pages/phar/wp-cli.phar
2. Verify WP-CLI Installation:
-
- Run the following command to ensure the downloaded WP-CLI.phar file works:
php wp-cli.phar --info
3. Make WP-CLI Executable:
-
- Use
chmodto make the WP-CLI.phar file executable:
- Use
chmod +x wp-cli.phar
4. Move WP-CLI to PATH:
-
- Move the WP-CLI.phar file to a directory in your system’s PATH. For instance,
/usr/local/binis a common location:
- Move the WP-CLI.phar file to a directory in your system’s PATH. For instance,
sudo mv wp-cli.phar /usr/local/bin/wp
5. Test WP-CLI:
-
- Run the
wp --infocommand to verify that WP-CLI is installed and configured correctly:
- Run the
wp --info
This command should display the WP-CLI version and information, confirming the successful installation.
This method ensures that WP-CLI is globally accessible from the command line. You can execute WP-CLI commands by simply typing wp followed by the command name, streamlining WordPress management tasks directly from the terminal.
*Prerequisites: Ensure PHP is installed and added to your system’s PATH to execute it globally.
1. Download WP-CLI.phar:
-
- Go to the WP-CLI website or GitHub repository to download the
wp-cli.pharfile manually.
- Go to the WP-CLI website or GitHub repository to download the
2. Create Folder and Save Files:
-
- Create a folder for WP-CLI, for instance,
c:\wp-cli. - Save the downloaded
wp-cli.pharfile into this folder.
- Create a folder for WP-CLI, for instance,
3. Create wp.bat File:
-
- In the
c:\wp-clifolder, create a new text file namedwp.bat.
- In the
4. Add Contents to wp.bat File:
-
- Open
wp.batwith a text editor. - Add the following contents:
- Open
@ECHO OFF

php "c:/wp-cli/wp-cli.phar" %*
5. Adding c:\wp-cli to PATH:
-
- Open Command Prompt as an administrator (right-click and choose “Run as administrator”).
- Enter the following command:
setx path "%path%;c:\wp-cli"Now, you can use WP-CLI from anywhere in the Windows command line.
Open Command Prompt (you might need to restart it if it was open during installation). Type wp followed by any WP-CLI command, for example:
wp --info
This command should display WP-CLI’s version and information, confirming that it’s installed and configured correctly.
This manual setup allows you to use WP-CLI commands globally within the Command Prompt, enabling efficient management of your WordPress installations directly from the Windows command line interface.
Step 2: Accessing Terminal/Command Prompt
- Navigate to WordPress Root Directory:
- Open the terminal or command prompt on your system.
- Use commands like
cdto navigate to the root directory of your WordPress installation where the core WordPress files are located.
Step 3: Executing WP-CLI Commands
- wp site empty:
- This command empties the site’s database, removing all its tables and content.
- Example:
wp site empty --yes
- Caution: This command irreversibly removes all content from the site, so use it with extreme caution. Always back up your data before executing such commands.
- wp db reset:
- Resets the WordPress database by dropping all tables and reinitializing the database.
- Example:
wp db reset --yes
- Important Note: Similar to
wp site empty, this command erases the entire database. Ensure you have a backup and thoroughly understand its impact before executing.
Always create a complete backup of your WordPress site before running WP-CLI commands that alter or reset the database. Carefully review the implications of each command. Incorrect usage can result in data loss or irreversible changes to your site. If possible, practice running WP-CLI commands on a staging site to familiarize yourself and understand their effects before applying them to a live site.
Amelia: The Best Booking Plugin for Your WordPress Site
Amelia stands as an exceptional booking plugin within the WordPress ecosystem, elevating the way businesses manage appointments and bookings online.
With its user-friendly interface and robust functionality, Amelia streamlines the entire booking process, offering seamless integration into WordPress sites.
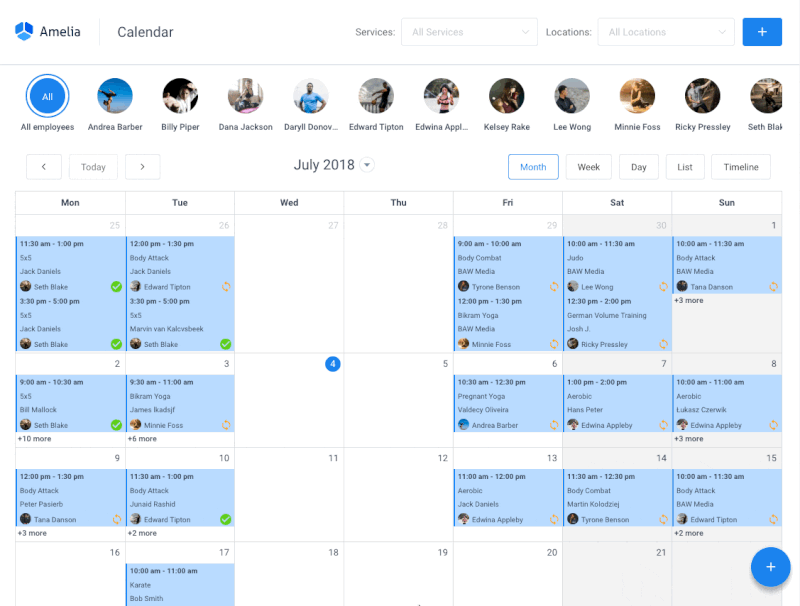
From scheduling appointments and managing staff availability to facilitating secure payments, Amelia ensures a hassle-free booking experience for both businesses and their clientele.
Its customizable booking forms, intuitive dashboard, and comprehensive reporting tools empower businesses to efficiently organize and optimize their booking operations.
With Amelia, you’ll revolutionize your appointment management system, enhance customer satisfaction, and streamline your business operations effortlessly.
Best Practices and Precautions When Resetting WordPress
First of all, creating a comprehensive backup of your WordPress site is essential before initiating any reset action. That’s why it’s advisable to use trusted backup plugins or services to generate a complete backup encompassing files and the database. Plugins like UpdraftPlus or BackupBuddy provide reliable backup functionalities.
In addition, don’t forget to store backups in multiple secure locations, including external servers or cloud storage services like Dropbox, Google Drive, or dedicated backup services. This redundancy ensures data safety even if one location is compromised.
Moreover, before initiating a reset, ensure a smooth transition and minimize risks by gaining a comprehensive understanding of the WordPress reset process and its consequences. Read through documentation, seek guidance, or consult experts if needed to grasp the implications.
Also, make sure to conduct thorough testing post-reset to verify that all site functionalities, including plugins, themes, and essential features, work as expected. This step ensures a seamless user experience after the reset.
Troubleshooting Common Issues Once You Reset WordPress
Encountered errors or issues after a reset? Nothing to worry about, there are ways to tackle them effectively.
Error identification
Thoroughly analyze any error messages or unexpected behavior occurring after the reset of your WordPress website. These messages often contain crucial information pinpointing the root cause.
In addition, make sure to check log files within your WordPress installation or server logs. These logs might provide detailed information about errors or issues encountered, aiding in troubleshooting.
Using backup for restoration
In the event of critical issues that disrupt the site’s functionality or user experience, resort to the previously created backup. Reverting to the backup acts as a safety net, enabling you to roll back changes and restore the site to its previous stable state. This method mitigates risks and ensures continuity in case of unforeseen complications.
Isolating plugin or theme conflicts
If issues arise after you reset WordPress, selectively deactivate plugins one by one to identify any conflicting plugins causing the problem.
You can also temporarily switch to a default WordPress theme to check if the issue persists. This helps pinpoint theme-related issues.
Database integrity check
Perform a database integrity check using tools like phpMyAdmin or plugins such as WP-DBManager. Verify database tables for any corruption or inconsistencies that might have occurred during the reset.
Regardless of the post-reset WordPress issue you might be experiencing, it’s always a good idea to utilize WordPress support forums, online communities, or professional services. Discussing specific issues with experienced users or experts can offer valuable insights and resolutions.
Alternative Solutions to a WordPress Reset
In some scenarios, alternatives might be more suitable than a complete reset:
- Restoring from Backup: If the reset seems too drastic or causes unexpected challenges, revert to the backup created earlier. This method allows you to return to a known stable state without losing data.
- Utilizing Staging Environments: Use staging environments for testing changes without impacting the live site. Experiment and troubleshoot in a controlled setting before implementing changes on the actual site.
How to Reset a WordPress Website: Wrap-Up
The necessity to reset a WordPress site can arise due to various reasons – be it resolving technical glitches, enhancing security, or starting anew. This in-depth guide has navigated through the intricate process of resetting a WordPress site, aiming to empower users with the knowledge and tools necessary for a successful reset.
Resetting a WordPress site is a technical endeavor that demands foresight, expertise, and a methodical approach. By prioritizing preparation, understanding methods, troubleshooting effectively, and engaging community resources, users can navigate the process confidently. A meticulous and informed reset ensures a website’s stability, security, and optimal performance, empowering site owners to manage their WordPress sites with resilience and proficiency.
Looking for More WordPress Guides and Tutorials?
Make sure to check out these valuable resources to enhance your WordPress journey:
- How to Back Up Your WordPress Site: The Ultimate Guide
- How to Restore WordPress from Backup
- How to Delete a WordPress Site: A Step-By-Step Guide
- How to Install WordPress: A Beginner’s Guide
- WordPress User Roles Explained: Everything You Wanted to Know
- The Best Local WordPress Development Environments in 2023
- Discover 10 Best Plugins for WordPress in 2023 (Expert Picks)
- Is WordPress Free? Demystifying WordPress Pricing
Read Inspiring Customer Stories
Check out how our user set Amelia for his business
Read the full story