When it comes to WordPress, there are two types of website owners: those who have experienced a website crash, and those who will. Luckily, restoring WordPress from a backup is a skill that, once mastered, can save you from countless hours of headache.
Here’s a detailed, step-by-step guide to help you navigate the restoration process, whether you’re a beginner or an intermediate user.
What Are the Two Main Types of WordPress Backups
Before diving into the restoration process, it’s essential to become familiar with two main types of WordPress backups available – backup plugins and manual backups.
Both backup plugins and manual backups have their pros and cons. Backup plugins offer automation and ease of use, making them ideal for most users, while manual backups provide more control but require a higher skill level and more time. To learn more, check out our detailed guide on how to back up your WordPress site.
Choosing the right method depends on your comfort level with technical tasks and the specific needs of your WordPress site. Also, depending on the method you chose you’ll be restoring your WordPress site from backups either by using plugins or manually.
What to Do Before You Restore a WordPress Site from Backup
Before you restore your WordPress site, it’s essential to set the stage and ensure your backup is ready for a smooth restoration process.
First, verify that your backup includes all the necessary components. This should encompass all site content, user information, and settings. Specifically, make sure the backup contains the wp-content folder, themes, plugins, and uploads.
To ensure the integrity of your backup, use the verification feature provided by most backup plugins. This feature checks if the backup is complete and free of corruption. For manual backups, double-check that all files and the database export are accurately saved and that no critical components are missing.
Once you’ve confirmed the completeness and integrity of your backup, download the latest backup files to your local machine. Having these files readily available on your local machine ensures quick access during the restoration process.
Organize the files in clearly labeled folders, separating database backups from file backups. For example, create distinct folders named “Database Backups” and “File Backups,” with subfolders categorized by dates to easily track different versions.
In addition to local storage, consider using remote storage options. If your backup plugin supports cloud storage (like Google Drive, Dropbox, or Amazon S3), upload your latest backup to these services. This provides an extra layer of security against data loss. Additionally, you can store backups on external drives for added security. This method ensures you have access to your backups without relying solely on an internet connection.
To further ensure the reliability of your backups, regularly test them by restoring a backup to a test environment or a local server. This practice helps verify that the files are complete and functional. Periodically checking and downloading backups ensures that you always have a recent and operational backup available.
How to Restore WordPress from Backup by Using Plugins
Depending on the plugin you decide to use, the process of restoring a WordPress site may differ, but the general concept remains the same.
In this guide, we’ll show you how to restore a backup made with UpdraftPlus. If you need help with creating the backup, read our detailed guide on how to back up your WordPress site with UpdraftPlus.
Using UpdraftPlus
UpdraftPlus is known for its user-friendly interface and extensive cloud storage integrations, including Google Drive and Dropbox. The free version is robust enough for most users, while the premium version offers additional features like incremental backups and multisite support.
Step 1: Install UpdraftPlus
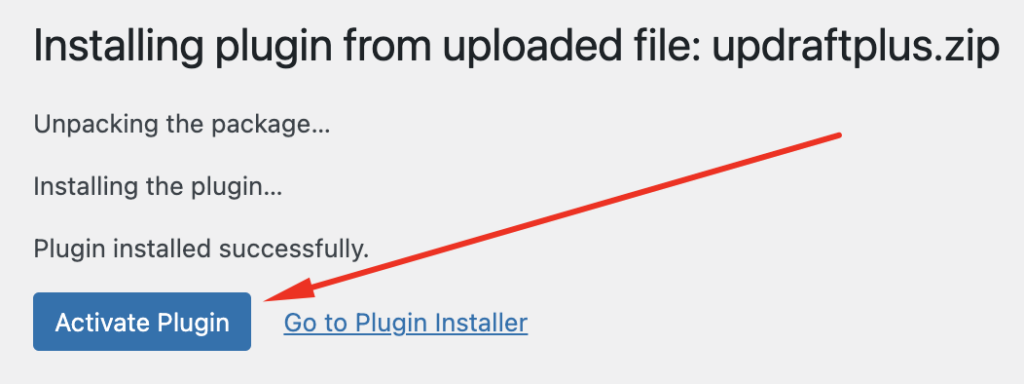
1. Add and Activate UpdraftPlus:
-
- Log into your WordPress admin panel.
- Navigate to Plugins > Add New.
- Search for “UpdraftPlus” and click “Install Now”.
- Once installed, click “Activate”.
Step 2: Access UpdraftPlus settings
1. Open UpdraftPlus Settings:
-
- In your WordPress dashboard, go to Settings > UpdraftPlus Backups. This will open the UpdraftPlus settings and management page.
Step 3: Restore backup
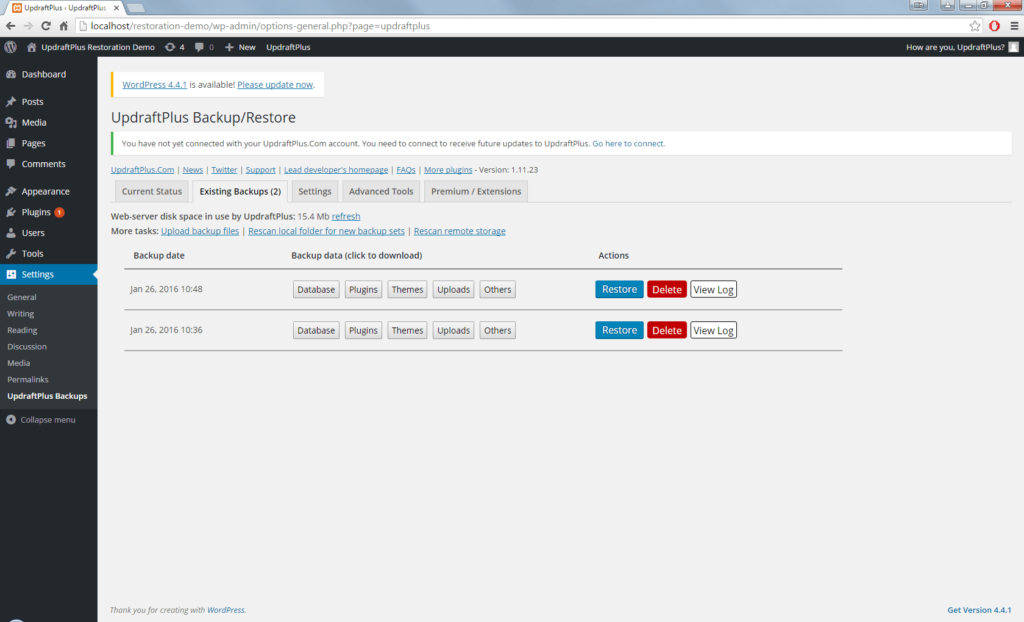
1. Click on the “Existing Backups” Tab:
-
- On the UpdraftPlus settings page, navigate to the “Existing Backups” tab.
- Here, you will see a list of your available backups.
2. Find the Backup You Want to Restore:
-
- Locate the backup you want to restore from the list.
- Click on the “Restore” button next to the backup.
3. Select the Components to Restore:
-
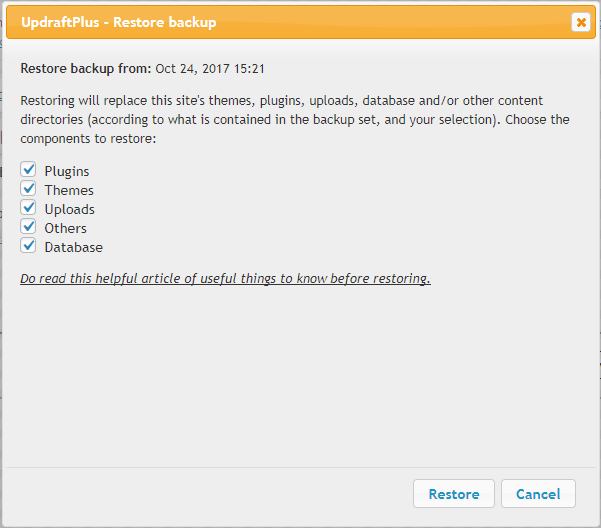
- A dialog box will appear, prompting you to select the components you wish to restore. Options include:
- Database: Contains your site’s content and settings.
- Plugins: Restores your installed plugins.
- Themes: Restores your installed themes.
- Uploads: Restores your media library files.
- Others: Restores other files such as custom code or additional folders.
- Select the components you need and click “Next”.
- A dialog box will appear, prompting you to select the components you wish to restore. Options include:
4. Click “Restore” and Follow the On-Screen Instructions:
-
- UpdraftPlus will begin the process of restoring WordPress site from backup.
- Follow any additional on-screen instructions provided by UpdraftPlus.
- Wait for the restoration process to complete. This may take a few minutes depending on the size of your backup.
Step 4: Test your site
1. Test Your Site:
-
- Visit your restored website to ensure it is functioning correctly.
- Check that all pages, posts, and media files are in place.
- Test the functionality of plugins and themes to ensure everything is working as expected.
How to Restore WordPress Site to Previous Version Manually
A decision to restore the WordPress site manually gives you greater control over the process. Here’s a detailed, step-by-step guide to restore your site’s database via phpMyAdmin.
Restoring WordPress database from backup via phpMyAdmin
Step 1: Create a new database
1. Log into Your Hosting Control Panel:
-
- Access your hosting account’s control panel. This could be cPanel, Plesk, or another type of interface provided by your host.
- Look for the MySQL Databases icon and click on it to open.
2. Create a New Database:
-
- Enter a name for your new database. Make sure it’s something you can easily recognize.
- Click the “Create Database” button to generate the new database.
4. Note Down Database Details:
-
- Write down the database name, username, and password. These details will be crucial for the restoration process and updating your
wp-config.phpfile.
- Write down the database name, username, and password. These details will be crucial for the restoration process and updating your
Step 2: Import the backup
1. Select Your New Database:
-
- In phpMyAdmin, click on the name of the new database you just created. This will open the database details page.
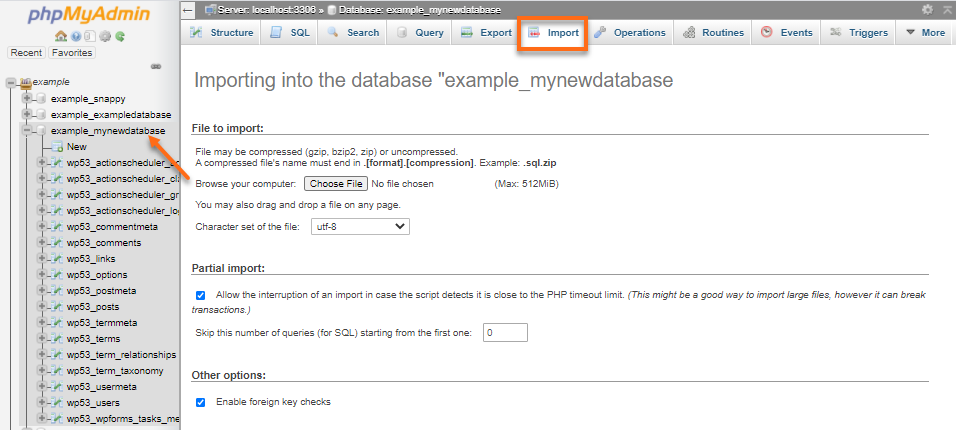
2. Go to the Import Tab:
-
- On the database details page, find and click the “Import” tab at the top.
3. Upload Your Database Backup File:
-
- Click on the “Choose File” button under the “File to import” section.
- Navigate to the location on your computer where your database backup file is stored.
- Select the file and click “Open” to upload it.
4. Configure Import Settings:
-
- Ensure that the format is set to SQL. This is typically the default setting.
- Leave other settings as default unless you have specific instructions for your database.
5. Start the Import Process:
-
- Scroll down and click the “Go” button at the bottom of the page.
- phpMyAdmin will now import the database backup into your new database. This may take a few moments depending on the size of the backup file.
6. Verify the Import:
-
- Once the import is complete, phpMyAdmin will display a success message.
- Check the new database to ensure all tables and data have been correctly imported.
Step 3: Update and test
1. Update wp-config.php:
-
- Use an FTP client to access your site’s root directory.
- Open the
wp-config.phpfile and update the database name, username, and password to match the new database credentials. - Save the changes and upload the updated
wp-config.phpfile back to your server.
2. Test Your Site:
-
- Visit your site in a web browser to ensure it’s functioning correctly.
- Log into the WordPress admin panel and check that all settings and content are intact.
Restoring WordPress database from backup via cPanel
Restoring your WordPress database via cPanel is a pretty straightforward process. Here’s a detailed, step-by-step guide to help you restore your WordPress from backup successfully:
Step 1: Access backup restore
1. Log into Your cPanel Account:
-
- Open your web browser and go to the URL provided by your hosting provider for cPanel access.
- Enter your cPanel username and password to log in.
2. Navigate to the Backup Section:
-
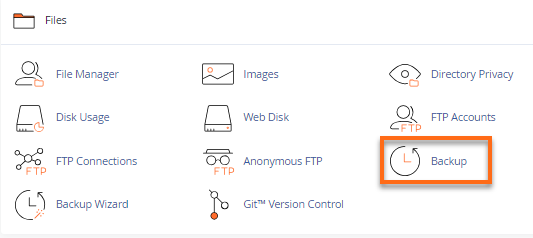
- Once logged in, scroll down to the “Files” section.
- Click on the “Backup” icon to open the Backup management page.
3. Select Restore a MySQL Database:
-
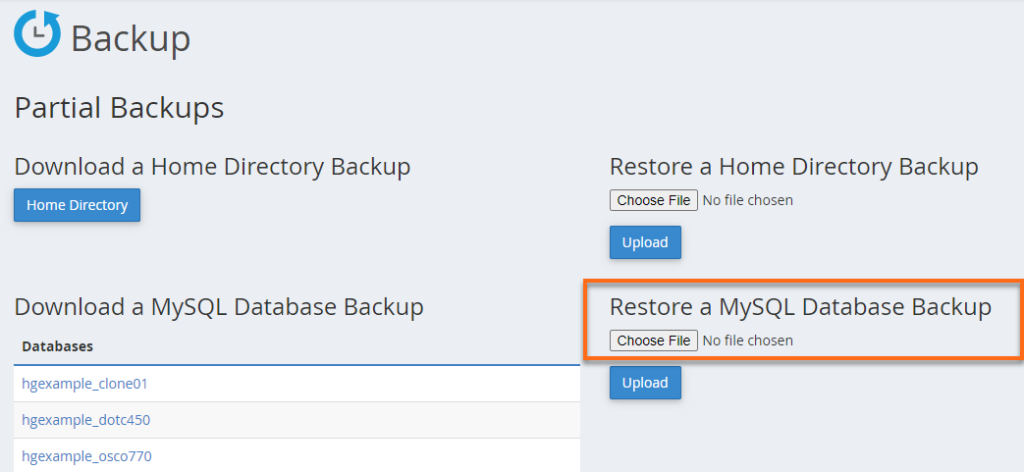
- On the Backup page, look for the section labeled “Restore a MySQL Database”.
- Click on the “Restore” link or button associated with this section.
Step 2: Restore database
1. Choose Your Backup File:
-
- In the Restore MySQL Database section, click on the “Choose File” button.
- Navigate to the location on your computer where your database backup file is stored.
- Select the file and click “Open” to upload it.
2. Upload and Restore:
-
- After selecting your backup file, click the “Upload” button.
- cPanel will begin the process of restoring your database. This may take a few moments depending on the size of the backup file.
3. Verify Restoration:
-
- Once the restoration is complete, cPanel will display a success message.
- Go back to the MySQL Databases section in cPanel and verify that your database tables are correctly restored.
Step 3: Update and test
1. Update wp-config.php:
-
- Use an FTP client to access your site’s root directory.
- Open the
wp-config.phpfile and update the database name, username, and password to match the restored database credentials. - Save the changes and upload the updated
wp-config.phpfile back to your server.
2. Test Your Site:
-
- Visit your site in a web browser to ensure it’s functioning correctly.
- Log into the WordPress admin panel and check that all settings and content are intact.
Restoring WordPress files from backup via FTP
Restoring your WordPress files via FTP allows for complete control over the process. Here’s a detailed, step-by-step guide to teach you how to restore your WordPress site to the previous version.
Step 1: Delete old files
1. Use an FTP Client to Connect to Your Server:
-
- Download and install an FTP client like FileZilla.
- Open the FTP client and enter your FTP credentials (host, username, password, port).
2. Navigate to Your WordPress Root Directory:
-
- Typically, this will be the
public_htmlorwwwdirectory. - Locate your WordPress installation folder.
- Typically, this will be the
3. Delete Old Files:
-
- Carefully delete all files and folders except for the
wp-config.phpfile and thewp-contentdirectory. Thewp-config.phpfile contains your database connection details, and thewp-contentdirectory holds your themes, plugins, and uploads.
- Carefully delete all files and folders except for the
Step 2: Upload new files
1. Upload Your Backup Files to the Server:
-
- Locate the backup files on your local machine.
- Upload all files to the root directory of your WordPress installation via the FTP client.
- Ensure you overwrite the existing files on the server.
Step 3: Edit wp-config.php
1. Ensure Database Credentials Match:
-
- In your FTP client, open the
wp-config.phpfile for editing. - Verify that the database name, username, and password match the credentials of your newly created or restored database.
- Save any changes made to the file.
- In your FTP client, open the
Step 4: Test
1. Test Your Site:
-
- Visit your restored website to ensure it is functioning correctly.
- Check that all pages, posts, and media files are in place.
- Test the functionality of plugins and themes to ensure everything is working as expected.
FAQs and Bonus Tips Concerning Restoring WordPress from Backup
What to do if restoration fails?
Sometimes things go awry, but here’s what to do if your restoration doesn’t go as planned:
- Double-Check Each Step: Ensure you didn’t miss any part of the process. Go through each step meticulously.
- Verify Backup Integrity: Make sure the backup file is not corrupted. If it is, try using an older backup.
- Contact Hosting Support: Your hosting provider can often help resolve issues. They have access to server logs and other tools that can diagnose the problem.
How to handle partial restorations?
Partial restorations can occur if the backup file is incomplete or if there was an interruption during the restoration process. Here’s how to handle them:
- Verify All Files and Database Tables: Ensure that all essential files and database tables are present.
- Restore Missing Components: If you identify any missing files or database tables, try restoring just those components from another backup.
- Use Different Backups: If one backup fails, try restoring from a different backup file, if available.
Looking for More WordPress Guides and Tutorials?
Take a look at these valuable resources and further enhance your WordPress journey:
- How to Backup Your WordPress Site
- How to Reset Your WordPress Site: An In-Depth Guide
- How to Delete a WordPress Site: A Step-By-Step Guide
- How to Install WordPress: A Beginner’s Guide
- Is WordPress Free? Demystifying WordPress Pricing
- WordPress User Roles Explained: Everything You Wanted to Know
- The Best Local WordPress Development Environments in 2023
- Discover 10 Best Plugins for WordPress in 2023 (Expert Picks)


