Explore topics
Types of Appointments in Amelia: A Complete Guide
Amelia vs Simply Schedule Appointments: Find the Right Fit for Your Business
Amelia 9.0 Is Live: From Idea to Reality
WordPress Gives a Hand 2025: Giving Back, Together
Is WPBakery Outdated? A 2025 Reality Check With Facts, Updates, and Performance Guidance

Read Inspiring Customer Stories
Check out how our user set Amelia for his business
Read the full storyDeleting a WordPress site is akin to deciding to remodel your house – a substantial decision that demands thoughtful contemplation. Whether you’re yearning for a digital facelift, planning a strategic rebrand, tightening up security, or feeling the allure of a new cyber-neighborhood, the decision to hit the delete button is not one to be taken lightly.
Throughout this comprehensive guide, we will walk you through the step-by-step process of deleting a WordPress site. Whether you’re in the self-hosted realm of wordpress.org or the all-inclusive world of wordpress.com, we’ve got your back.
So, without further ado, let’s navigate through the labyrinth of knowing how to delete a WordPress site with the finesse of a seasoned explorer. Because, let’s face it, the digital jungle can get wild, and caution is our guiding star.
Table of Contents
ToggleWhen and Why You Might Decide to Delete Your WordPress Site?
Deleting a WordPress site is like deciding to Marie Kondo your digital space. But, unlike decluttering your wardrobe, this decision is driven by a variety of compelling reasons. Let’s take a look at some scenarios.
- Rebranding and Restructuring: Businesses evolve, and sometimes, a website’s identity needs to evolve with them. Deleting a site might signify a strategic rebranding effort, aligning the digital presence with new goals, aesthetics, or target audiences.
- Consolidation and Streamlining: Managing multiple websites can be overwhelming. Deleting a site could be part of a consolidation strategy, merging several websites into one to streamline operations and focus efforts more effectively.
- Security and Cleanup: In cases where a site has been compromised or contains obsolete elements, deletion might be necessary to address security concerns. Removing outdated plugins, themes, or content that poses a security risk can be a reason to delete a WordPress site.
- Platform Migration or Change: Businesses or individuals may switch to a different web platform or content management system. Deleting the WordPress site paves the way for a seamless transition to a new platform.
- Starting Anew: Sometimes, you just want to hit the reset button. Deleting a WordPress site is like saying, “Ctrl+Alt+Del” to your digital past. It’s about starting fresh, wiping the slate clean to redefine your online presence, or maybe just trying out a new blogging theme without the baggage of the old.
These scenarios, among others, illustrate the various contexts in which the decision to delete a WordPress site might arise. It’s like deciding whether to keep that old concert t-shirt or finally let it go. The struggle is real, and so are the decisions in the digital realm. So, before you hit delete, ask yourself, “Does my website spark joy?” If not, maybe it’s time to bid it a fond farewell.
From Dominance to Doubt: What’s Really Happening with WordPress?
Get the insights. Spot the patterns. Decide for yourself where WordPress is really going — before the next big shift hits.
How to Delete a WordPress.org Site?
Deleting a WordPress.org site is like dismantling a complex machine – it requires precision and a strategic approach. So, make sure to follow these detailed instructions carefully to permanently remove your WordPress.org site:
- Step 1: Make a pre-deletion checklist
- Step 2: Back up your WordPress site
- Step 3: Delete WordPress site files
- Step 4: Delete your WordPress site database
- Step 5: Delete the domain name and terminate the hosting account
- Step 6: Delete your WordPress site content from search engines and web archives
Step 1: Make a pre-deletion checklist
Before beginning the deletion process, create a comprehensive checklist to ensure nothing essential is overlooked:
- Backup Confirmation: Use a reliable backup method, such as plugins like UpdraftPlus or manual backups via your hosting provider’s control panel, to create a backup of your entire WordPress site, including files, databases, themes, and plugins.
- Documentation of Settings: Document all crucial settings, including theme configurations, plugin settings, as well as any custom code modifications.
- Inventory of Active Plugins and Themes: List all active plugins and themes currently in use. This documentation will be helpful if you decide to rebuild the site later.
- Secure Necessary Data: Download or export any essential data not included in the backup, such as user-submitted content or additional media files.
Step 2: Back up your WordPress site
Your WordPress site holds all your posts, pages, media files, custom settings, themes, and plugin configurations, representing hours of hard work. Deleting a WordPress site without a backup is like jumping into a black hole – not the wisest move, as it could result in the loss of valuable content and settings.
So, before proceeding with the deletion process, it’s crucial to back up your WordPress site. There are several methods available for creating backups, including:
- Backup Plugins: Utilize trusted backup plugins like UpdraftPlus or Jetpack, accessible from your WordPress dashboard, to automate the backup process.
- cPanel Backup: Your hosting provider’s cPanel often offers tools or wizards for creating full backups of your WordPress site, including files and databases.
- FTP (File Transfer Protocol): For more technical users, FTP allows manual backup by transferring WordPress files and folders to a local device or remote server.
Choose a method that suits your expertise and preferences to securely back up your site before proceeding with deletion. For more information, take a look at our in-depth guide on how you can back up your WordPress website successfully.
Step 3: Delete WordPress site files
Deleting WordPress site files involves various methods, each requiring specific steps:
Method 1: Deleting WordPress files with a web-based File Manager (cPanel)
Ideal for users comfortable with navigating file structures via a web-based interface. The advantage of this method is the complete control over what gets removed. However, as using a web-based File Manager requires manual identification of WordPress files, there’s more room for accidental deletion if not cautious.
1. Access cPanel and File Manager:
-
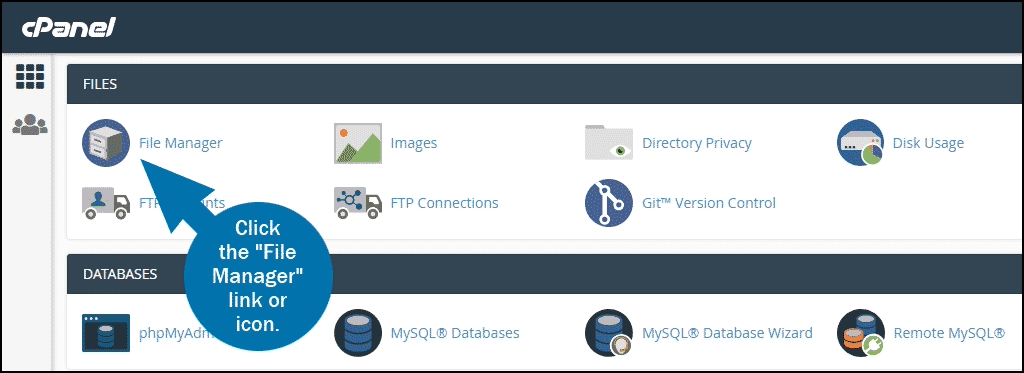
- Log in to your hosting account and access the cPanel dashboard. Find and click on the “File Manager” option.
2. Locate WordPress Directory:
-
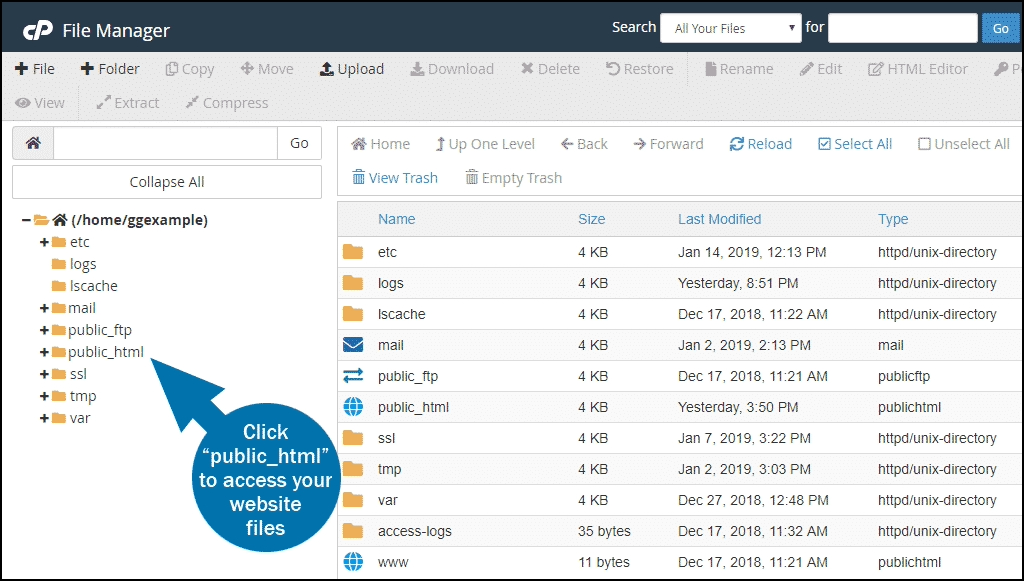
- Navigate to the directory for the specific WordPress site you intend to delete (usually under “public_html/YourDomain”).
3. Select WordPress Files:
-
- In the WordPress directory, identify files like wp-admin, wp-content, and wp-includes.
- Select these files by clicking on them.
- 4. Delete Selected Files:
-
- After selecting the WordPress files, choose the “Delete” option from the menu or toolbar.
- Confirm the deletion action when prompted, permanently removing the selected WordPress files.
Method 2: Deleting WordPress files via cPanel auto-installer
This method is perfect for users familiar with cPanel features who are seeking a straightforward uninstallation process. Auto-installer offers a user-friendly interface for software management, especially useful for those new to server operations. Keep in mind, though, that it does not provide detailed file-level control.
1. Access cPanel Hosting Settings:
-
- From the cPanel dashboard, click on the Hosting tab to manage domain settings.
2. View Domain Configuration:
-
- Find and select the domain where WordPress is installed. Click to view its configuration settings.
3. Open Auto-Installer Tool:
-
- Locate and access the auto-installer tool associated with WordPress.
4. Choose the Uninstall Option:
-
- Within the auto-installer tool, locate the Uninstall or Remove option for WordPress.
- Click on this option to trigger the removal process.
5. Confirm Deletion:
-
- Confirm the uninstallation action when prompted. You’ll receive a confirmation message indicating the successful deletion of the WordPress software.
Method 3: Deleting WordPress files using FTP
FTP is ideal for users comfortable with using FTP clients and seeking manual control over file deletion. This approach provides full control over file management, enabling precise deletion and transfer operations. However, it’s potentially intimidating for beginners or those unfamiliar with FTP protocols.
1. Retrieve FTP Login Details:
-
- Gather the FTP login credentials provided at the time your hosting account was set up. Access this information from your hosting panel or the original email.
2. Connect via FTP Client:
-
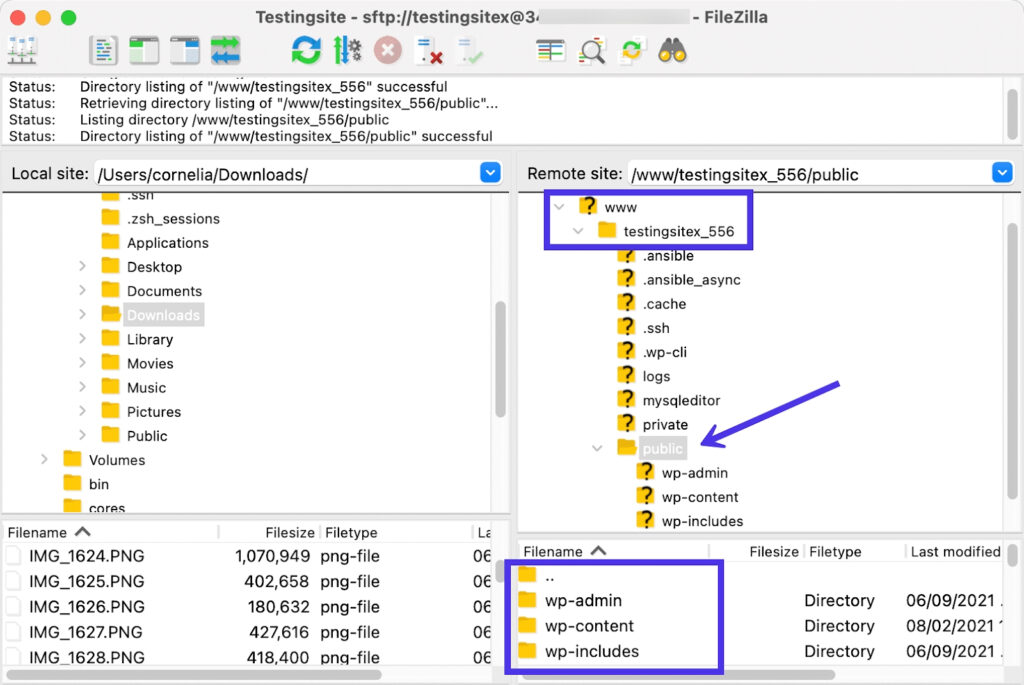
- Open your preferred FTP client (e.g., FileZilla) and use the FTP login details to connect to your hosting server.
3. Navigate to WordPress Directory:
-
- Locate and enter the directory of your WordPress site within the FTP client.
4. Delete WordPress Directory
-
- Right-click on the WordPress site’s directory and select the “Delete” option.
- Confirm the deletion action to remove the entire WordPress directory from the hosting server.
When choosing the right method to delete WordPress site files, it’s a good idea to first consider your familiarity with server operations and the method’s technicality. Also, assess whether you prefer granular file selection or a more automated, user-friendly process. And, regardless of the method, ensure you have backups and exercise caution to prevent accidental data loss.
Step 4: Delete your WordPress site database
The database serves as the core repository for your WordPress site’s content, settings, and configurations. Deleting the site’s files without removing the database is akin to erasing the text from a document but leaving the empty file on your computer.
To delete the WordPress site database, follow these steps:
1. Access Your Hosting Panel:
-
- Log in to your web hosting panel, typically the same platform where you accessed the File Manager for deleting site files.
2. Access cPanel or phpMyAdmin:
-
- Once logged in, navigate to the cPanel or phpMyAdmin dashboard.
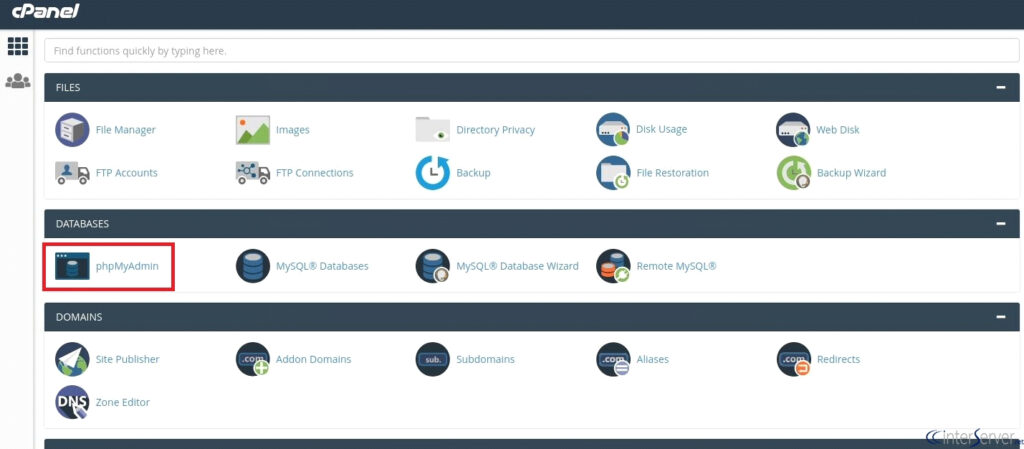
Once you access your phpMyAdmin dashboard:
1. Locate MySQL Databases:
-
- Within the dashboard, scroll down to find the section labeled Databases.
- Look for an entry similar to MySQL Databases and click on it.
2. Identify the Database:
-
- Find the database associated with your WordPress site. It usually starts with a prefix like “wp_” followed by alphanumeric characters.
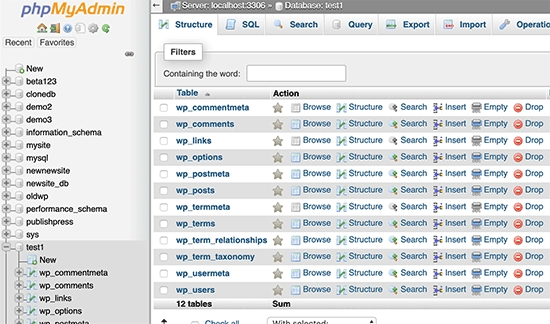
3. Delete the Database:
-
- Next to the database name, look for the option labeled “Drop”, “Delete”, or “Delete Database.”
- Click on this option to initiate the deletion process.
4. Confirm Deletion:
-
- A warning message will appear, confirming the irreversible nature of this action. Read the message carefully.
- Confirm that you want to proceed with the deletion to remove all data traces of the site from your WordPress hosting server.
By following these steps and deleting the WordPress site database via phpMyAdmin, you’ll successfully remove all data associated with your site from the hosting server.
Step 5: Delete the domain name and terminate the hosting account
Once your WordPress.org site is successfully deleted, it’s advisable to consider terminating the hosting account to prevent any further charges. If you’ve been managing your domain through a public DNS provider, be sure to remove DNS zones or records associated with the deleted site to prevent any residual DNS queries or security risks.
1. Sign in to Your Hosting Panel:
-
- Access your hosting panel by signing in with your credentials.
2. Navigate to Account Settings or Billing:
-
- Look for options within the hosting panel like Account Settings, Billing, or a similar designation.
3. Close, Cancel, or Terminate Account:
-
- Within the account settings, proceed to Close Account, Cancel Service, or Terminate Account.
- The closure process may prompt you for password verification or security questions. Follow the prompts accordingly to complete the termination.
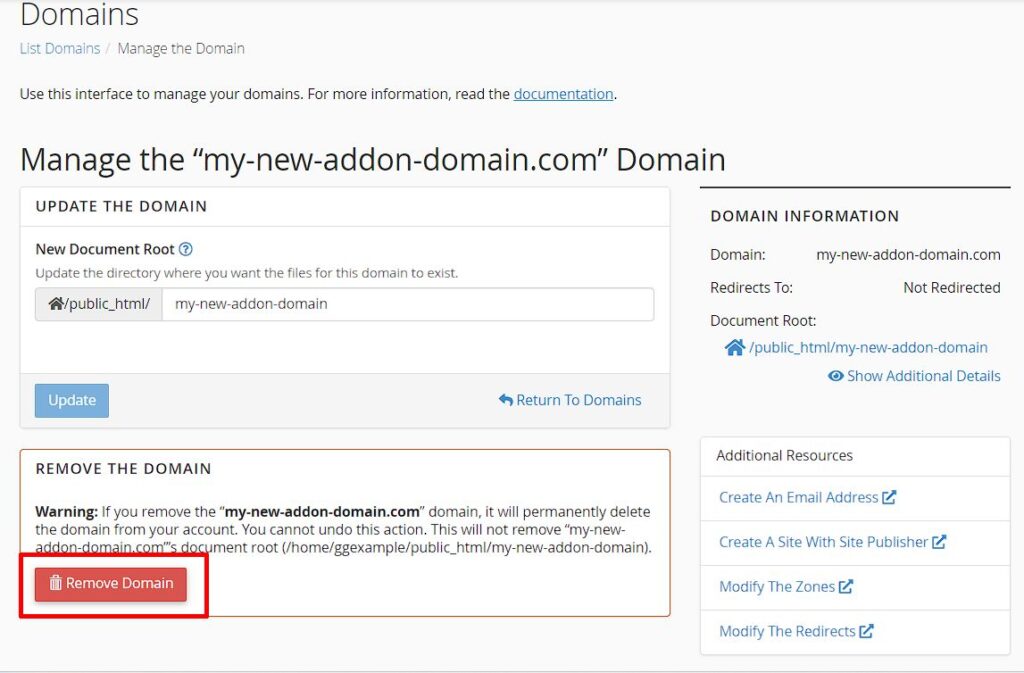
4. Delete Domain Name (Optional):
-
- Using cPanel (For Domains Purchased from Host):
-
-
- If you bought your domain from your hosting provider, navigate to “Addon Domains” in cPanel.
- Locate the domain name associated with your WordPress site.
- Choose the option to delete or remove the domain name.
-
-
- Using Other Hosts:
-
-
- Go to “Domains” and then “My Domains” in your hosting panel.
- Click on the “Manage” button next to the domain name you want to delete.
- Choose the option to delete the domain.
-
Note: If you purchased the domain from another registrar, ensure it’s set up in the hosting DNS for it to appear in the panel.
5. Confirmation of Hosting Closure:
-
- Confirm the termination of your hosting account, ensuring that all associated services are discontinued.
Your WordPress website is now offline, and its content is no longer accessible on the Internet. However, there’s a crucial step to ensure it’s fully removed from search engine results.
Step 6: Delete your WordPress site content from search engines and web archives
Making certain that your WordPress website is no longer visible on search engines and clearing traces from web archives is crucial for a complete deletion.
To ensure your website stays out of sight, you should:
1. Remove content from Google Search
There are two approaches you can take here:
1. Quick (but Temporary) Method:
-
- Access the Google Search Console and select the property (your website).
- Navigate to the “Temporary removals” tab and click on “New request”.
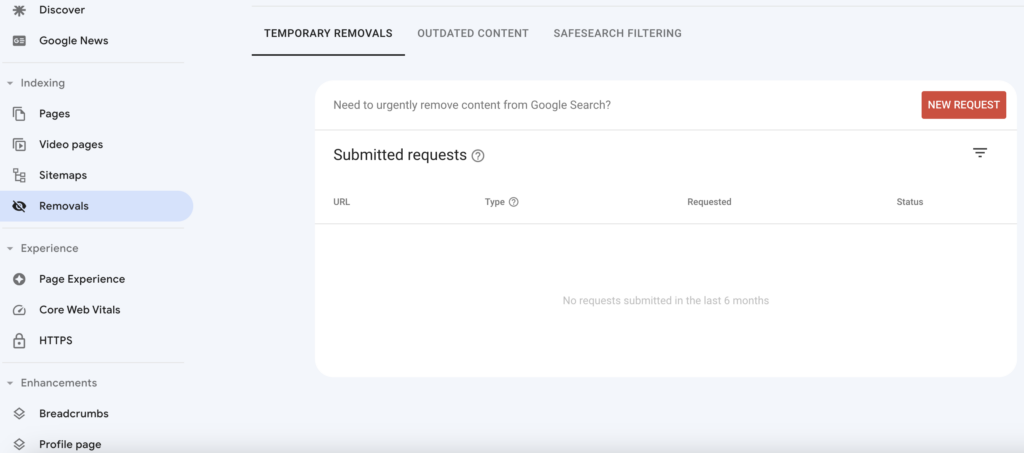
-
- Enter the URL you want to remove and follow the prompts.
- This method temporarily blocks the page from Google’s search results for about 6 months.
2. Permanent Methods Recommended by Google:
-
- Delete or update content, ensuring Google’s approval for the removal of outdated content.
- Block access to content pages with password protection.
- Add a noindex tag to your page to prevent Google indexing.
2. Block Google from crawling your website
1. Create and Edit robots.txt File:
-
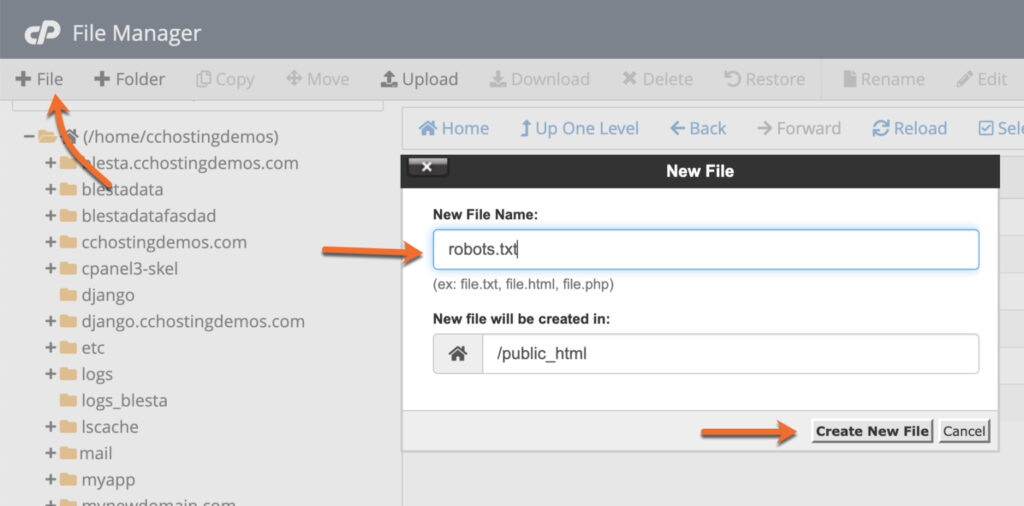
- Use the File Manager in cPanel or FTP to create a new robots.txt file.
-
- Alternatively, use plugins like AIOSEO or WPCode for an easier setup.
2. Add the Following Lines to robots.txt:
User-agent: *

Disallow: /
-
- These lines disallow all user agents (crawlers like Googlebot) from accessing URLs under your domain.
3. Notify search engines about content removal
1. Use .htaccess File:
-
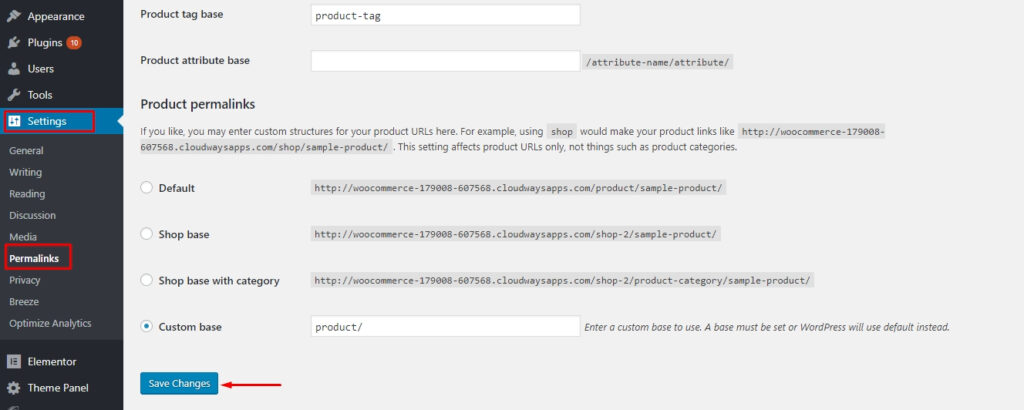
- Create a new file named .htaccess in your website’s root directory.
-
- Edit the .htaccess file and then add the code below to redirect all requests to your website and show a 410 error.
RewriteEngine On

RewriteCond %{REQUEST_URI} !^/robots.txt

RewriteCond %{HTTP_HOST} ^www\.example\.com$ [NC]

RewriteRule ^(.*)$ - [L,G]
-
- Don’t forget to replace
www.example.comwith your actual domain name. Make sure to take precautions before editing your .htaccess file, as it directly affects how your website functions. Always keep a backup of the original .htaccess file before making any changes.
- Don’t forget to replace
2. Submit Cache Removal Request:
-
- Even after taking all steps, the process may take time.
- Speed up the removal process by submitting a cache removal request to search engines.
Delete website archives from the internet archive (Wayback Machine)
First, visit the Wayback Machine and enter your website’s URL to check if it’s listed in the archives. If your WordPress site is listed, contact the Internet Archive via email. Then, request them to remove snapshots of your content from their database.
Congratulations! Your WordPress website has been successfully deleted, and steps have been taken to ensure its removal from search engines and web archives.
Pro tips:
- Avoid relying only on blocking access via robots.txt as it may not guarantee removal from all search engines.
- Remember that removing a page from Google doesn’t automatically remove it from other search engines like Bing or Yahoo. Consult their documentation and take necessary actions.
- Remove links to your website from social networks, Google Business profile, and email signature.
How to Delete a WordPress.com Site?
This guide explains how to shut down your WordPress.com site and erase all of its contents permanently.
⚠️ Deleting a site permanently removes it, and you’ll never be able to re-use its WordPress.com address. Make sure this is the path you truly want to take.
1. Access Your Site’s General Settings
-
- Log in to your WordPress.com account. Visit your site’s dashboard and navigate to “Settings”. Then choose “General”.
2. Proceed to Delete Your Site Permanently
-
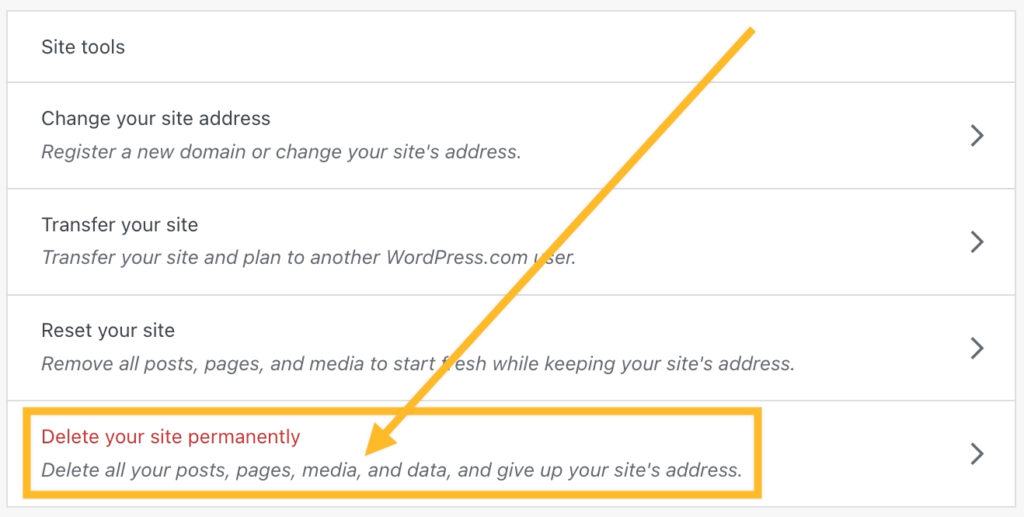
- Scroll to the bottom of the screen and you’ll find the “Delete your site permanently” option.
3. Remove Active Subscriptions
-
- If you have any active subscriptions (like a plan or domain), they need to go first. You’ll be prompted to cancel and remove any active subscriptions associated with your site.
4. Export Your Content
-
- Before the final farewell, export your content. You’ll be prompted to do that by clicking the “Export Content” button.
5. Delete Your WordPress Site
-
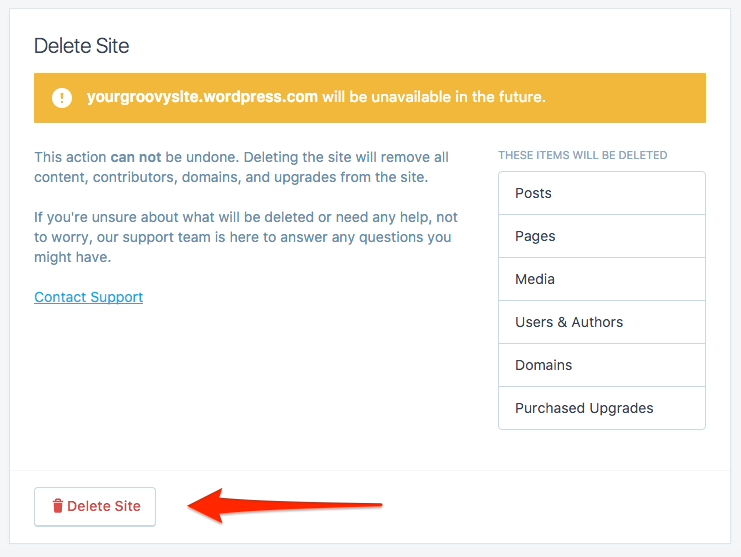
- The moment of truth. Scroll down and click the “Delete Site” button.
6. Confirmation
-
- Confirm the deletion by typing the site address into the provided field. It’s the last check – no turning back now.
7. Click the “Delete this Site” Button
-
- This is it. The final step. Click “Delete this Site,” and within a few seconds, your site will be but a digital memory.
How to Delete a WordPress Site with a Plugin?
Considering the convenience that plugins often bring to managing a WordPress site, the idea of having one specifically crafted for effortless site deletion might seem appealing. Imagine a tool that sweeps away the manual intricacies, providing a seamless way to bid farewell to your website. Such a plugin could not only be a time-saving asset but also a savior for those less versed in the technical aspects of site management.
However, the reality is a bit of a downer – as of now, there isn’t a dedicated plugin tailored solely for the task of deleting a WordPress site. Deactivating or deleting a WordPress site typically involves manual steps, as it’s a critical action that requires careful consideration.
However, there are plugins that can assist in certain aspects of the deletion process, such as WordPress backup plugins to safeguard your data before deletion. These plugins ensure that you have a copy of your site’s content, settings, and configurations, allowing you to restore them if needed.
45 Must-Have WordPress Tools for 2025
Staying ahead as a WordPress professional, developer, or agency owner is crucial. But are you using the right tools to make your work easier and more efficient?
What are the Alternatives to Deleting Your WordPress Site?
Before taking the irreversible step of deleting your WordPress site, consider these alternatives. Each provides a unique solution to address specific needs or concerns, allowing you to tailor your approach based on your circumstances:
Make your site private
Instead of deleting your site entirely, consider making it private. This means that only you or selected individuals can access and view the content. It’s an excellent option if you need temporary privacy or want to restrict access without permanent deletion.
Cancel purchases to revert to a free site
If your site is on a premium plan or has additional paid features, consider canceling those purchases. This reverts your site to a free version, ensuring no future charges from WordPress.com. It’s a useful option if you’re looking to cut costs or simplify your online presence.
Change your site’s address
If the primary reason for deletion is dissatisfaction with your current domain name, changing it might be a more straightforward solution. WordPress allows users to update their site’s address, providing a fresh identity without losing the existing content.
Reset your site for a fresh start
Instead of permanently deleting everything, consider resetting your site. This option allows you to start afresh with the same address, eliminating content, settings, and configurations. It’s a middle ground between deletion and preserving your existing site.
Transfer your site to another WordPress.com account
If you’re contemplating deletion due to a change in ownership or management, consider transferring your site to another WordPress.com account. This ensures continuity while allowing a new administrator to take charge. It’s a seamless way to pass the torch without losing the site’s history.
Before making any decisions, explore alternative options to enhance or transform your site, ensuring you maintain critical functionalities while considering a change.
Amelia: The Best Booking Plugin for Your WordPress Site
Considering a change of heart and prefer not to permanently part ways with your WordPress site? Opting for alternatives to keep your appointment-based business intact?
Then meet Amelia – the go-to booking plugin that simplifies your appointment management process.
With its user-friendly interface and robust functionality, Amelia streamlines the entire booking process, offering seamless integration into WordPress sites.
Key features
- User-Friendly Interface: Intuitive design for effortless navigation.
- Customizable Booking Forms: Tailor forms to match your brand and capture essential client information.
- Automated Notifications: Keep clients informed with automated reminders and confirmations.
- Flexible Calendar Views: Easily manage appointments with daily, weekly, or monthly calendar views.
Ready to transform your booking experience?
Explore the endless possibilities of Amelia and transform your site into a dynamic appointment hub!
How to Delete a WordPress Site: Takeaway
In the dynamic realm of web management, the decision to delete a WordPress site is a substantial one, often influenced by strategic shifts, rebranding endeavors, or the pursuit of a fresh digital start. Throughout this comprehensive guide, we’ve dissected the intricate process of deleting a WordPress site, covering both the wordpress.org and wordpress.com platforms.
From making a pre-deletion checklist to meticulously handling file deletions, database removals, and terminating hosting accounts, each step demands a careful approach. It’s not merely a series of clicks; it’s a calculated journey through your digital space.
While the allure of a deletion plugin might be a tempting thought, the reality, as of now, is that such a dedicated tool doesn’t exist. The gravity of deleting a WordPress site demands a hands-on, manual process, ensuring a deliberate approach to safeguard your content, settings, and configurations.
However, in the ever-evolving landscape of WordPress, innovation is constant. Stay tuned to the latest developments, but always proceed with caution, especially when irreversible actions are at play.
Whether you’re bidding farewell to an old online identity or reshaping your digital presence, the meticulous steps outlined in this guide aim to be your compass. Remember, each click holds significance, and every decision contributes to the narrative of your digital journey. As you navigate the complexities of site deletion, may your path be guided by prudence, awareness, and the assurance that the online canvas is ever-ready for new beginnings.
Looking for More WordPress Guides and Tutorials?
Make sure to check out these valuable resources to enhance your WordPress journey:
- How to Restore WordPress from Backup
- How to Reset Your WordPress Site: An In-Depth Guide
- How to Install WordPress: A Beginner’s Guide
- WordPress User Roles Explained: Everything You Wanted to Know
- The Best Local WordPress Development Environments in 2023
- Discover 10 Best Plugins for WordPress in 2023 (Expert Picks)
- How to Back Up Your WordPress Site: The Ultimate Guide
- Is WordPress Free? Demystifying WordPress Pricing
FAQ on Deleting a WordPress Site
How do I delete my site in WordPress?
To delete your WordPress site, first log in to your dashboard. Next, navigate to Settings, then General. Scroll to the bottom and select “Delete your site permanently”. Follow the on-screen prompts, remove any active subscriptions, export your content, and, finally, confirm the deletion.
Why can’t I delete a WordPress site?
If you’re unable to delete your WordPress site, ensure that you have the necessary permissions. Confirm that you’re the site owner or have administrator rights. Additionally, resolve any active subscriptions or outstanding issues that might hinder the deletion process.
How do I manually delete WordPress?
Manually deleting a WordPress site involves steps like making a pre-deletion checklist, backing up your site, deleting files via cPanel or FTP, removing the database, and terminating the hosting account. Follow a meticulous process to ensure a complete and secure deletion.
What happens if I delete WordPress?
Deleting WordPress permanently erases your site, making it inaccessible on the internet. All content, settings, and configurations are lost. So, take precautions by backing up essential data before deletion to avoid irreversible loss.
How to delete a WordPress site and start over?
To start over in WordPress, consider deleting your site and following a fresh installation process. Alternatively, you can reset your site for a clean slate. The key is to evaluate the options based on your specific needs and preferences.
How do I rebuild my WordPress site from scratch?
Rebuilding a WordPress site from scratch involves installing a fresh WordPress instance, selecting a theme, configuring settings, and finally adding content. Take this opportunity to rethink your site structure, design, and content strategy.
How do I cancel WordPress?
Cancelling WordPress involves terminating your hosting account. Begin by signing in to your hosting panel. Then, navigate to Account Settings or Billing and follow the process to close or terminate your account. Ensure all associated services are discontinued.
How do I remove my WordPress site from Google Search?
Use the Google Search Console if you want to remove your WordPress site from Google Search. Submit a removal request using the URL removal tool for temporary removal. In addition, you can implement permanent solutions like updating content, blocking access, or adding a noindex tag.
What happens when you delete a domain on WordPress?
When you delete a domain on WordPress, it disassociates from your hosting account. If purchased from your host, use cPanel to remove it. Ensure the domain is set up in the hosting DNS for it to appear in the panel. And remember – deleting a domain doesn’t delete the associated site content.
What happens when you delete a website?
When you delete a website, it becomes inaccessible on the internet. Visitors will see a message indicating that the site is no longer available. Content, configurations, and settings are permanently erased. One more reason to follow additional steps to remove traces from search engines and archives.
Explore topics
Types of Appointments in Amelia: A Complete Guide
Amelia vs Simply Schedule Appointments: Find the Right Fit for Your Business
Amelia 9.0 Is Live: From Idea to Reality
WordPress Gives a Hand 2025: Giving Back, Together
Is WPBakery Outdated? A 2025 Reality Check With Facts, Updates, and Performance Guidance

Read Inspiring Customer Stories
Check out how our user set Amelia for his business
Read the full story
